Figure-1
Introduction to Linux Containers (LXC)
| Bhaskar S | 09/20/2014 |
Overview
Linux Containers or LXC, is a lightweight operating-system level virtualization that allows a user to run one or more virtualized operating environments on a single host.
Think of the virtualized operating environment as a self-contained and isolated container with its own file system, networking stack, processes, etc and with controlled access to the shared physical resources of the host such as CPU, Memory, I/O, etc.
The users of a virtual machine like VirtualBox may ask - what is the difference between a virtual machine and a linux container ?
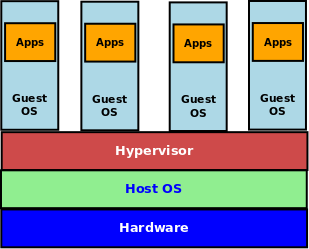
A Virtual Machine requires a Hypervisor on top of the host operating system and each virtualized operating environment runs on top of the hypervisor with its own guest operating system.
The following Figure-1 illustrates the high-level overview of a Virtual Machine:
A Linux Container (LXC), on the other hand, does not require a Hypervisor and each virtualized operating environment runs on top of the shared host operating system.
Currently, LXC is a Linux only virtualization solution. In other words, one cannot run other operating systems like Windows.
The following Figure-2 illustrates the high-level overview of a Linux Container:
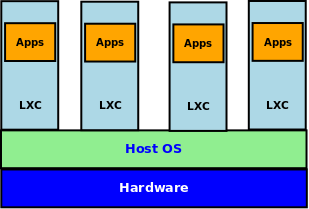
Linux Containers (LXC) provide an operating system level virtualization that are much more lightweight, efficient and faster to launch compared to the Virtual Machines.
Installation
The installation is on a Ubuntu 14.04 LTS based Linux desktop.
To install the LXC, issue the following command:
$ sudo apt-get install lxc lxctl lxc-templates
Once the install completes, issue the following command to check everything was ok:
$ lxc-checkconfig
If LXC was installed correctly, the following would be a typical output:
Kernel configuration not found at /proc/config.gz; searching...
Kernel configuration found at /boot/config-3.13.0-24-generic
--- Namespaces ---
Namespaces: enabled
Utsname namespace: enabled
Ipc namespace: enabled
Pid namespace: enabled
User namespace: enabled
Network namespace: enabled
Multiple /dev/pts instances: enabled

--- Control groups ---
Cgroup: enabled
Cgroup clone_children flag: enabled
Cgroup device: enabled
Cgroup sched: enabled
Cgroup cpu account: enabled
Cgroup memory controller: enabled
Cgroup cpuset: enabled

--- Misc ---
Veth pair device: enabled
Macvlan: enabled
Vlan: enabled
File capabilities: enabled

Note : Before booting a new kernel, you can check its configuration
usage : CONFIG=/path/to/config /usr/bin/lxc-checkconfig
Hands-on with LXC
Linux containers LXC can be operated in two modes - privileged or unprivileged.
In the privileged mode, all the commands are issued in the root user context using the sudo command.
We will operate in the unprivileged mode as it is more secure and shields the host from any harm.
To get started, we need to first create an LXC container. To create a container, use the lxc-create as follows:
$ lxc-create -n my_lxc_ubuntu -t ubuntu
Using the option -n, we specify the container name and using the option -t, we specify the type of the container. In our case we want a ubuntu based container.
The following would be a typical output:
lxc_container: No mapping for container root
lxc_container: Error chowning /home/mytest/.local/share/lxc/my_lxc_ubuntu/rootfs to container root
lxc_container: Error creating backing store type (none) for my_lxc_ubuntu
lxc_container: Error creating container my_lxc_ubuntu
Hmm - we got an error. The reason for this error is that we are trying to create an unprivileged container and we are missing some setup.
Execute the following commands so that we are able to create unprivileged containers:
$ mkdir -p ~/.config/lxc
$ echo "lxc.id_map = u 0 100000 65536" > ~/.config/lxc/default.conf
$ echo "lxc.id_map = g 0 100000 65536" >>
~/.config/lxc/default.conf
$ echo "lxc.network.type = veth" >> ~/.config/lxc/default.conf
$ echo "lxc.network.link = lxcbr0" >> ~/.config/lxc/default.conf
$ echo "$USER veth lxcbr0 2" | sudo tee -a /etc/lxc/lxc-usernet
Let us again try to create a container, using lxc-create as follows:
$ lxc-create -n my_lxc_ubuntu -t ubuntu
The following would be a typical output:
lxc: Missing newuidmap/newgidmap
error mapping child
setgid: Invalid argument
lxc_container: Error chowning /home/mytest/.local/share/lxc/my_lxc_ubuntu/rootfs to container root
lxc_container: Error creating backing store type (none) for my_lxc_ubuntu
lxc_container: Error creating container my_lxc_ubuntu
Again, we got an error. The reason for this error is that the Linux container (LXC) depends on the commands newuidmap and newgidmap.
Execute the following command to install newuidmap and newgidmap so that we are able to create unprivileged containers:
$ sudo apt-get install uidmap
Once again, let us again try to create a container, using lxc-create as follows:
$ lxc-create -n my_lxc_ubuntu -t ubuntu
The following would be a typical output:
This template can't be used for unprivileged containers.
You may want to try the "download" template instead.
lxc_container: container creation template for my_lxc_ubuntu failed
lxc_container: Error creating container my_lxc_ubuntu
Once again, we got an error. The reason for this error is that the unprivileged container is not able to use the default pre-built templates that are located in the directory /usr/share/lxc/templates/. These pre-built templates need root user access to perform some setup (create device nodes).
Hence the suggestion to use the special template called download which downloads images from a central repository maintained by the LXC community.
Finally, let us again attempt to create a container, using lxc-create as follows:
$ lxc-create -n my_lxc_ubuntu -t download
The following would be a typical output:
Setting up the GPG keyring
Downloading the image index

---
DIST	RELEASE	ARCH	VARIANT	BUILD
---
centos	6	amd64	default	20140829_02:16
centos	6	i386	default	20140829_02:16
debian	jessie	amd64	default	20140828_22:42
debian	jessie	armel	default	20140828_22:42
debian	jessie	armhf	default	20140828_22:42
debian	jessie	i386	default	20140828_22:42
debian	sid	amd64	default	20140828_22:42
debian	sid	armel	default	20140828_22:42
debian	sid	armhf	default	20140827_01:23
debian	sid	i386	default	20140828_22:42
debian	wheezy	amd64	default	20140828_22:42
debian	wheezy	armel	default	20140828_22:42
debian	wheezy	armhf	default	20140828_22:42
debian	wheezy	i386	default	20140828_22:42
oracle	6.5	amd64	default	20140828_11:40
oracle	6.5	i386	default	20140828_11:40
plamo	5.x	amd64	default	20140828_21:36
plamo	5.x	i386	default	20140828_21:36
ubuntu	lucid	amd64	default	20140828_03:49
ubuntu	lucid	i386	default	20140828_03:49
ubuntu	precise	amd64	default	20140828_03:49
ubuntu	precise	armel	default	20140828_03:49
ubuntu	precise	armhf	default	20140828_03:49
ubuntu	precise	i386	default	20140828_03:49
ubuntu	trusty	amd64	default	20140828_03:49
ubuntu	trusty	arm64	default	20140828_03:49
ubuntu	trusty	armhf	default	20140828_03:49
ubuntu	trusty	i386	default	20140828_03:49
ubuntu	trusty	ppc64el	default	20140825_03:49
ubuntu	utopic	amd64	default	20140828_03:49
ubuntu	utopic	arm64	default	20140828_03:49
ubuntu	utopic	armhf	default	20140828_03:49
ubuntu	utopic	i386	default	20140828_03:49
ubuntu	utopic	ppc64el	default	20140825_03:49
---
Bingo !!!. We are now prompted to type the Distribution we desire. We will type in ubuntu. Next, we will be prompted for the Release. We will type in trusty. Finally, we will be prompted to type the Architecture. We will type in i386.
The following would be a typical output:
Distribution: ubuntu
Release: trusty
Architecture: i386

Downloading the image index
Downloading the rootfs
Downloading the metadata
The image cache is now ready
Unpacking the rootfs

---
You just created an Ubuntu container (release=trusty, arch=i386, variant=default)
The default username/password is: ubuntu / ubuntu
To gain root privileges, please use sudo.
Now that we have successfully created a ubuntu based container, we need to get it up and running in order to use it. To start the container as a daemon, use the lxc-start command as follows:
$ lxc-start -n my_lxc_ubuntu -d
Typical there is no output when we start a container in the daemon mode.
To check the status of the container(s), use the lxc-ls command as follows:
$ lxc-ls -f
The following would be a typical output:
NAME           STATE    IPV4        IPV6  AUTOSTART
---------------------------------------------------
my_lxc_ubuntu  RUNNING  10.0.3.140  -     NO
To get more information about a container, use the lxc-info command as follows:
$ lxc-info -n my_lxc_ubuntu
The following would be a typical output:
Name:           my_lxc_ubuntu
State:          RUNNING
PID:            5362
IP:             10.0.3.140
CPU use:        1.55 seconds
BlkIO use:      18.66 MiB
Memory use:     23.36 MiB
Link:           vethTO4SY6
 TX bytes:      3.45 KiB
 RX bytes:      9.51 KiB
 Total bytes:   12.96 KiB
To use a container that has been started, use the lxc-console command as follows:
$ lxc-console -n my_lxc_ubuntu
The following would be a typical output:
Ubuntu 14.04.1 LTS my_lxc_ubuntu tty1

my_lxc_ubuntu login:
Login to the container using the user-id ubuntu and the default password ubuntu.
The following would be a typical output:
my_lxc_ubuntu login: ubuntu
Password:
Last login: Sat Sep 20 18:45:03 UTC 2014 on tty1
Welcome to Ubuntu 14.04.1 LTS (GNU/Linux 3.13.0-24-generic i686)

 * Documentation:  https://help.ubuntu.com/
ubuntu@my_lxc_ubuntu:~$
We can use the container normally like any other virtual machine or a real machine. One can manage software packages (add, upgrade, remove) on the container just like a regular host.
To shutdown a running container, use the lxc-stop command as follows:
$ lxc-stop -n my_lxc_ubuntu
Typical there is no output when we stop a container.
To check the status of the container(s), let us once again use the lxc-ls command as follows:
$ lxc-ls -f
The following would be a typical output:
NAME           STATE    IPV4  IPV6  AUTOSTART
---------------------------------------------
my_lxc_ubuntu  STOPPED  -     -     NO
To completely delete a container from a host, use the lxc-destroy command as follows:
$ lxc-destroy -n my_lxc_ubuntu
Typical there is no output when we remove a container.
To check the status of the container(s), let us once again use the lxc-ls command as follows:
$ lxc-ls -f
The following would be a typical output:
NAME  STATE  IPV4  IPV6  AUTOSTART
----------------------------------
Linux Containers (LXC) provide lightweight virtualization that allow one to create isolated and secure environment(s) for experimenting with new or different versions of software, which is useful for application developers.
References