Figure-1
| PolarSPARC |
Introduction to InterPlanetary File System (IPFS)
| Bhaskar S | 10/24/2021 |
Overview
Imagine you wrote an interesting in-depth article on this topic and published it on a popular blog site indepthblog.io, accessed via the URL https://www.indepthblog.io/articles/ba12cz945. After a few days, your article becomes really popular, while at the same time the owners of the blog site declare bankrupcy and the blog site goes offline. How does one access that content now ???
This is one of the issues with the current generation web - the content is stored and accessed through nodes controlled by a single entity.
Is there a way for us to store and access the same content from multiple nodes that are owned and operated by different entities across the globe, such that, even if one or more entities go offline, the content is still accessible through other nodes across the globe ???
This is where the InterPlanetary File System (or IPFS for short) comes into play. It is a decentralized peer-to-peer hypermedia protocol, for storing and accessing content, from the different nodes distributed across the planet, in a faster, open, and resilient way.
The following are some of the key concepts to understand IPFS:
Location Addressing :: content in the current generation web (which follows a client-server model) is identified by an URL, which is essentially a location to that content. In our (fictitious) example above for your popular article (content), the URL https://www.indepthblog.io/articles/ba12cz945 indicates the domain name of the server www.indepthblog.io and the URI /articles/ba12cz945 indicates where that content can be located on the server
Cryptographic Hash :: the unique fingerprint of any content that is generated by passing the content through a cryptographic hash function (such as SHA-256)
Content Addressing :: content in a peer-to-peer (decentralized) network is identified by its unique cryptographic hash and is referred to as the Content Identifier (or CID for short)
Content Identifier :: is a unique identifier that contains both the cryptographic hash as well as the codec used to encode (or later decode) the content
Content De-duplication :: trying to store two identical copies of the same content results in that content being stored ONLY once, eliminating content duplication, since the copies will have the same CID
Distributed Hash Table :: DHT for short, is the catalog that maps a CID to the peer nodes that store the content (identified by the CID)
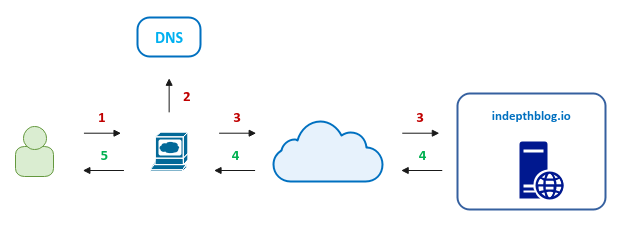
In the current client-server based web, when one makes a request to the URL https://www.indepthblog.io/articles/ba12cz945, the browser first resolves the domain name indepthblog.io to an ip address using DNS and then makes a HTTP request to the resolved ip address to fetch the content at the URI /articles/ba12cz945. The server at the ip address returns the content back to the user and displayed on the browser.
The following illustration depicts this high-level flow:
Notice that the content in the current generation client-server web uses location based addressing.
If for any reason (bankrupcy, legal takedown, etc), the server hosting the content goes offline, there is no recourse to get to the content.
In the decentralized peer-to-peer IPFS network, when one makes a request for a CID, the IPFS client (command-line or the browser) first resolves the CID to a set of peers nodes that hold the requested content. Realize it is not a single server that holds the content anymore - it is a set of peer nodes across the planet. The client then makes a IPFS request to one or more peer address(es) to fetch the content for the specified CID. The content is returned from the peer(s) back to the client.
The following illustration depicts this high-level flow:
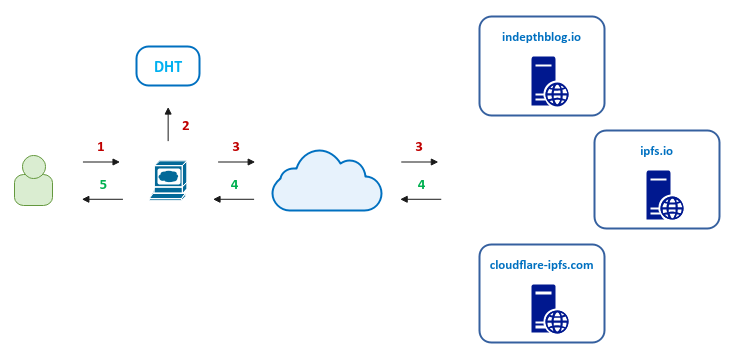
Notice that the content in the decentraliced peer-to-peer IPFS web uses content based addressing.
If for any reason one or more server(s) hosting the content goes offline, there are other peer node(s) in the distributed network where the content is stored. In fact, you and me can host a server and have the IPFS server (daemon) running to become peer(s) in the decentralized network.
Installation and Setup
The setup and demonstration will be on a Ubuntu 20.04 LTS based Linux desktop.
Open a Terminal window for the install/setup of the pre-requisites.
To install the lightweight JSON processor command-line utility jq on the desktop, execute the following command in the terminal window:
$ sudo apt install jq -y
The following would be a typical output:
Reading package lists... Done
Building dependency tree
Reading state information... Done
The following additional packages will be installed:
  libjq1 libonig5
The following NEW packages will be installed:
  jq libjq1 libonig5
0 upgraded, 3 newly installed, 0 to remove and 0 not upgraded.
Need to get 313 kB of archives.
After this operation, 1,062 kB of additional disk space will be used.
Get:1 http://us.archive.ubuntu.com/ubuntu focal/universe amd64 libonig5 amd64 6.9.4-1 [142 kB]
Get:2 http://us.archive.ubuntu.com/ubuntu focal-updates/universe amd64 libjq1 amd64 1.6-1ubuntu0.20.04.1 [121 kB]
Get:3 http://us.archive.ubuntu.com/ubuntu focal-updates/universe amd64 jq amd64 1.6-1ubuntu0.20.04.1 [50.2 kB]
Fetched 313 kB in 0s (1,512 kB/s)
Selecting previously unselected package libonig5:amd64.
(Reading database ... 196789 files and directories currently installed.)
Preparing to unpack .../libonig5_6.9.4-1_amd64.deb ...
Unpacking libonig5:amd64 (6.9.4-1) ...
Selecting previously unselected package libjq1:amd64.
Preparing to unpack .../libjq1_1.6-1ubuntu0.20.04.1_amd64.deb ...
Unpacking libjq1:amd64 (1.6-1ubuntu0.20.04.1) ...
Selecting previously unselected package jq.
Preparing to unpack .../jq_1.6-1ubuntu0.20.04.1_amd64.deb ...
Unpacking jq (1.6-1ubuntu0.20.04.1) ...
Setting up libonig5:amd64 (6.9.4-1) ...
Setting up libjq1:amd64 (1.6-1ubuntu0.20.04.1) ...
Setting up jq (1.6-1ubuntu0.20.04.1) ...
Processing triggers for man-db (2.9.1-1) ...
Processing triggers for libc-bin (2.31-0ubuntu9.2) ...
In order to demonstrate ipfs on the local desktop, we will install and use a command-line utility called ipfs. At the time of this article, the current version of the command-line utility was v0.10.0.
We will install the ipfs command-line tool in the $HOME/Downloads directory on the local desktop.
To change the directory to $HOME/Downloads, execute the following command in the terminal window:
$ cd $HOME/Downloads
To download the ipfs command-line tool, execute the following command in the terminal window:
$ wget https://dist.ipfs.io/go-ipfs/v0.10.0/go-ipfs_v0.10.0_linux-amd64.tar.gz
The following would be a typical output:
--2021-10-23 15:35:16--  https://dist.ipfs.io/go-ipfs/v0.10.0/go-ipfs_v0.10.0_linux-amd64.tar.gz
Resolving dist.ipfs.io (dist.ipfs.io)... 209.94.78.1, 2602:fea2:3::1
Connecting to dist.ipfs.io (dist.ipfs.io)|209.94.78.1|:443... connected.
HTTP request sent, awaiting response... 200 OK
Length: 26156481 (25M) [application/gzip]
Saving to: ‘go-ipfs_v0.10.0_linux-amd64.tar.gz’

go-ipfs_v0.10.0_linux-amd64.tar. 100%[==========================================================>]  24.94M  7.73MB/s    in 3.3s

2021-10-23 15:35:20 (7.55 MB/s) - 'go-ipfs_v0.10.0_linux-amd64.tar.gz' saved [26156481/26156481]
To extract the ipfs command-line tool, execute the following command in the terminal window:
$ tar -xvzf go-ipfs_v0.10.0_linux-amd64.tar.gz
The following would be a typical output:
go-ipfs/LICENSE
go-ipfs/LICENSE-APACHE
go-ipfs/LICENSE-MIT
go-ipfs/README.md
go-ipfs/install.sh
go-ipfs/ipfs
The ipfs binary is extracted to the directory $HOME/Downloads/go-ipfs. To change to that directory, execute the following command in the terminal window:
$ cd $HOME/Downloads/go-ipfs
To validate the ipfs command-line tool works, let us check its version by executing the following command in the terminal window:
$ ./ipfs version
The following would be a typical output:
ipfs version 0.10.0
PERFECT !!! The ipfs setup works as expected.
Hands-on with IPFS
Before we can perform any operations in IPFS, one needs to first initialize the IPFS node, which setups the configuration, the cryptographic keypair, and the storage repository.
To initialize IPFS, execute the following command in the terminal window:
$ ./ipfs init
The following would be a typical output:
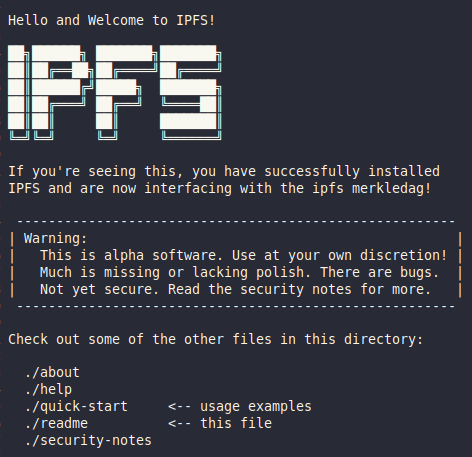
generating ED25519 keypair...done
peer identity: 12D3KooWBaoTzPavzLeUdLXS6CEu4RiupiuSFiP3hEjuytdhL4L7
initializing IPFS node at /home/polarsparc/.ipfs
to get started, enter:

  ipfs cat /ipfs/QmQPeNsJPyVWPFDVHb77w8G42Fvo15z4bG2X8D2GhfbSXc/readme
As part of the initialization, a readme file is stored in the IPFS local repository. The value QmQPeNsJPyVWPFDVHb77w8G42Fvo15z4bG2X8D2GhfbSXc above is the CID of the folder containing the 'readme' file.
Let us execute the above displayed command in the terminal window to display the contents of the 'readme' file:
$ ./ipfs cat /ipfs/QmQPeNsJPyVWPFDVHb77w8G42Fvo15z4bG2X8D2GhfbSXc/readme
The following would be a typical output:
To display the information about this peer node (local desktop), such as the node ID, the IPFS client version, the public key, etc., execute the following command in the terminal window:
$ ./ipfs id
The following would be a typical output:
{
  "ID": "12D3KooWBaoTzPavzLeUdLXS6CEu4RiupiuSFiP3hEjuytdhL4L7",
  "PublicKey": "CAESIBo92KiGygbGLilhDyxqe6LxlaPzFFnMewgdlfLh5qh4",
  "Addresses": null,
  "AgentVersion": "go-ipfs/0.10.0/",
  "ProtocolVersion": "ipfs/0.1.0",
  "Protocols": null
}
To display the configuration information about this peer node (local desktop), execute the following command in the terminal window:
$ ./ipfs config show
The following would be a typical output:
{
  "API": {
    "HTTPHeaders": {}
  },
  "Addresses": {
    "API": "/ip4/127.0.0.1/tcp/5001",
    "Announce": [],
    "Gateway": "/ip4/127.0.0.1/tcp/8080",
    "NoAnnounce": [],
    "Swarm": [
      "/ip4/0.0.0.0/tcp/4001",
      "/ip6/::/tcp/4001",
      "/ip4/0.0.0.0/udp/4001/quic",
      "/ip6/::/udp/4001/quic"
    ]
  },
  "AutoNAT": {},
  "Bootstrap": [
    "/ip4/104.131.131.82/tcp/4001/p2p/QmaCpDMGvV2BGHeYERUEnRQAwe3N8SzbUtfsmvsqQLuvuJ",
    "/ip4/104.131.131.82/udp/4001/quic/p2p/QmaCpDMGvV2BGHeYERUEnRQAwe3N8SzbUtfsmvsqQLuvuJ",
    "/dnsaddr/bootstrap.libp2p.io/p2p/QmNnooDu7bfjPFoTZYxMNLWUQJyrVwtbZg5gBMjTezGAJN",
    "/dnsaddr/bootstrap.libp2p.io/p2p/QmQCU2EcMqAqQPR2i9bChDtGNJchTbq5TbXJJ16u19uLTa",
    "/dnsaddr/bootstrap.libp2p.io/p2p/QmbLHAnMoJPWSCR5Zhtx6BHJX9KiKNN6tpvbUcqanj75Nb",
    "/dnsaddr/bootstrap.libp2p.io/p2p/QmcZf59bWwK5XFi76CZX8cbJ4BhTzzA3gU1ZjYZcYW3dwt"
  ],
  "DNS": {
    "Resolvers": {}
  },
  "Datastore": {
    "BloomFilterSize": 0,
    "GCPeriod": "1h",
    "HashOnRead": false,
    "Spec": {
      "mounts": [
        {
          "child": {
            "path": "blocks",
            "shardFunc": "/repo/flatfs/shard/v1/next-to-last/2",
            "sync": true,
            "type": "flatfs"
          },
          "mountpoint": "/blocks",
          "prefix": "flatfs.datastore",
          "type": "measure"
        },
        {
          "child": {
            "compression": "none",
            "path": "datastore",
            "type": "levelds"
          },
          "mountpoint": "/",
          "prefix": "leveldb.datastore",
          "type": "measure"
        }
      ],
      "type": "mount"
    },
    "StorageGCWatermark": 90,
    "StorageMax": "10GB"
  },
  "Discovery": {
    "MDNS": {
      "Enabled": true,
      "Interval": 10
    }
  },
  "Experimental": {
    "AcceleratedDHTClient": false,
    "FilestoreEnabled": false,
    "GraphsyncEnabled": false,
    "Libp2pStreamMounting": false,
    "P2pHttpProxy": false,
    "ShardingEnabled": false,
    "StrategicProviding": false,
    "UrlstoreEnabled": false
  },
  "Gateway": {
    "APICommands": [],
    "HTTPHeaders": {
      "Access-Control-Allow-Headers": [
        "X-Requested-With",
        "Range",
        "User-Agent"
      ],
      "Access-Control-Allow-Methods": [
        "GET"
      ],
      "Access-Control-Allow-Origin": [
        "*"
      ]
    },
    "NoDNSLink": false,
    "NoFetch": false,
    "PathPrefixes": [],
    "PublicGateways": null,
    "RootRedirect": "",
    "Writable": false
  },
  "Identity": {
    "PeerID": "12D3KooWBaoTzPavzLeUdLXS6CEu4RiupiuSFiP3hEjuytdhL4L7"
  },
  "Internal": {},
  "Ipns": {
    "RecordLifetime": "",
    "RepublishPeriod": "",
    "ResolveCacheSize": 128
  },
  "Migration": {
    "DownloadSources": [],
    "Keep": ""
  },
  "Mounts": {
    "FuseAllowOther": false,
    "IPFS": "/ipfs",
    "IPNS": "/ipns"
  },
  "Peering": {
    "Peers": null
  },
  "Pinning": {
    "RemoteServices": {}
  },
  "Plugins": {
    "Plugins": null
  },
  "Provider": {
    "Strategy": ""
  },
  "Pubsub": {
    "DisableSigning": false,
    "Router": ""
  },
  "Reprovider": {
    "Interval": "12h",
    "Strategy": "all"
  },
  "Routing": {
    "Type": "dht"
  },
  "Swarm": {
    "AddrFilters": null,
    "ConnMgr": {
      "GracePeriod": "20s",
      "HighWater": 900,
      "LowWater": 600,
      "Type": "basic"
    },
    "DisableBandwidthMetrics": false,
    "DisableNatPortMap": false,
    "EnableAutoRelay": false,
    "EnableRelayHop": false,
    "Transports": {
      "Multiplexers": {},
      "Network": {},
      "Security": {}
    }
  }
}
By default, the IPFS local stoarge repository will be created and located in the directory $HOME/.ipfs
To display the contents of the IPFS local storage repository, execute the following command in the terminal window:
$ ls -l $HOME/.ipfs
The following would be a typical output:
total 24
drwxr-xr-x 25 polarsparc polarsparc 4096 Oct 23 15:45 blocks
-rw-------  1 polarsparc polarsparc 3712 Oct 23 15:45 config
drwxr-xr-x  2 polarsparc polarsparc 4096 Oct 23 15:45 datastore
-rw-------  1 polarsparc polarsparc  190 Oct 23 15:45 datastore_spec
drwx------  2 polarsparc polarsparc 4096 Oct 23 15:45 keystore
-rw-r--r--  1 polarsparc polarsparc    3 Oct 23 15:45 version
To list all the file(s) stored in the folder with the CID QmQPeNsJPyVWPFDVHb77w8G42Fvo15z4bG2X8D2GhfbSXc (from the above when we initialized IPFS), execute the following command in the terminal window:
$ ./ipfs ls QmQPeNsJPyVWPFDVHb77w8G42Fvo15z4bG2X8D2GhfbSXc
The following would be a typical output:
QmQy6xmJhrcC5QLboAcGFcAE1tC8CrwDVkrHdEYJkLscrQ 1681 about
QmYCvbfNbCwFR45HiNP45rwJgvatpiW38D961L5qAhUM5Y 189  contact
QmU5k7ter3RdjZXu3sHghsga1UQtrztnQxmTL22nPnsu3g 311  help
QmejvEPop4D7YUadeGqYWmZxHhLc4JBUCzJJHWMzdcMe2y 4    ping
QmQGiYLVAdSHJQKYFRTJZMG4BXBHqKperaZtyKGmCRLmsF 1681 quick-start
QmPZ9gcCEpqKTo6aq61g2nXGUhM4iCL3ewB6LDXZCtioEB 1091 readme
QmQ5vhrL7uv6tuoN9KeVBwd4PwfQkXdVVmDLUZuTNxqgvm 1162 security-notes
Let us now create a super simple text file called ipfs.txt for storing in our local IPFS storage repository. To create the file 'ipfs.txt', execute the following command in the terminal window:
$ echo 'Helloworld IPFS !!!' > ipfs.txt
To check the contents of the text file 'ipfs.txt', execute the following command in the terminal window:
$ cat ipfs.txt
The following would be a typical output:
Helloworld IPFS !!!
To store the text file 'ipfs.txt' in the local IPFS storage repository, execute the following command in the terminal window:
$ ./ipfs add ipfs.txt
The following would be a typical output:
added QmcgWj3yEdUBvuwtyQ9FjLX2jBS61oSQDzzmaubkengdSs ipfs.txt
 20 B / 20 B [=============================================================================================================] 100.00%
The value QmcgWj3yEdUBvuwtyQ9FjLX2jBS61oSQDzzmaubkengdSs above is the CID of the text file 'ipfs.txt' we just added to the local IPFS storage repository.
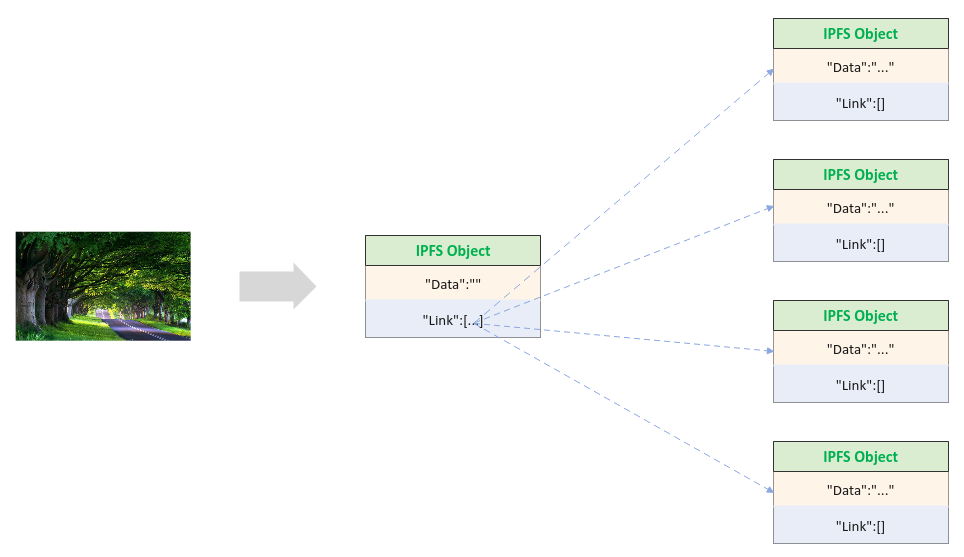
When a file is store in IPFS, it is stored as an IPFS Object in the local repository. An IPFS Object consists of two attributes - a 256KB binary data blob and an array of IPFS Link objects.
The IPFS Link object consists of three attributes - a name for the link, the CID for the linked IPFS Object, and the size of the linked IPFS Object.
The IPFS Link objects are created for a large file whose size exceeds 256KB. In other words, what a large file is stored in IPFS, it is broken into a set of 256KB IPFS Objects. The root IPFS Object has the links to the set of IPFS Objects.
To display the IPFS Object corresponding to the CID QmcgWj3yEdUBvuwtyQ9FjLX2jBS61oSQDzzmaubkengdSs, execute the following command in the terminal window:
$ ./ipfs object get QmcgWj3yEdUBvuwtyQ9FjLX2jBS61oSQDzzmaubkengdSs | jq
The following would be a typical output:
{
  "Links": [],
  "Data": "\b\u0002\u0012\u0014Helloworld IPFS !!!\n\u0018\u0014"
}
Since our simple text file 'ipfs.txt' is very small, its content fit into a single IPFS Object and hence no links.
To display the contents corresponding to the CID QmcgWj3yEdUBvuwtyQ9FjLX2jBS61oSQDzzmaubkengdSs, execute the following command in the terminal window:
$ ./ipfs cat QmcgWj3yEdUBvuwtyQ9FjLX2jBS61oSQDzzmaubkengdSs
The following would be a typical output:
Helloworld IPFS !!!
The following is a sample picture called nature.jpg which is large enough for storing into IPFS:

To store the file 'nature.jpg' in the local IPFS storage repository, execute the following command in the terminal window:
$ ./ipfs add nature.jpg
The following would be a typical output:
added QmPWJJ5d31YhBGtuuzeMnPgFx8Bzh4wKj5mbP13d9Ka1Jp nature.jpg
 780.08 KiB / 780.08 KiB [=================================================================================================] 100.00%
The value QmPWJJ5d31YhBGtuuzeMnPgFx8Bzh4wKj5mbP13d9Ka1Jp above is the CID of the image file 'nature.jpg' we just added to the local IPFS storage repository.
To display the IPFS Object corresponding to the CID QmPWJJ5d31YhBGtuuzeMnPgFx8Bzh4wKj5mbP13d9Ka1Jp, execute the following command in the terminal window:
$ ./ipfs object get QmPWJJ5d31YhBGtuuzeMnPgFx8Bzh4wKj5mbP13d9Ka1Jp | jq
The following would be a typical output:
{
  "Links": [
    {
      "Name": "",
      "Hash": "QmZg5ZUMFJPrZyrvEjFXCiPKkzvVkLWrXfFkMMkxgH9szq",
      "Size": 262158
    },
    {
      "Name": "",
      "Hash": "QmThwQwE5GCTVKXg65bbv6nLeyw7sK1CWMqbvVZrnBpJeE",
      "Size": 262158
    },
    {
      "Name": "",
      "Hash": "QmasBqA6XJn6Yzzc14aDPArL1RjGCbFbMizbQ56cW6XvLU",
      "Size": 262158
    },
    {
      "Name": "",
      "Hash": "QmfRduXxTHSj81gT8w7f6EjHHdGNpkfAiSWhnA9r8KszDm",
      "Size": 12385
    }
  ],
  "Data": "\b\u0002\u0018??0 ??\u0010 ??\u0010 ??\u0010 ?`"
}
Since our image file 'nature.jpg' is large, its content is broken into 4 IPFS Objects and hence we see the 4 IPFS Link objects.
The following is the pictorial illustration of the IPFS Objects corresponding to the image file 'nature.jpg' stored in the local IPFS storage repository:
Note that all the store in this demo is on the local desktop - it has not been replicated to the other peer nodes distributed across the planet.
In order to replicate our content out to the other peer nodes across the global, we need to start the IPFS daemon so that our desktop becomes a peer node in the IPFS distributed network.
To make our local desktop a peer node in the IPFS distributed network, execute the following command in a new terminal window:
$ ./ipfs daemon
The following would be a typical output:
Initializing daemon...
go-ipfs version: 0.10.0
Repo version: 11
System version: amd64/linux
Golang version: go1.16.8
2021/10/24 16:15:03 failed to sufficiently increase receive buffer size (was: 208 kiB, wanted: 2048 kiB, got: 416 kiB). See https://github.com/lucas-clemente/quic-go/wiki/UDP-Receive-Buffer-Size for details.
Swarm listening on /ip4/127.0.0.1/tcp/4001
Swarm listening on /ip4/127.0.0.1/udp/4001/quic
Swarm listening on /ip4/192.168.1.71/tcp/4001
Swarm listening on /ip4/192.168.1.71/udp/4001/quic
Swarm listening on /ip6/::1/tcp/4001
Swarm listening on /ip6/::1/udp/4001/quic
Swarm listening on /p2p-circuit
Swarm announcing /ip4/127.0.0.1/tcp/4001
Swarm announcing /ip4/127.0.0.1/udp/4001/quic
Swarm announcing /ip4/173.71.122.117/udp/4001/quic
Swarm announcing /ip4/192.168.1.71/tcp/4001
Swarm announcing /ip4/192.168.1.71/udp/4001/quic
Swarm announcing /ip6/::1/tcp/4001
Swarm announcing /ip6/::1/udp/4001/quic
API server listening on /ip4/127.0.0.1/tcp/5001
WebUI: http://127.0.0.1:5001/webui
Gateway (readonly) server listening on /ip4/127.0.0.1/tcp/8080
Daemon is ready
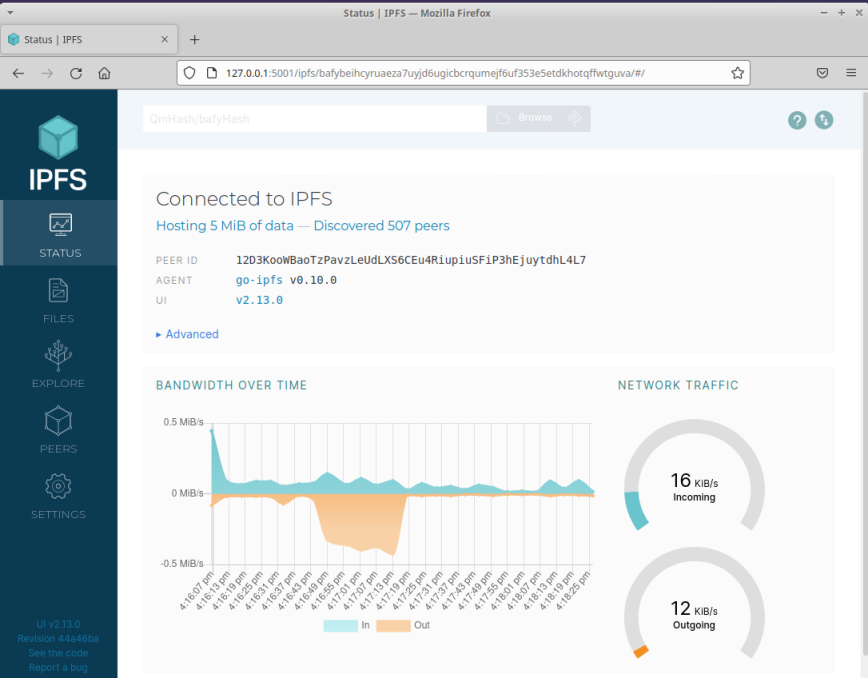
Wait a few seconds and then open the URL http://127.0.0.1:5001/webui in a browser. The following illustration shows our local desktop is connected to the IPFS distributed network as a peer node:
Note that the content we add is BY DEFAULT stored locally.
To replicate our content to the other peer node(s) in the IPFS distributed network, we need to pin the content in our local node. To do that, execute the following command in a terminal window:
$ ./ipfs pin add QmPWJJ5d31YhBGtuuzeMnPgFx8Bzh4wKj5mbP13d9Ka1Jp
The following would be a typical output:
pinned QmPWJJ5d31YhBGtuuzeMnPgFx8Bzh4wKj5mbP13d9Ka1Jp recursively
Remember that the CID QmPWJJ5d31YhBGtuuzeMnPgFx8Bzh4wKj5mbP13d9Ka1Jp above corresponds to the image 'nature.jpg' we stored in IPFS.
Now, open the URL https://ipfs.io/ipfs/QmPWJJ5d31YhBGtuuzeMnPgFx8Bzh4wKj5mbP13d9Ka1Jp in a browser and WALLA pops our image on the browser !!!
References