| PolarSPARC |
Hands-on Kubernetes Storage
| Bhaskar S | 03/03/2023 |
Overview
In the article Practical Kubernetes on ODroid-N2 Cluster, we covered the fundamentals of Kubernetes.
Container(s) inside Pods are ephemeral, in the sense, they can come and go at will and any data they write to their own filesystem is lost if they crash or restart. Workloads in the real world are stateful and need the data to persist beyond those crashes or restarts. This is why the concept of Persistent Volumes is critical for the real world Enterprise applications running on Kubernetes.
Volumes are an abstraction layer in Kubernetes that allow containers access an external storage, such as, the local host storage, or NFS, or public cloud storage.
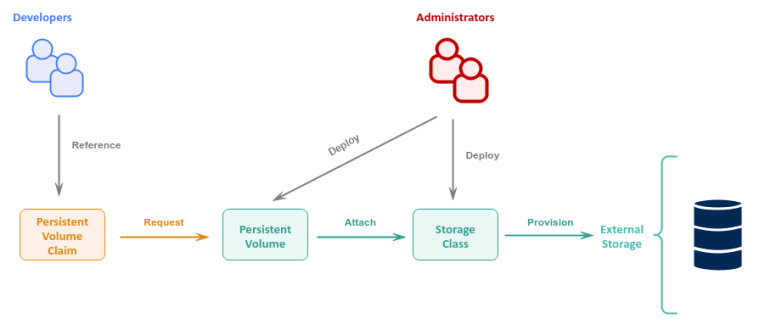
The following are the core Kubernetes storage objects:
Storage Class :: an abstraction which encapsulates the details of storage provisioning and storage management of the underlying external storage provider
Persistent Volume :: an instance of the storage volume that is provisioned using the associated Storage Class and attached as a volume to the Kubernetes cluster
Persistent Volume Claim :: a request for storage by an application container from the the attached Persistent Volume
The following diagram illustrates the high-level relationship between the different Kubernetes storage objects:
Installation and Setup
We will perform the installation and setup on a VirtualBox VM running Ubuntu 22.04 LTS.
Also, the logged in username will be alice.
Open a Terminal window to perform the various steps.
To perform a system update and install the prerequisite software, execute the following command:
$ sudo apt update && sudo apt install apt-transport-https ca-certificates curl software-properties-common -y
The following would be a typical trimmed output:
...[ SNIP ]...
ca-certificates is already the newest version (20211016ubuntu0.22.04.1).
ca-certificates set to manually installed.
The following additional packages will be installed:
  python3-software-properties software-properties-gtk
The following NEW packages will be installed:
  apt-transport-https curl
The following packages will be upgraded:
  python3-software-properties software-properties-common software-properties-gtk
3 upgraded, 2 newly installed, 0 to remove and 14 not upgraded.
...[ SNIP ]...
To add the Docker package repository, execute the following commands:
$ curl -fsSL https://download.docker.com/linux/ubuntu/gpg | sudo gpg --dearmor -o /usr/share/keyrings/docker-archive-keyring.gpg
$ echo "deb [arch=$(dpkg --print-architecture) signed-by=/usr/share/keyrings/docker-archive-keyring.gpg] https://download.docker.com/linux/ubuntu $(lsb_release -cs) stable" | sudo tee /etc/apt/sources.list.d/docker.list
The following would be a typical output:
deb [arch=amd64 signed-by=/usr/share/keyrings/docker-archive-keyring.gpg] https://download.docker.com/linux/ubuntu jammy stable
To install docker, execute the following command:
$ sudo apt update && sudo apt install docker-ce -y
The following would be a typical trimmed output:
...[ SNIP ]...
Get:5 https://download.docker.com/linux/ubuntu jammy InRelease [48.9 kB]
Get:6 https://download.docker.com/linux/ubuntu jammy/stable amd64 Packages [13.6 kB]
...[ SNIP ]...
To add the logged in user alice to the group docker, execute the following command:
$ sudo usermod -aG docker ${USER}
Reboot the Ubuntu 22.04 LTS VM for the changes to take effect.
To verify docker installation was ok, execute the following command:
$ docker info
The following would be a typical output:
Client:
  Context:    default
  Debug Mode: false
  Plugins:
    buildx: Docker Buildx (Docker Inc.)
      Version:  v0.10.2
      Path:     /usr/libexec/docker/cli-plugins/docker-buildx
    compose: Docker Compose (Docker Inc.)
      Version:  v2.16.0
      Path:     /usr/libexec/docker/cli-plugins/docker-compose
    scan: Docker Scan (Docker Inc.)
      Version:  v0.23.0
      Path:     /usr/libexec/docker/cli-plugins/docker-scan

Server:
  Containers: 0
    Running: 0
    Paused: 0
    Stopped: 0
  Images: 0
  Server Version: 23.0.1
  Storage Driver: overlay2
    Backing Filesystem: extfs
    Supports d_type: true
    Using metacopy: false
    Native Overlay Diff: true
    userxattr: false
  Logging Driver: json-file
  Cgroup Driver: systemd
  Cgroup Version: 2
  Plugins:
    Volume: local
    Network: bridge host ipvlan macvlan null overlay
    Log: awslogs fluentd gcplogs gelf journald json-file local logentries splunk syslog
  Swarm: inactive
  Runtimes: runc io.containerd.runc.v2
  Default Runtime: runc
  Init Binary: docker-init
  containerd version: 2456e983eb9e37e47538f59ea18f2043c9a73640
  runc version: v1.1.4-0-g5fd4c4d
  init version: de40ad0
  Security Options:
    apparmor
    seccomp
    Profile: builtin
    cgroupns
  Kernel Version: 5.19.0-32-generic
  Operating System: Ubuntu 22.04.2 LTS
  OSType: linux
  Architecture: x86_64
  CPUs: 2
  Total Memory: 3.832GiB
  Name: xubuntu-vm-1
  ID: 859dad55-839f-4a1a-90de-9212fab79df8
  Docker Root Dir: /var/lib/docker
  Debug Mode: false
  Registry: https://index.docker.io/v1/
  Experimental: false
  Insecure Registries:
    127.0.0.0/8
  Live Restore Enabled: false
To download and install the kubectl binary, execute the following commands:
$ cd $HOME/Downloads
$ curl -LO "https://dl.k8s.io/release/$(curl -L -s https://dl.k8s.io/release/stable.txt)/bin/linux/amd64/kubectl"
$ sudo install -o root -g root -m 0755 kubectl /usr/local/bin/kubectl
$ rm -f kubectl*
To verify the version of the kubectl binary, execute the following command:
$ kubectl version --output=yaml
The following would be a typical output:
clientVersion:
  buildDate: "2023-02-22T13:39:03Z"
  compiler: gc
  gitCommit: fc04e732bb3e7198d2fa44efa5457c7c6f8c0f5b
  gitTreeState: clean
  gitVersion: v1.26.2
  goVersion: go1.19.6
  major: "1"
  minor: "26"
  platform: linux/amd64
kustomizeVersion: v4.5.7

The connection to the server localhost:8080 was refused - did you specify the right host or port?
For the hands-on demonstration, we will setup a single node development cluster using the lightweight implementation of Kubernetes called the Minikube.
To download and install the minikube binary, execute the following commands:
$ cd $HOME/Downloads
$ curl -LO https://storage.googleapis.com/minikube/releases/latest/minikube-linux-amd64
$ sudo install -o root -g root -m 0755 minikube-linux-amd64 /usr/local/bin/minikube
$ rm -f minikube*
To verify the version of the minikue binary, execute the following command:
$ minikube version
The following would be a typical output:
minikube version: v1.29.0
commit: ddac20b4b34a9c8c857fc602203b6ba2679794d3
To start a single node minikue cluster on the VM, execute the following command:
$ minikube start
The following would be a typical output:
minikube v1.29.0 on Ubuntu 22.04
Automatically selected the docker driver
Using Docker driver with root privileges
Starting control plane node minikube in cluster minikube
Pulling base image ...
Downloading Kubernetes v1.26.1 preload ...
> gcr.io/k8s-minikube/kicbase...:  407.19 MiB / 407.19 MiB  100.00% 52.15 M
> preloaded-images-k8s-v18-v1...:  397.05 MiB / 397.05 MiB  100.00% 6.52 Mi
Creating docker container (CPUs=2, Memory=2200MB) ...
Preparing Kubernetes v1.26.1 on Docker 20.10.23 ...
* Generating certificates and keys ...
* Booting up control plane ...
* Configuring RBAC rules ...
Configuring bridge CNI (Container Networking Interface) ...
* Using image gcr.io/k8s-minikube/storage-provisioner:v5
Verifying Kubernetes components...
Enabled addons: default-storageclass, storage-provisioner
Done! kubectl is now configured to use "minikube" cluster and "default" namespace by default
Note Minikube by default uses docker as the virtual machine and a bridge network as the overlay network to run the single node Kubernetes cluster.
To verify the status of the minikue cluster, execute the following command:
$ minikube status
The following would be a typical output:
minikube
type: Control Plane
host: Running
kubelet: Running
apiserver: Running
kubeconfig: Configured
YIPPEE !!! - with this we have completed the necessary setup for the demonstration.
Hands-on Kubernetes Storage
To display the details of the available Storage Class, execute the following command:
$ kubectl get storageclass
The following would be a typical output:
NAME                 PROVISIONER                RECLAIMPOLICY   VOLUMEBINDINGMODE   ALLOWVOLUMEEXPANSION   AGE
standard (default)   k8s.io/minikube-hostpath   Delete          Immediate           false                  9h
As indicated earlier, a Storage Class encapsulates details such as, the storage provisioner that is used to create/delete the storage volume from the underlying storage provider, the storage reclaim policy that manages the lifecycle of the storage volume that is no longer needed, the storage volume binding mode - whether to bind the storage volume immediately or wait till a storage volume request, etc.
The following are the supported reclaim policies for a Storage Class:
Delete :: deletes the storage volume from both Kubernetes as well as the attached Persistent Volume, returning back to the external storage provider
Retain :: allows for an administrator to manually release the storage volume back to the external storage provider
As can be inferred from Output.9 above, the reclaim policy for the default Storage Class (known as standard) is set to Delete.
In the following sections, we will demonstrate the use of Kubernetes storage using two types of storage - Local Storage and Network File System.
Local Storage
A Local Storage is the storage that is attached to the host on a certain directory path that is running the Kubernetes node.
On the host VM, we will create a shared persistent directory called $HOME/Downloads/pv-storage that will be attached to the Kubernetes cluster (single node cluster) at the mount point directory called /pv-storage.
To create the shared persistent directory on the host VM, execute the following command:
$ mkdir -p $HOME/Downloads/pv-storage
Open a new Terminal window on the host VM and execute the following command to mount the shared persistent directory on the minikube cluster:
$ minikube mount $HOME/Downloads/pv-storage:/pv-storage
The following would be a typical output:
Mounting host path /home/alice/Downloads/pv-storage into VM as /pv-storage ...
  * Mount type:
  * User ID:      docker
  * Group ID:     docker
  * Version:      9p2000.L
  * Message Size: 262144
  * Options:      map[]
  * Bind Address: 192.168.49.1:34935
  Userspace file server: ufs starting
  Successfully mounted /home/alice/Downloads/pv-storage to /pv-storage

  NOTE: This process must stay alive for the mount to be accessible ...
To login to the minikube single node cluster, execute the following command:
$ minikube ssh
The shell prompt will change to indicate we are in minikube environment and the following would be a typical output:
Last login: Thu Mar  3 20:33:01 2023 from 192.168.49.1
docker@minikube:~$
Execute the following commands in the minikube environment to create a simple HTML file called index.html in the shared storage volume and then exit:
docker@minikube:~$ echo 'HOORAY - From Persistent Volume (local) !!!' > /pv-storage/index.html
docker@minikube:~$ exit
To display the details of the available Persistent Volumes, execute the following command:
$ kubectl get persistentvolumes
The following would be a typical output:
No resources found
Before a container running in a Pod can request storage, a Persistent Volume instance must be deployed to the Kubernetes cluster.
The following is the definition of the Persistent Volume YAML that refers to the mounted shared storage on the minikube cluster:
apiVersion: v1
kind: PersistentVolume
metadata:
  name: pv-storage
spec:
  storageClassName: standard
  capacity:
    storage: 2Gi
  accessModes:
    - ReadWriteOnce
  persistentVolumeReclaimPolicy: Delete
  hostPath:
    path: "/pv-storage"
A question that may arise at this point - how does one know what fields to define in the YAML file ???
To display the list of all the fields for a Persistent Volume YAML definition, execute the following command:
$ kubectl explain PersistentVolume
The following would be a typical output:
KIND:     PersistentVolume
VERSION:  v1

DESCRIPTION:
      PersistentVolume (PV) is a storage resource provisioned by an
      administrator. It is analogous to a node. More info:
      https://kubernetes.io/docs/concepts/storage/persistent-volumes

FIELDS:
    apiVersion	<string>
      APIVersion defines the versioned schema of this representation of an
      object. Servers should convert recognized schemas to the latest internal
      value, and may reject unrecognized values. More info:
      https://git.k8s.io/community/contributors/devel/sig-architecture/api-conventions.md#resources

    kind	<string>
      Kind is a string value representing the REST resource this object
      represents. Servers may infer this from the endpoint the client submits
      requests to. Cannot be updated. In CamelCase. More info:
      https://git.k8s.io/community/contributors/devel/sig-architecture/api-conventions.md#types-kinds

    metadata	<Object>
      Standard object's metadata. More info:
      https://git.k8s.io/community/contributors/devel/sig-architecture/api-conventions.md#metadata

    spec	<Object>
      spec defines a specification of a persistent volume owned by the cluster.
      Provisioned by an administrator. More info:
      https://kubernetes.io/docs/concepts/storage/persistent-volumes#persistent-volumes

    status	<Object>
      status represents the current information/status for the persistent volume.
      Populated by the system. Read-only. More info:
      https://kubernetes.io/docs/concepts/storage/persistent-volumes#persistent-volumes
To further drill-down into the list of all the fields for the spec field, execute the following command:
$ kubectl explain PersistentVolume.spec
The following would be a typical trimmed output:
KIND:     PersistentVolume
VERSION:  v1

RESOURCE: spec <Object>

DESCRIPTION:
      spec defines a specification of a persistent volume owned by the cluster.
      Provisioned by an administrator. More info:
      https://kubernetes.io/docs/concepts/storage/persistent-volumes#persistent-volumes

      PersistentVolumeSpec is the specification of a persistent volume.

FIELDS:
    accessModes	<[]string>
      accessModes contains all ways the volume can be mounted. More info:
      https://kubernetes.io/docs/concepts/storage/persistent-volumes#access-modes

...[ SNIP ]...

    capacity	<map[string]string>
      capacity is the description of the persistent volume's resources and
      capacity. More info:
      https://kubernetes.io/docs/concepts/storage/persistent-volumes#capacity

...[ SNIP ]...

    hostPath	<Object>
      hostPath represents a directory on the host. Provisioned by a developer or
      tester. This is useful for single-node development and testing only!
      On-host storage is not supported in any way and WILL NOT WORK in a
      multi-node cluster. More info:
      https://kubernetes.io/docs/concepts/storage/volumes#hostpath

...[ SNIP ]...

    persistentVolumeReclaimPolicy	<string>
      persistentVolumeReclaimPolicy defines what happens to a persistent volume
      when released from its claim. Valid options are Retain (default for
      manually created PersistentVolumes), Delete (default for dynamically
      provisioned PersistentVolumes), and Recycle (deprecated). Recycle must be
      supported by the volume plugin underlying this PersistentVolume. More info:
      https://kubernetes.io/docs/concepts/storage/persistent-volumes#reclaiming

      Possible enum values:
      - `"Delete"` means the volume will be deleted from Kubernetes on release
      from its claim. The volume plugin must support Deletion.
      - `"Recycle"` means the volume will be recycled back into the pool of
      unbound persistent volumes on release from its claim. The volume plugin
      must support Recycling.
      - `"Retain"` means the volume will be left in its current phase (Released)
      for manual reclamation by the administrator. The default policy is Retain.

...[ SNIP ]...
To deploy our local storage definition pv-storage.yaml to the minikube cluster, execute the following command:
$ kubectl create -f ./pv-storage.yaml
The following would be a typical output:
persistentvolume/pv-storage created
To display the details of the available Persistent Volumes, execute the following command:
$ kubectl get pv
The following would be a typical output:
NAME         CAPACITY   ACCESS MODES   RECLAIM POLICY   STATUS      CLAIM   STORAGECLASS   REASON   AGE
pv-storage   2Gi        RWO            Delete           Available           standard                8s
COOL !!! - we have successfully deployed the local storage to our minikube cluster.
To display the details of the available Persistent Volume Claims, execute the following command:
$ kubectl get persistentvolumeclaim
The following would be a typical output:
No resources found in default namespace.
Before a container running in a Pod can request storage, a Persistent Volume Claim definition must be deployed to the Kubernetes cluster.
The following is the definition of the Persistent Volume Claim YAML that refers to the deployed local storage volume on the minikube cluster:
apiVersion: v1
kind: PersistentVolumeClaim
metadata:
  name: pv-storage-claim
spec:
  storageClassName: standard
  accessModes:
    - ReadWriteOnce
  resources:
    requests:
      storage: 2Gi
  volumeName: "pv-storage"
To display the list of all the fields for a Persistent Volume Claim YAML definition, execute the following command:
$ kubectl explain PersistentVolumeClaim
The following would be a typical trimmed output:
KIND:     PersistentVolumeClaim
VERSION:  v1

DESCRIPTION:
      PersistentVolumeClaim is a user's request for and claim to a persistent
      volume

FIELDS:
    apiVersion	<string>
      APIVersion defines the versioned schema of this representation of an
      object. Servers should convert recognized schemas to the latest internal
      value, and may reject unrecognized values. More info:
      https://git.k8s.io/community/contributors/devel/sig-architecture/api-conventions.md#resources

    kind	<string>
      Kind is a string value representing the REST resource this object
      represents. Servers may infer this from the endpoint the client submits
      requests to. Cannot be updated. In CamelCase. More info:
      https://git.k8s.io/community/contributors/devel/sig-architecture/api-conventions.md#types-kinds

    metadata	<Object>
      Standard object's metadata. More info:
      https://git.k8s.io/community/contributors/devel/sig-architecture/api-conventions.md#metadata

    spec	<Object>
      spec defines the desired characteristics of a volume requested by a pod
      author. More info:
      https://kubernetes.io/docs/concepts/storage/persistent-volumes#persistentvolumeclaims

...[ SNIP ]...
To deploy our local storage request definition pv-storage-claim.yaml to the minikube cluster, execute the following command:
$ kubectl create -f ./pv-storage-claim.yaml
The following would be a typical output:
persistentvolumeclaim/pv-storage-claim created
To display the details of the available Persistent Volume Claims, execute the following command:
$ kubectl get pvc
The following would be a typical output:
NAME               STATUS   VOLUME       CAPACITY   ACCESS MODES   STORAGECLASS   AGE
pv-storage-claim   Bound    pv-storage   2Gi        RWO            standard       6s
GOOD !!! - we have successfully deployed the storage request definition to our minikube cluster.
We need to deploy a simple application container to request storage via pv-storage-claim from our minikube cluster.
The following is the YAML definition for an nginx webserver application which will access the HTML file residing on the local storage volume attached to the minikube cluster:
apiVersion: apps/v1
kind: Deployment
metadata:
  name: nginx-deploy
  labels:
    app: nginx-server
spec:
  replicas: 1
  selector:
    matchLabels:
      app: nginx-server
  template:
    metadata:
      labels:
        app: nginx-server
    spec:
      containers:
        - name: nginx-server
          image: nginx:1.23.3
          ports:
            - name: "nginx-server"
              containerPort: 80
          volumeMounts:
            - name: nginx-storage
              mountPath: "/usr/share/nginx/html"
      volumes:
        - name: nginx-storage
          persistentVolumeClaim:
            claimName: pv-storage-claim
To display the details of the application deployments on our cluster, execute the following command:
$ kubectl get deployments
The following would be a typical output:
No resources found in default namespace.
To deploy our webserver application nginx-deploy.yaml to the minikube cluster, execute the following command:
$ kubectl create -f ./nginx-deploy.yaml
The following would be a typical output:
pod/nginx-deploy created
To display the details of the application deployments, execute the following command:
$ kubectl get deploy
The following would be a typical output:
NAME           READY   UP-TO-DATE   AVAILABLE   AGE
nginx-deploy   1/1     1            1           9s
To display the details of the underlying application pods, execute the following command:
$ kubectl get po
The following would be a typical output:
NAME                           READY   STATUS    RESTARTS   AGE
nginx-deploy-79d489487-45ldf   1/1     Running   0          16s
GREAT !!! - we have successfully deployed the webserver application to our minikube cluster.
Now is the time to test if our webserver container is able to serve the index.html file from the local storage volume attached to the minikube cluster.
To access the webserver from the deployed pod, execute the following commands:
$ kubectl exec -it nginx-deploy-79d489487-45ldf -- /bin/bash
root@nginx-deploy-79d489487-45ldf:/# curl http://localhost
The following would be a typical output:
HOORAY - From Persistent Volume (local) !!!
YIPPEE !!! - we have successfully tested the access to the local storage volume attached to our minikube cluster.
To exit from the webserver pod, execute the following command:
root@nginx-deploy-79d489487-45ldf:/# exit
It is time to perform clean-up by deleting all the deployed resources from our minikube cluster.
To delete the webserver deployment, execute the following command:
$ kubectl delete deploy nginx-deploy
The following would be a typical output:
deployment.apps "nginx-deploy" deleted
To delete the storage request definition, execute the following command:
$ kubectl delete pvc pv-storage-claim
The following would be a typical output:
persistentvolumeclaim "pv-storage-claim" deleted
To delete the local storage definition, execute the following command:
$ kubectl delete pv pv-storage
The following would be a typical output:
persistentvolume "pv-storage" deleted
Finally, stop the minikube mount running in a Terminal.
Network File System Storage
A Network File System (or NFS for short) is a distributed file system, which allows clients on a network to access a shared storage via a directory.
We will need to setup an NFS server to share the directory $HOME/Downloads/pv-storage on the host VM as a network storage via the directory /nfs-storage.
We will download and use a pre-build docker image for the NFS server.
To download the docker image erichough/nfs-server:2.2.1, execute the following command:
$ docker pull erichough/nfs-server:2.2.1
The following would be a typical output:
2.2.1: Pulling from erichough/nfs-server
c9b1b535fdd9: Pull complete
996ff6ad91f1: Pull complete
09b7a13e0642: Pull complete
37e0e43fb719: Pull complete
Digest: sha256:1efd4ece380c5ba27479417585224ef857006daa46ab84560a28c1224bc71e9e
Status: Downloaded newer image for erichough/nfs-server:2.2.1
docker.io/erichough/nfs-server:2.2.1
Tried the docker images itsthenetwork/nfs-server-alpine and gists/nfs-server for the NFS server and they did *NOT* work as expected
To export the directory /nfs-storage as a network directory, create an exports definition file called $HOME/Downloads/exports.txt with the following text content:
/nfs-storage *(rw,fsid=0,sync,nohide,no_subtree_check,no_auth_nlm,insecure,no_root_squash)
To start the NFS server on the host VM, execute the following command:
$ docker run --rm --name nfs-server --privileged -v $HOME/Downloads/exports.txt:/etc/exports:ro -v $HOME/Downloads/pv-storage:/nfs-storage -p 2049:2049 erichough/nfs-server:2.2.1
The following would be a typical output:
==================================================================
      SETTING UP ...
==================================================================
----> setup complete

==================================================================
      STARTING SERVICES ...
==================================================================
----> starting rpcbind
----> starting exportfs
----> starting rpc.mountd on port 32767
----> starting rpc.statd on port 32765 (outgoing from port 32766)
----> starting rpc.nfsd on port 2049 with 2 server thread(s)
----> all services started normally

==================================================================
      SERVER STARTUP COMPLETE
==================================================================
----> list of enabled NFS protocol versions: 4.2, 4.1, 4, 3
----> list of container exports:
---->   /nfs-storage *(rw,fsid=0,sync,nohide,no_subtree_check,no_auth_nlm,insecure,no_root_squash)
----> list of container ports that should be exposed:
---->   111 (TCP and UDP)
---->   2049 (TCP and UDP)
---->   32765 (TCP and UDP)
---->   32767 (TCP and UDP)

==================================================================
      READY AND WAITING FOR NFS CLIENT CONNECTIONS
==================================================================
Since the NFS server is running in a docker container that is external to the minikube cluster, the two networks will need to be connected.
To connect the nfs-server network to the minikube network, execute the following command:
$ docker network connect minikube nfs-server
To login to the minikube single node cluster, execute the following command:
$ minikube ssh
The shell prompt will change to indicate we are in minikube environment and the following would be a typical output:
Last login: Thu Mar  3 21:14:21 2023 from 192.168.49.1
docker@minikube:~$
To verify minikube is able to connect to the nfs-server, execute the following command in minikube environment:
docker@minikube:~$ ping -c 3 nfs-server
The following would be a typical output:
PING nfs-server (192.168.49.3) 56(84) bytes of data.
64 bytes from nfs-server.minikube (192.168.49.3): icmp_seq=1 ttl=64 time=0.057 ms
64 bytes from nfs-server.minikube (192.168.49.3): icmp_seq=2 ttl=64 time=0.037 ms
64 bytes from nfs-server.minikube (192.168.49.3): icmp_seq=3 ttl=64 time=0.055 ms

--- nfs-server ping statistics ---
3 packets transmitted, 3 received, 0% packet loss, time 2047ms
rtt min/avg/max/mdev = 0.037/0.049/0.057/0.009 ms
Execute the following commands in the minikube environment to create a simple HTML file called index.html in the NFS shared storage and then exit:
docker@minikube:~$ sudo mkdir /nfs-storage
sudo mount -t nfs -o vers=4,port=2049 nfs-server:/nfs-storage /nfs-storage
docker@minikube:~$ echo 'HOORAY - Loaded from NFS storage !!!' > /nfs-storage/index.html
docker@minikube:~$ exit
The following is the definition of the Persistent Volume YAML that refers to the NFS storage on the minikube cluster:
apiVersion: v1
kind: PersistentVolume
metadata:
  name: nfs-storage
  labels:
    type: nfs
spec:
  storageClassName: standard
  capacity:
    storage: 2Gi
  accessModes:
    - ReadWriteMany
  persistentVolumeReclaimPolicy: Retain
  nfs:
    server: nfs-server
    path: "/nfs-storage"
To deploy our NFS storage definition nfs-pv-storage.yaml to the minikube cluster, execute the following command:
$ kubectl create -f ./nfs-pv-storage.yaml
The following would be a typical output:
persistentvolume/nfs-storage created
To display the details of the available Persistent Volumes, execute the following command:
$ kubectl get pv
The following would be a typical output:
NAME          CAPACITY   ACCESS MODES   RECLAIM POLICY   STATUS      CLAIM   STORAGECLASS   REASON   AGE
nfs-storage   2Gi        RWX            Retain           Available           standard                7s
The following is the definition of the Persistent Volume Claim YAML that refers to the deployed NFS storage volume on the minikube cluster:
apiVersion: v1
kind: PersistentVolumeClaim
metadata:
  name: nfs-storage-claim
spec:
  storageClassName: standard
  accessModes:
    - ReadWriteMany
  resources:
    requests:
      storage: 2Gi
  volumeName: "nfs-storage"
To deploy our NFS storage request definition nfs-pv-storage-claim.yaml to the minikube cluster, execute the following command:
$ kubectl create -f ./nfs-pv-storage-claim.yaml
The following would be a typical output:
persistentvolumeclaim/nfs-storage-claim created
To display the details of the available Persistent Volume Claims, execute the following command:
$ kubectl get pvc
The following would be a typical output:
NAME                STATUS   VOLUME        CAPACITY   ACCESS MODES   STORAGECLASS   AGE
nfs-storage-claim   Bound    nfs-storage   2Gi        RWX            standard       8s
The following is the YAML definition for an nginx webserver application which will access the HTML file residing on the NFS storage volume attached to the minikube cluster:
apiVersion: apps/v1
kind: Deployment
metadata:
  name: nginx-nfs-deploy
  labels:
    app: nginx-server
spec:
  replicas: 1
  selector:
    matchLabels:
      app: nginx-server
  template:
    metadata:
      labels:
        app: nginx-server
    spec:
      containers:
        - name: nginx-server
          image: nginx:1.23.3
          ports:
            - name: "nginx-server"
              containerPort: 80
          volumeMounts:
            - name: nginx-nfs-storage
              mountPath: "/usr/share/nginx/html"
      volumes:
        - name: nginx-nfs-storage
          persistentVolumeClaim:
            claimName: nfs-storage-claim
To deploy our webserver application nginx-nfs-deploy.yaml to the minikube cluster, execute the following command:
$ kubectl create -f ./nginx-nfs-deploy.yaml
The following would be a typical output:
pod/nginx-nfs-deploy created
To display the details of the application deployments, execute the following command:
$ kubectl get deploy
The following would be a typical output:
NAME               READY   UP-TO-DATE   AVAILABLE   AGE
nginx-nfs-deploy   1/1     1            1           9s
To display the details of the underlying application pods, execute the following command:
$ kubectl get po
The following would be a typical output:
NAME                                READY   STATUS    RESTARTS   AGE
nginx-nfs-deploy-5db89c4848-qxl59   1/1     Running   0          53s
To access the webserver from the deployed pod, execute the following commands:
$ kubectl exec -it nginx-nfs-deploy-5db89c4848-qxl59 -- /bin/bash
root@nginx-nfs-deploy-5db89c4848-qxl59:/# curl http://localhost
The following would be a typical output:
HOORAY - Loaded from NFS storage !!!
BINGO !!! - we have successfully tested the access to the NFS storage volume attached to our minikube cluster.
To exit from the webserver pod, execute the following command:
root@nginx-nfs-deploy-5db89c4848-qxl59:/# exit
It is time to perform clean-up by deleting all the deployed resources from our minikube cluster.
To delete the webserver deployment, execute the following command:
$ kubectl delete deploy nginx-nfs-deploy
The following would be a typical output:
deployment.apps "nginx-nfs-deploy" deleted
To delete the storage request definition, execute the following command:
$ kubectl delete pvc nfs-storage-claim
The following would be a typical output:
persistentvolumeclaim "nfs-storage-claim" deleted
To delete the local storage definition, execute the following command:
$ kubectl delete pv nfs-storage
The following would be a typical output:
persistentvolume "nfs-storage" deleted
Finally, stop the NFS server docker container running in a Terminal.
References