Figure.1
| PolarSPARC |
Fundamentals of Linux iptables Firewall
| Bhaskar S | 11/22/2020 |
Overview
In networking, a Firewall is a security protection system, through which all network traffic is routed, to monitor and control the flow of network traffic coming in or going out using a set of rules. In other words, a firewall is used to enforce the security policies in a network.
A network firewall is also referred to as a Packet Filter, which basically implies inspect and regulate all network packets traversing between the nodes in the network.
netfilter is a Linux kernel space networking framework, with various hooks for performing different network inspections and operations, such that it provides the firewall functionality required for monitoring and directing packets in the network.
iptables is a user-space command-line interface for netfilter that allows system adminstrators to add, modify, or remove packet filtering rules.
To level set on the networking basics, the following are some of terms used in this article:
| Term | Description |
|---|---|
| Ethernet | a family of computer networking protocols used for communication between nodes in a network |
| NIC | Network Interface Controller (or Card) is a physical device that connects a system to the network |
| MAC Address | Media Access Control address is a globally unique address assigned to a NIC and used by the Ethernet protocol |
| IP | stands for Internet Protocol and is the standard of internet communication |
| ICMP | stands for Internet Control Message Protocol and is used for exchaning informational data on the success or failure of communication between systems in the network |
| IP Address | a logical numerical label assigned to each system on the IP network |
| IPv4 | a 32-bit IP address that is often represented using the form A.B.C.D, where A, B, C, and D can have a value from 0 through 255. Example: 192.168.1.56 |
| TCP | stands for Transmission Control Protocol and is part of the IP protocol suite that is a connection-oriented, meaning, a connection channel must be established between two systems before data can be exchanged |
| UDP | stands for User Datagram Protocol and is part of the IP protocol suite that is a connectionless, meaning, data can be exchanged between two systems without establishing any connection channel |
| NAT | stands for Network Address Translation and is a method of mapping an IP address to another in the network |
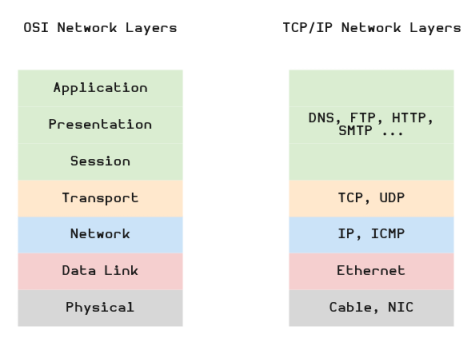
The following diagram illustrates the OSI Network Model and the simplified TCP/IP Network Model:
In the Figure.1 above, the diagram on the left is the general OSI Network Model, while the diagram on the right is the simplified TCP/IP Network Model. The following are the descriptions of the layers from the simplified TCP/IP Network Model:
The Physical layer is associated with the physical network cabling and hardware
The Data Link layer is responsible for the transmission of the data over the underlying link protocol such as Ethernet using MAC addresses
The Network layer is responsible for dealing with the IP addressing, ICMP messages, and routing of data in the network
The Transport layer provides support for TCP and UDP protocols that are responsible for providing services for system to system communication as well as services for congestion control, flow control, and multiplexing
The packet filtering mechanism provided by iptables is organized into 4 core components:
Table :: used for organizing a set of rules and is defined based on the type of packet processing they perform
Chain :: allows one to inspect traffic at various points, such as when they just arrive on the NIC or just before they are handed over to a process
Rule :: statement that tells the system what to do with the network packet
Target :: decides the destiny of a packet once a rule matches - either allow it or reject it
There are 4 types of tables defined in iptables:
raw :: used for tracking packets based on their state
mangle :: used to alter IP headers
nats :: used to translation of the source or destination IP address
filter :: is the default table and is used for filtering packets
There are 5 types of chains defined in iptables:
PREROUTING :: used to process packets as they arrive on the NIC for destination NAT or port forwarding
INPUT :: used for processing incoming packets to a system
OUTPUT :: used on packets originating from a system to be transmitted out
FORWARD :: used on packets that are routed through a system
POSTROUTING :: used to process packets as they are about to leave the NIC for source NAT (sometimes referred to as IP masquerade)
There are 3 types of targets defined in iptables:
ACCEPT :: causes the packet to be accepted
DROP :: causes the packet to be dropped silently
REJECT :: causes the packet to be rejected and respond with an ICMP reply
At a high-level, when a packet arrives (or leaves) a system, the packet traverses the different layers of the network model and in turn the various tables/chains of the iptables within the layer. Within a table, the packet starts at the top of the chain and is matched against each rule in the chain (till the last rule). If a rule is matched, the corresponding target is executed. If none of the rules match, the default iptables policy is applied.
The following diagram illustrates how a packet would traverse through the core components of the iptables in the simplified TCP/IP Network Model:
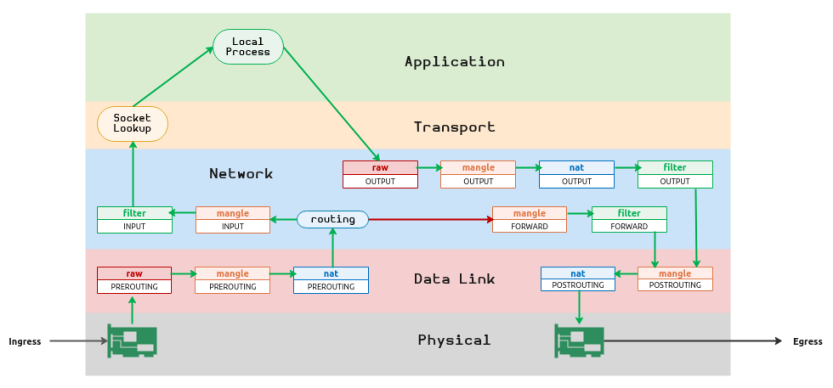
The following is the high-level traversal of a packet from the illustration in Figure.2 above:
When a packet arrives through the NIC (ingress), it traverses the PREROUTING chain of the tables raw, mangle and nat in the Data Link layer
The packet then arrives at the Network layer to determine if the packet is for this system or another system by the routing module
If the packet is for THIS system, then the packet traverses the INPUT chain of the tables mangle and filter at the Network layer. If the packet is not dropped or rejected it moves to the Transport layer (step 5 below)
If the packet is for ANOTHER system, then the packet traverses the FORWARD chain of the tables mangle and filter at the Network layer and moves to the Data Link layer (step 7 below)
In the Transport layer, the local network application process to which the packet needs to be dispatched is determined (look up) using the destination IP and port
The packet is processed by the local application process in the Application layer. The local application process creates and sends a response packet back to the source IP and port. This causes the packet to traverse the OUTPUT chain of the tables raw, mangle, nat, and filter in the Network layer and moves to the Data Link layer
In the Data Link layer, the packet traverses the POSTROUTING chain of the tables mangle and nat to go out through the NIC (egress)
Installation and Setup
The setup will be on a Ubuntu 20.04 LTS based Linux desktop. For the demonstrations, we will create an environment with 3 virtual machines running on the hypervisor VirtualBox.
The following diagram illustrates the virtual machines environment setup:
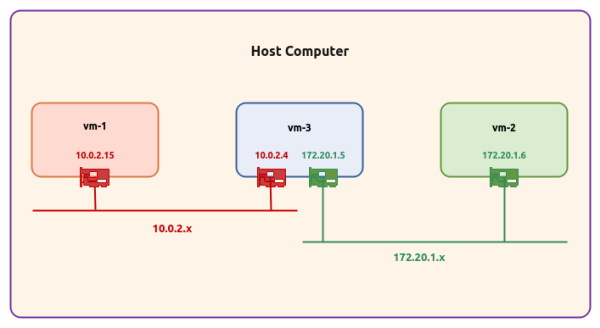
The following are some of the highlights of the 3 virtual machines:
vm-1 :: 1 vCPU, 2GB RAM, 20GB storage, Ubuntu 20.04 OS, and uses a single virtual network interface with NAT networking (10.0.2.15)
vm-2 :: 1 vCPU, 2GB RAM, 20GB storage, Ubuntu 20.04 OS, and uses a single virtual network interface with NAT networking (172.20.1.6)
vm-3 :: 1 vCPU, 2GB RAM, 20GB storage, Ubuntu 20.04 OS, and uses a two separate virtual network interfaces - one with NAT networking (10.0.2.4) and the other also with NAT networking (172.20.1.5)
Open a Terminal window for each of the 3 virtual machines vm-1 thru vm-3 to install few pre-requisites by executing the following command:
$ sudo apt install python3-flask net-tools nmap openssh-server traceroute -y
The following would be a typical output (some portion trimmed ... [SNIP] ...):
Reading package lists... Done
Building dependency tree
Reading state information... Done
The following additional packages will be installed:
  javascript-common libjs-jquery liblinear4 liblua5.3-0 lua-lpeg ncurses-term nmap-common openssh-sftp-server
  python3-itsdangerous python3-jinja2 python3-markupsafe python3-openssl python3-pyinotify python3-werkzeug
  ssh-import-id traceroute
Suggested packages:
  apache2 | lighttpd | httpd molly-guard monkeysphere ssh-askpass liblinear-tools liblinear-dev ncat ndiff zenmap
  python-flask-doc python-jinja2-doc python-openssl-doc python3-openssl-dbg python-pyinotify-doc ipython3
  python-werkzeug-doc python3-lxml python3-termcolor python3-watchdog
The following NEW packages will be installed:
  javascript-common libjs-jquery liblinear4 liblua5.3-0 lua-lpeg ncurses-term net-tools nmap nmap-common
  openssh-server openssh-sftp-server python3-flask python3-itsdangerous python3-jinja2 python3-markupsafe
  python3-openssl python3-pyinotify python3-werkzeug ssh-import-id
0 upgraded, 20 newly installed, 0 to remove and 0 not upgraded.
Get:1 http://us.archive.ubuntu.com/ubuntu focal/main amd64 javascript-common all 11 [6,066 B]
Get:2 http://us.archive.ubuntu.com/ubuntu focal/main amd64 libjs-jquery all 3.3.1~dfsg-3 [329 kB]
Get:3 http://us.archive.ubuntu.com/ubuntu focal/universe amd64 liblinear4 amd64 2.3.0+dfsg-3build1 [41.7 kB]
Get:4 http://us.archive.ubuntu.com/ubuntu focal/main amd64 liblua5.3-0 amd64 5.3.3-1.1ubuntu2 [116 kB]
Get:5 http://us.archive.ubuntu.com/ubuntu focal/universe amd64 lua-lpeg amd64 1.0.2-1 [31.4 kB]
Get:6 http://us.archive.ubuntu.com/ubuntu focal/main amd64 ncurses-term all 6.2-0ubuntu2 [249 kB]
Get:7 http://us.archive.ubuntu.com/ubuntu focal/main amd64 net-tools amd64 1.60+git20180626.aebd88e-1ubuntu1 [196 kB]
Get:8 http://us.archive.ubuntu.com/ubuntu focal/universe amd64 nmap-common all 7.80+dfsg1-2build1 [3,676 kB]
Get:9 http://us.archive.ubuntu.com/ubuntu focal/universe amd64 nmap amd64 7.80+dfsg1-2build1 [1,662 kB]
Get:10 http://us.archive.ubuntu.com/ubuntu focal-updates/main amd64 openssh-sftp-server amd64 1:8.2p1-4ubuntu0.1 [51.5 kB]
Get:11 http://us.archive.ubuntu.com/ubuntu focal-updates/main amd64 openssh-server amd64 1:8.2p1-4ubuntu0.1 [377 kB]
Get:12 http://us.archive.ubuntu.com/ubuntu focal/main amd64 python3-itsdangerous all 1.1.0-1 [14.6 kB]
Get:13 http://us.archive.ubuntu.com/ubuntu focal/main amd64 python3-markupsafe amd64 1.1.0-1build2 [13.9 kB]
Get:14 http://us.archive.ubuntu.com/ubuntu focal/main amd64 python3-jinja2 all 2.10.1-2 [95.5 kB]
Get:15 http://us.archive.ubuntu.com/ubuntu focal/main amd64 python3-werkzeug all 0.16.1+dfsg1-2 [183 kB]
Get:16 http://us.archive.ubuntu.com/ubuntu focal/main amd64 python3-flask all 1.1.1-2 [80.3 kB]
Get:17 http://us.archive.ubuntu.com/ubuntu focal/main amd64 python3-openssl all 19.0.0-1build1 [43.3 kB]
Get:18 http://us.archive.ubuntu.com/ubuntu focal/main amd64 python3-pyinotify all 0.9.6-1.2ubuntu1 [24.8 kB]
Get:19 http://us.archive.ubuntu.com/ubuntu focal/main amd64 ssh-import-id all 5.10-0ubuntu1 [10.0 kB]
Get:20 http://us.archive.ubuntu.com/ubuntu focal/universe amd64 traceroute amd64 1:2.1.0-2 [45.4 kB]
...
... [SNIP] ...
...
Setting up python3-openssl (19.0.0-1build1) ...
Setting up ssh-import-id (5.10-0ubuntu1) ...
Attempting to convert /etc/ssh/ssh_import_id
Setting up python3-pyinotify (0.9.6-1.2ubuntu1) ...
Setting up python3-itsdangerous (1.1.0-1) ...
Setting up python3-markupsafe (1.1.0-1build2) ...
Setting up python3-jinja2 (2.10.1-2) ...
Setting up libjs-jquery (3.3.1~dfsg-3) ...
Setting up ncurses-term (6.2-0ubuntu2) ...
Setting up python3-werkzeug (0.16.1+dfsg1-2) ...
Setting up python3-flask (1.1.1-2) ...
Setting up lua-lpeg:amd64 (1.0.2-1) ...
Setting up liblinear4:amd64 (2.3.0+dfsg-3build1) ...
Setting up nmap-common (7.80+dfsg1-2build1) ...
Setting up liblua5.3-0:amd64 (5.3.3-1.1ubuntu2) ...
Setting up nmap (7.80+dfsg1-2build1) ...
Processing triggers for systemd (245.4-4ubuntu3.3) ...
Processing triggers for ufw (0.36-6) ...
Processing triggers for man-db (2.9.1-1) ...
Processing triggers for libc-bin (2.31-0ubuntu9.1) ...
By default, Linux does *NOT* forward any packets in the network. In order for the 3 virtual machines to reach each other, we need to enable network packet forwarding as well as add network routes.
In the Terminal for vm-1, execute the following command:
$ ip addr
The following would be a typical output:
1: lo: <LOOPBACK,UP,LOWER_UP> mtu 65536 qdisc noqueue state UNKNOWN group default qlen 1000
    link/loopback 00:00:00:00:00:00 brd 00:00:00:00:00:00
    inet 127.0.0.1/8 scope host lo
        valid_lft forever preferred_lft forever
    inet6 ::1/128 scope host
        valid_lft forever preferred_lft forever
2: enp0s3: <BROADCAST,MULTICAST,UP,LOWER_UP> mtu 1500 qdisc fq_codel state UP group default qlen 1000
    link/ether 11:11:11:11:11:11 brd ff:ff:ff:ff:ff:ff
    inet 10.0.2.15/24 brd 10.0.2.255 scope global dynamic noprefixroute enp0s3
        valid_lft 548sec preferred_lft 548sec
    inet6 fe80::5a1:8e6f:8f37:6d3a/64 scope link noprefixroute
        valid_lft forever preferred_lft forever
From the Output.2 above, we see the IP address of vm-1 is 10.0.2.15.
Similarly, in the Terminal for vm-2, execute the following command:
$ ip addr
The following would be a typical output:
1: lo: <LOOPBACK,UP,LOWER_UP> mtu 65536 qdisc noqueue state UNKNOWN group default qlen 1000
    link/loopback 00:00:00:00:00:00 brd 00:00:00:00:00:00
    inet 127.0.0.1/8 scope host lo
        valid_lft forever preferred_lft forever
    inet6 ::1/128 scope host
        valid_lft forever preferred_lft forever
2: enp0s3: <BROADCAST,MULTICAST,UP,LOWER_UP> mtu 1500 qdisc fq_codel state UP group default qlen 1000
    link/ether 22:22:22:22:22:22 brd ff:ff:ff:ff:ff:ff
    inet 172.20.1.6/24 brd 172.20.1.255 scope global dynamic noprefixroute enp0s3
        valid_lft 505sec preferred_lft 505sec
    inet6 fe80::c5bd:dd71:57f6:2d03/64 scope link noprefixroute
        valid_lft forever preferred_lft forever
From the Output.3 above, we see the IP address of vm-2 is 172.20.1.6.
Finally, in the Terminal for vm-3, execute the following command:
$ ip addr
The following would be a typical output:
1: lo: <LOOPBACK,UP,LOWER_UP> mtu 65536 qdisc noqueue state UNKNOWN group default qlen 1000
    link/loopback 00:00:00:00:00:00 brd 00:00:00:00:00:00
    inet 127.0.0.1/8 scope host lo
        valid_lft forever preferred_lft forever
    inet6 ::1/128 scope host
        valid_lft forever preferred_lft forever
2: enp0s3: <BROADCAST,MULTICAST,UP,LOWER_UP> mtu 1500 qdisc fq_codel state UP group default qlen 1000
    link/ether 33:33:33:33:33:33 brd ff:ff:ff:ff:ff:ff
    inet 10.0.2.4/24 brd 10.0.2.255 scope global dynamic noprefixroute enp0s3
        valid_lft 459sec preferred_lft 459sec
    inet6 fe80::f46c:140d:630d:82d4/64 scope link noprefixroute
        valid_lft forever preferred_lft forever
3: enp0s8: <BROADCAST,MULTICAST,UP,LOWER_UP> mtu 1500 qdisc fq_codel state UP group default qlen 1000
    link/ether 44:44:44:44:44:44 brd ff:ff:ff:ff:ff:ff
    inet 172.20.1.5/24 brd 172.20.1.255 scope global dynamic noprefixroute enp0s8
        valid_lft 459sec preferred_lft 459sec
    inet6 fe80::f0c9:1f25:2962:c783/64 scope link noprefixroute
        valid_lft forever preferred_lft forever
From the Output.4 above, we see vm-3 has two IP addresses - one is 10.0.2.4 and the other is 172.20.1.5.
Setup vm-1
To trace the network route of a packet from vm-1 to vm-2, execute the following command:
$ traceroute -m 3 172.20.1.6
The following would be a typical output:
traceroute to 172.20.1.6 (172.20.1.6), 5 hops max, 60 byte packets
  1  _gateway (10.0.2.1)  0.255 ms  0.182 ms  0.162 ms
  2  * * *
  3  * * *
From the Output.5 above, we see vm-2 is NOT reachable.
To check if IP forwarding is enabled, execute the following command:
$ cat /proc/sys/net/ipv4/ip_forward
The following would be a typical output:
0
From the Output.6 above, we see IP forwarding is disabled (value of 0) on vm-1.
To enable IP forwarding on vm-1, execute the following command:
$ sudo bash -c 'echo 1 > /proc/sys/net/ipv4/ip_forward'
To check the IP routes on vm-1, execute the following command:
$ ip route show
The following would be a typical output:
default via 10.0.2.1 dev enp0s3 proto dhcp metric 100
10.0.2.0/24 dev enp0s3 proto kernel scope link src 10.0.2.15 metric 100
169.254.0.0/16 dev enp0s3 scope link metric 1000
Given only vm-3 can communicate with vm-2, we need to add a route to vm-2 via vm-3 as the gateway.
To add an IP route on vm-1, execute the following command:
$ sudo ip route add 172.20.1.0/24 via 10.0.2.4 dev enp0s3
Again, to check the IP routes on vm-1, execute the following command:
$ ip route show
The following would be a typical output:
default via 10.0.2.1 dev enp0s3 proto dhcp metric 100
10.0.2.0/24 dev enp0s3 proto kernel scope link src 10.0.2.15 metric 100
169.254.0.0/16 dev enp0s3 scope link metric 1000
172.20.1.0/24 via 10.0.2.4 dev enp0s3
Setup vm-2
We will only indicate the steps to enable IP forwarding and adding a route on vm-2.
To enable IP forwarding on vm-2, execute the following command:
$ sudo bash -c 'echo 1 > /proc/sys/net/ipv4/ip_forward'
Given only vm-3 can communicate with vm-1, we need to add a route to vm-1 via vm-3 as the gateway.
To add an IP route on vm-2, execute the following command:
$ sudo ip route add 10.0.2.0/24 via 172.20.1.5 dev enp0s3
Again, to check the IP routes on vm-2, execute the following command:
$ ip route show
The following would be a typical output:
default via 172.20.1.1 dev enp0s3 proto dhcp metric 100
10.0.2.0/24 via 172.20.1.5 dev enp0s3
169.254.0.0/16 dev enp0s3 scope link metric 1000
172.20.1.0/24 dev enp0s3 proto kernel scope link src 172.20.1.6 metric 100
Setup vm-3
We will only indicate the step to enable IP forwarding on vm-3.
To enable IP forwarding on vm-3, execute the following command:
$ sudo bash -c 'echo 1 > /proc/sys/net/ipv4/ip_forward'
At this stage, the 3 virtual machines should be able to reach each other via vm-3 acting as a gateway.
Hands-on iptables
In the Terminal for vm-1, execute the following command:
$ traceroute -m 3 172.20.1.6
The following would be a typical output:
traceroute to 172.20.1.6 (172.20.1.6), 3 hops max, 60 byte packets
  1  10.0.2.4 (10.0.2.4)  0.464 ms  0.402 ms  0.383 ms
  2  172.20.1.6 (172.20.1.6)  0.654 ms  0.631 ms  0.755 ms
Similarly, in the Terminal for vm-2, execute the following command:
$ traceroute -m 3 10.0.2.15
The following would be a typical output:
traceroute to 10.0.2.15 (10.0.2.15), 3 hops max, 60 byte packets
  1  172.20.1.5 (172.20.1.5)  0.446 ms  0.385 ms  0.365 ms
  2  10.0.2.15 (10.0.2.15)  0.709 ms  0.636 ms  0.615 ms
PERFECT !!! Our setup works as expected.
Given vm-3 is the gateway, we will make it the iptables firewall and enforce the security policies there.
iptables needs elevated access to work - we will need to use sudo
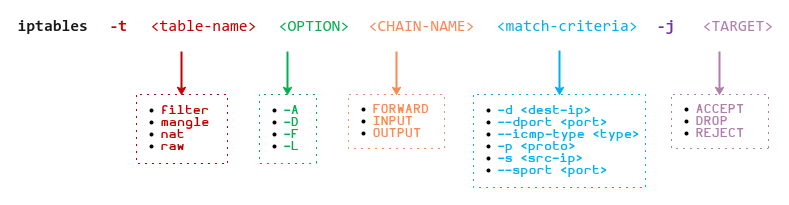
The following illustration shows the general format of the iptables command:
To list all the firewall rules in the filter table, execute the following command in the Terminal for vm-3:
$ sudo iptables -t filter -L
The following would be a typical output:
Chain INPUT (policy ACCEPT)
target     prot opt source               destination

Chain FORWARD (policy ACCEPT)
target     prot opt source               destination

Chain OUTPUT (policy ACCEPT)
target     prot opt source               destination
As indicated earlier, the filter table is the default. Executing the following command will produce the same results as in Output.12 above:
$ sudo iptables -L
Copy the following Python based web application to vm-2 in a file named Web.py:
To start the Python web application on vm-2 on the IP address 172.20.1.6 and port 8080, execute the following command in the Terminal for vm-2:
$ python3 Web.py 172.20.1.6 8080
The following would be a typical output:
* Serving Flask app "Web" (lazy loading)
* Environment: production
  WARNING: This is a development server. Do not use it in a production deployment.
  Use a production WSGI server instead.
* Debug mode: off
* Running on http://172.20.1.6:8080/ (Press CTRL+C to quit)
To check if vm-1 can access the web application running on vm-2, execute the following command:
$ nmap -p 8080 172.20.1.6
The following would be the typical output:
Starting Nmap 7.80 ( https://nmap.org ) at 2020-11-22 19:55 EST
Nmap scan report for 172.20.1.6
Host is up (0.00072s latency).

PORT     STATE SERVICE
8080/tcp open  http-proxy

Nmap done: 1 IP address (1 host up) scanned in 0.12 seconds
To block access to the traffic from vm-1 to the web application running on vm-2, execute the following command in the Terminal for vm-3:
$ sudo iptables -t filter -A FORWARD -p tcp --dport 8080 -j DROP
Given that the web application is a TCP process (-p tcp) running on vm-2 and vm-3 forwards the request to vm-2 on port 8080 (--dport 8080), we need to append (-A) the rule to the FORWARD chain of the filter table (-t filter -A FORWARD).
To list all the firewall rules in the filter table, execute the following command in the Terminal for vm-3:
$ sudo iptables -t filter -L
The following would be a typical output:
Chain INPUT (policy ACCEPT)
target     prot opt source               destination

Chain FORWARD (policy ACCEPT)
target     prot opt source               destination
DROP       tcp  --  anywhere             anywhere             tcp dpt:http-alt

Chain OUTPUT (policy ACCEPT)
target     prot opt source               destination
By default, the list option -L will display host names, network names, or services.
To list all the firewall rules in the filter table using numeric IP address(es) and port number(s), execute the following command in the Terminal for vm-3 by adding the -n option:
$ sudo iptables -t filter -n -L
The following would be a typical output:
Chain INPUT (policy ACCEPT)
target     prot opt source               destination

Chain FORWARD (policy ACCEPT)
target     prot opt source               destination
DROP       tcp  --  0.0.0.0/0            0.0.0.0/0            tcp dpt:8080

Chain OUTPUT (policy ACCEPT)
target     prot opt source               destination
Once again, to check if vm-1 can access the web application running on vm-2 , execute the following command:
$ nmap -p 8080 172.20.1.6
The following would be the typical output:
Starting Nmap 7.80 ( https://nmap.org ) at 2020-11-22 20:22 EST
Nmap scan report for 172.20.1.6
Host is up (0.00066s latency).

PORT     STATE    SERVICE
8080/tcp filtered http-proxy

Nmap done: 1 IP address (1 host up) scanned in 0.31 seconds
BINGO !!! The request from vm-1 to vm-2 on port 8080 is BLOCKED (filtered).
Executing the above command from vm-3 to vm-2 on port 8080 will be ALLOWED and the result will be similar to the one in Output.14 above.
To block access to all ssh (port 22) traffic to vm-3, execute the following command in the Terminal for vm-3:
$ sudo iptables -t filter -A INPUT -p tcp --dport 22 -j DROP
Given that ssh is a TCP process (-p tcp) running on port 22 (--dport 22), we need to append (-A) the rule to the INPUT chain of the filter table (-t filter -A INPUT).
Execute the following command in the Terminal of vm-3 to list all the firewall rules in the filter table:
$ sudo iptables -t filter -n -L
The following would be a typical output:
Chain INPUT (policy ACCEPT)
target     prot opt source               destination
DROP       tcp  --  0.0.0.0/0            0.0.0.0/0            tcp dpt:22

Chain FORWARD (policy ACCEPT)
target     prot opt source               destination
DROP       tcp  --  0.0.0.0/0            0.0.0.0/0            tcp dpt:8080

Chain OUTPUT (policy ACCEPT)
target     prot opt source               destination
Execute the following command in the Terminal of vm-1:
$ nmap -p 22 10.0.2.4
The following would be the typical output:
Starting Nmap 7.80 ( https://nmap.org ) at 2020-11-22 21:02 EST
Nmap scan report for 10.0.2.4
Host is up (0.00041s latency).

PORT   STATE    SERVICE
22/tcp filtered ssh

Nmap done: 1 IP address (1 host up) scanned in 0.31 seconds
Similarly, one can check from vm-2 as well and will get similar results as in Output.19 above.
To block access to all ping (ICMP) traffic to vm-3, execute the following command in the Terminal for vm-3:
$ sudo iptables -t filter -A INPUT -p icmp -j DROP
Given that ping is a ICMP process (-p icmp), we need to append (-A) the rule to the INPUT chain of the filter table (-t filter -A INPUT).
Execute the following command in the Terminal of vm-3 to list all the firewall rules in the filter table:
$ sudo iptables -t filter -n -L
The following would be a typical output:
Chain INPUT (policy ACCEPT)
target     prot opt source               destination
DROP       tcp  --  0.0.0.0/0            0.0.0.0/0            tcp dpt:22
DROP       icmp --  0.0.0.0/0            0.0.0.0/0

Chain FORWARD (policy ACCEPT)
target     prot opt source               destination
DROP       tcp  --  0.0.0.0/0            0.0.0.0/0            tcp dpt:8080

Chain OUTPUT (policy ACCEPT)
target     prot opt source               destination
Execute the following command in the Terminal of vm-1:
$ ping -c 3 10.0.2.4
The following would be the typical output:
PING 10.0.2.4 (10.0.2.4) 56(84) bytes of data.

--- 10.0.2.4 ping statistics ---
3 packets transmitted, 0 received, 100% packet loss, time 2029ms
Similarly, one can check from vm-2 as well and will get similar results as in Output.21 above.
One should be able to ping from vm-3 to the other 2 virtual machines. To verify that, execute the following command in the Terminal of vm-3:
$ ping -c 3 10.0.2.15
The following would be the typical output:
PING 10.0.2.15 (10.0.2.15) 56(84) bytes of data.

--- 10.0.2.15 ping statistics ---
3 packets transmitted, 0 received, 100% packet loss, time 2028ms
WHAT ??? Why is ping from vm-3 blocked ???.
The reason for this is because we have block all types of ICMP requests to vm-3. When we issue the ping from vm-3, it sends out an icmp request packet to vm-1. In response, vm-1 sends an icmp reply packet which is blocked by vm-3.
To fix this, we need to remove (-D) the existing ICMP rule from vm-3 and be more specific. To remove the existing rule, execute the following command in the Terminal for vm-3:
$ sudo iptables -t filter -D INPUT -p icmp -j DROP
To only block ICMP request traffic to vm-3, execute the following command in the Terminal for vm-3:
$ sudo iptables -t filter -A INPUT -p icmp --icmp-type echo-request -j DROP
Execute the following command in the Terminal of vm-3 to list all the firewall rules in the filter table:
$ sudo iptables -t filter -n -L
The following would be a typical output:
Chain INPUT (policy ACCEPT)
target     prot opt source               destination
DROP       tcp  --  0.0.0.0/0            0.0.0.0/0            tcp dpt:22
DROP       icmp --  0.0.0.0/0            0.0.0.0/0            icmptype 8

Chain FORWARD (policy ACCEPT)
target     prot opt source               destination
DROP       tcp  --  0.0.0.0/0            0.0.0.0/0            tcp dpt:8080

Chain OUTPUT (policy ACCEPT)
target     prot opt source               destination
Now vm-3 will be anle to ping the other 2 virtual machines, but not the other way around.
To remove all the firewall rules from vm-3, execute the following command in the Terminal for vm-3:
$ sudo iptables -t filter -F
Execute the following command in the Terminal of vm-3 to list all the firewall rules in the filter table:
$ sudo iptables -t filter -n -L
The result should be similar to the one in Output.12 above.
From the Output.12 above, we see the default policy is to accept all the network traffic (policy ACCEPT).
To reverse the policy to reject all the network traffic, execute the following commands in the Terminal for vm-3:
$ sudo iptables -t filter -P INPUT DROP
$ sudo iptables -t filter -P FORWARD DROP
$ sudo iptables -t filter -P OUTPUT DROP
Execute the following command in the Terminal of vm-3 to list all the firewall rules in the filter table:
$ sudo iptables -t filter -n -L
The following would be a typical output:
Chain INPUT (policy DROP)
target     prot opt source               destination

Chain FORWARD (policy DROP)
target     prot opt source               destination

Chain OUTPUT (policy DROP)
target     prot opt source               destination
From the Output.24 above, we see the default policy is now to reject all the network traffic (policy DROP).
To verify the default policy, execute the following command in the Terminal of vm-1:
$ ping -c 3 10.0.2.4
The result should be similar to the one in Output.21 above. Similarly, one can check from vm-2 or vm-3 and one will get similar results as in Output.21 above.
To ONLY allow vm-3 to be able to ping the other 2 virtual machines, execute the following commands in the Terminal for vm-3:
$ sudo iptables -t filter -A OUTPUT -p icmp --icmp-type echo-request -j ACCEPT
$ sudo iptables -t filter -A INPUT -p icmp --icmp-type echo-reply -j ACCEPT
We want to allow ICMP requests going OUT from vm-3 and also allow ICMP replies coming IN to vm-3.
Execute the following command in the Terminal of vm-3 to list all the firewall rules in the filter table:
$ sudo iptables -t filter -n -L
The following would be a typical output:
Chain INPUT (policy DROP)
target     prot opt source               destination
ACCEPT     icmp --  0.0.0.0/0            0.0.0.0/0            icmptype 0

Chain FORWARD (policy DROP)
target     prot opt source               destination

Chain OUTPUT (policy DROP)
target     prot opt source               destination
ACCEPT     icmp --  0.0.0.0/0            0.0.0.0/0            icmptype 8
To verify the ICMP rules, execute the following command in the Terminal of vm-3:
$ ping -c 3 10.0.2.15
The following would be the typical output:
PING 10.0.2.15 (10.0.2.15) 56(84) bytes of data.
64 bytes from 10.0.2.15: icmp_seq=1 ttl=64 time=0.407 ms
64 bytes from 10.0.2.15: icmp_seq=2 ttl=64 time=0.385 ms
64 bytes from 10.0.2.15: icmp_seq=3 ttl=64 time=0.361 ms

--- 10.0.2.15 ping statistics ---
3 packets transmitted, 3 received, 0% packet loss, time 2052ms
rtt min/avg/max/mdev = 0.361/0.384/0.407/0.018 ms
WALLA !!! The firewall rules behave as expected.
To ONLY allow vm-1 to be able to access the web application that is hosted on vm-2 (on port 8080), execute the following commands in the Terminal for vm-3:
$ sudo iptables -t filter -A FORWARD -p tcp -s 10.0.2.15 -d 172.20.1.6 --dport 8080 -j ACCEPT
$ sudo iptables -t filter -A FORWARD -p tcp -s 172.20.1.6 -d 10.0.2.15 --sport 8080 -j ACCEPT
We want to allow HTTP requests forwarded from vm-1 to vm-2 and also allow HTTP responses forwarded from vm-2 to vm-1.
Execute the following command in the Terminal of vm-3 to list all the firewall rules in the filter table:
$ sudo iptables -t filter -n -L
The following would be a typical output:
Chain INPUT (policy DROP)
target     prot opt source               destination
ACCEPT     icmp --  0.0.0.0/0            0.0.0.0/0            icmptype 0

Chain FORWARD (policy DROP)
target     prot opt source               destination
ACCEPT     tcp  --  10.0.2.15            172.20.1.6           tcp dpt:8080
ACCEPT     tcp  --  172.20.1.6           10.0.2.15            tcp spt:8080

Chain OUTPUT (policy DROP)
target     prot opt source               destination
ACCEPT     icmp --  0.0.0.0/0            0.0.0.0/0            icmptype 8
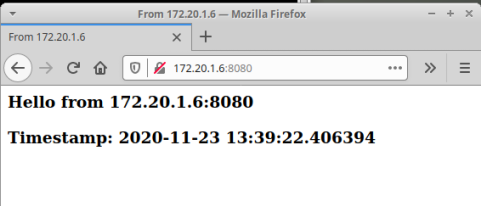
To verify the HTTP rules, launch a browser on vm-1 and open the url to http://172.20.1.6:8080.
The following diagram illustrates the screenshot of the browser:
Trying to access the url http://172.20.1.6:8080 from a browser on vm-3 will NOT work.
TA DA !!! The firewall rules works as expected.
References