Figure.1
| PolarSPARC |
Hands-on with Nmap
| Bhaskar S | 09/25/2021 |
Overview
Nmap (or Network Mapper) is a free and open-source network scanner that can be used to discover devices and services on the network. Network administrators, system adminstrators, and security professionals use nmap to create an inventory of devices on the network, services exposed by these devices, the operating system (along with their versions) that these devices are running, etc.
To level set on the networking basics, the following are some of terms used in this article:
| Term | Description |
|---|---|
| Ethernet | a family of computer networking protocols used for communication between nodes in a network |
| NIC | Network Interface Controller (or Card) is a physical device that connects a system to the network |
| MAC Address | Media Access Control address is a globally unique address assigned to a NIC and used by the Ethernet protocol |
| IP | stands for Internet Protocol and is the standard of internet communication |
| IP Address | a logical numerical label assigned to each system on the IP network |
| IPv4 | a 32-bit IP address that is often represented using the form A.B.C.D, where A, B, C, and D can have a value from 0 through 255. Example: 192.168.1.56 |
| TCP | stands for Transmission Control Protocol and is part of the IP protocol suite that is a connection-oriented, meaning, a connection channel must be established between two systems before data can be exchanged |
| UDP | stands for User Datagram Protocol and is part of the IP protocol suite that is a connectionless, meaning, data can be exchanged between two systems without establishing any connection channel |
| TCP 3-way Handshake | A client initiating a connection to a server sends a SYN packet to the server. The server responds with a SYN-ACK packet back to the client. Finally, the client responds with a ACK packet back to the server establishing a connection |
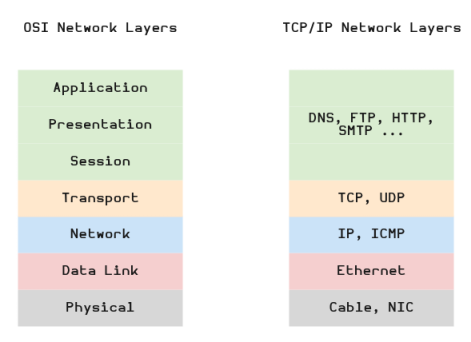
The following diagram illustrates the OSI Network Model and the simplified TCP/IP Network Model:
In the Figure.1 above, the diagram on the left is the general OSI Network Model, while the diagram on the right is the simplified TCP/IP Network Model. The following are the descriptions of the layers from the simplified TCP/IP Network Model:
The Physical layer is associated with the physical network cabling and hardware
The Data Link layer is responsible for the transmission of the data over the underlying link protocol such as Ethernet using MAC addresses
The Network layer is responsible for dealing with the IP addressing, ICMP messages, and routing of data in the network
The Transport layer provides support for TCP and UDP protocols that are responsible for providing services for system to system communication as well as services for congestion control, flow control, and multiplexing
Proceed with *EXTREME CAUTION*. There are *LEGAL* ramafications with network scanning of organizations without prior permission. In order to learn nmap, one can scan their own private network. Alternatively, the Nmap organization provides a free server scanme.nmap.org for testing purposes.
The following diagram illustrates the Nmap Phases involved in the network scanning:
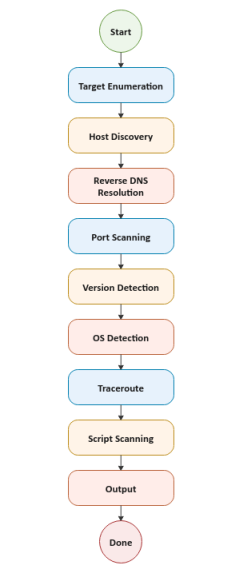
The following table lists and describes the multiple phases of Nmap:
| Phase | Description |
|---|---|
| Target Enumeration | In this very important mandatory phase in which Nmap enumerates the host targets provided by the user, which could be a combination of host domain names, ip addresses (including ranges), cidr network ranges, etc. The end result of this phase is a list of host targets to scan |
| Host Discovery | In this phase, Nmap discovers host targets that are online via various scanning techniques such has ping scan, SYN probe, ICMP probe, etc |
| Reverse DNS Resolution | In this phase, Nmap uses dns to resolve the ip address of the identified host target to a host name. This phase can be skipped if the -n option is specified |
| Port Scanning | In this very important phase, Nmap sends probes to the identified host targets to identify port thats are open, closed, or filtered. This phase can be skipped if the -sn option is specified |
| Version Detection | In this phase, Nmap will try to determine the software for the service that is running on each of the open ports. To include the software version one can specify the -sV option |
| OS Detection | In this phase, Nmap will try to determine the operating system if the -O option has been specified |
| Traceroute | In this phase, Nmap will trace and record the route through all the intermediaries to the host target if the --traceroute option is specified |
| Script Scanning | In this phase, Nmap uses a collection of pre-defined special-purpose scripts to gain more information about the host targets |
| Output | In this final phase, Nmap will display all the information it has collected for the host targets |
Installation and Setup
The setup will be on a Ubuntu 20.04 LTS based Linux desktop (the host). For the demonstrations, we will also create 3 virtual machines running on the VirtualBox hypervisor.
Open a terminal window on the host machine and execute the following command:
$ sudo apt install nmap -y
The following would be a typical output:
Reading package lists... Done
Building dependency tree
Reading state information... Done
The following additional packages will be installed:
  liblinear4 liblua5.3-0 lua-lpeg nmap-common
Suggested packages:
  liblinear-tools liblinear-dev ncat ndiff zenmap
The following NEW packages will be installed:
  liblinear4 liblua5.3-0 lua-lpeg nmap nmap-common
0 upgraded, 5 newly installed, 0 to remove and 0 not upgraded.
Need to get 5,528 kB of archives.
After this operation, 26.3 MB of additional disk space will be used.
Get:1 http://archive.ubuntu.com/ubuntu focal/universe amd64 liblinear4 amd64 2.3.0+dfsg-3build1 [41.7 kB]
Get:2 http://archive.ubuntu.com/ubuntu focal/main amd64 liblua5.3-0 amd64 5.3.3-1.1ubuntu2 [116 kB]
Get:3 http://archive.ubuntu.com/ubuntu focal/universe amd64 lua-lpeg amd64 1.0.2-1 [31.4 kB]
Get:4 http://archive.ubuntu.com/ubuntu focal/universe amd64 nmap-common all 7.80+dfsg1-2build1 [3,676 kB]
Get:5 http://archive.ubuntu.com/ubuntu focal/universe amd64 nmap amd64 7.80+dfsg1-2build1 [1,662 kB]
Fetched 5,528 kB in 1s (5,034 kB/s)
Selecting previously unselected package liblinear4:amd64.
(Reading database ... 474534 files and directories currently installed.)
Preparing to unpack .../liblinear4_2.3.0+dfsg-3build1_amd64.deb ...
Unpacking liblinear4:amd64 (2.3.0+dfsg-3build1) ...
Selecting previously unselected package liblua5.3-0:amd64.
Preparing to unpack .../liblua5.3-0_5.3.3-1.1ubuntu2_amd64.deb ...
Unpacking liblua5.3-0:amd64 (5.3.3-1.1ubuntu2) ...
Selecting previously unselected package lua-lpeg:amd64.
Preparing to unpack .../lua-lpeg_1.0.2-1_amd64.deb ...
Unpacking lua-lpeg:amd64 (1.0.2-1) ...
Selecting previously unselected package nmap-common.
Preparing to unpack .../nmap-common_7.80+dfsg1-2build1_all.deb ...
Unpacking nmap-common (7.80+dfsg1-2build1) ...
Selecting previously unselected package nmap.
Preparing to unpack .../nmap_7.80+dfsg1-2build1_amd64.deb ...
Unpacking nmap (7.80+dfsg1-2build1) ...
Setting up lua-lpeg:amd64 (1.0.2-1) ...
Setting up liblinear4:amd64 (2.3.0+dfsg-3build1) ...
Setting up nmap-common (7.80+dfsg1-2build1) ...
Setting up liblua5.3-0:amd64 (5.3.3-1.1ubuntu2) ...
Setting up nmap (7.80+dfsg1-2build1) ...
Processing triggers for man-db (2.9.1-1) ...
Processing triggers for libc-bin (2.31-0ubuntu9.3) ...
The following diagram illustrates the virtual machines environment setup:
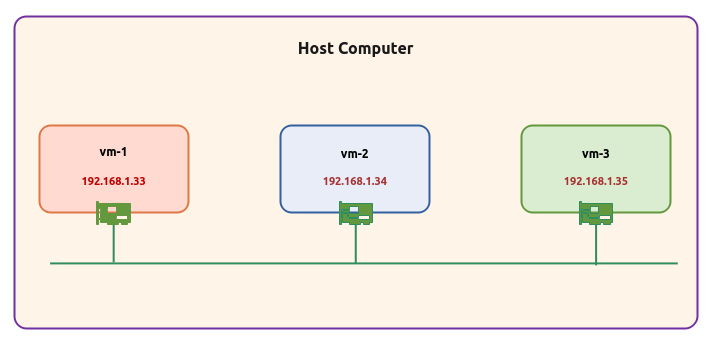
The following are some of the highlights of the 3 virtual machines:
vm-1 :: 1 vCPU, 2GB RAM, 20GB storage, Ubuntu 20.04 OS, and uses a single virtual network interface with Bridge networking (192.168.1.33)
vm-2 :: 1 vCPU, 2GB RAM, 20GB storage, Ubuntu 20.04 OS, and uses a single virtual network interface with Bridge networking (192.168.1.34)
vm-3 :: 1 vCPU, 2GB RAM, 20GB storage, Ubuntu 20.04 OS, and uses a single virtual network interface with Bridge networking (192.168.1.35)
We will install Python Flask on vm-1. Open a terminal window on the vm-1 machine and execute the following command:
$ sudo apt install python3-flask -y
The following would be a typical output:
Reading package lists... Done
Building dependency tree
Reading state information... Done
The following packages were automatically installed and are no longer required:
  gnome-software-common libappstream-glib8 libgspell-1-2 libgspell-1-common libllvm10 libllvm11 linux-headers-5.4.0-58
  linux-headers-5.4.0-58-generic linux-image-5.4.0-58-generic linux-modules-5.4.0-58-generic linux-modules-extra-5.4.0-58-generic
Use 'sudo apt autoremove' to remove them.
The following additional packages will be installed:
  javascript-common libjs-jquery python3-itsdangerous python3-jinja2 python3-markupsafe python3-openssl python3-pyinotify
  python3-werkzeug
Suggested packages:
  apache2 | lighttpd | httpd python-flask-doc python-jinja2-doc python-openssl-doc python3-openssl-dbg python-pyinotify-doc
  ipython3 python-werkzeug-doc python3-lxml python3-termcolor python3-watchdog
The following NEW packages will be installed:
  javascript-common libjs-jquery python3-flask python3-itsdangerous python3-jinja2 python3-markupsafe python3-openssl
  python3-pyinotify python3-werkzeug
0 upgraded, 9 newly installed, 0 to remove and 0 not upgraded.
Need to get 790 kB of archives.
After this operation, 3,086 kB of additional disk space will be used.
Get:1 http://us.archive.ubuntu.com/ubuntu focal/main amd64 javascript-common all 11 [6,066 B]
Get:2 http://us.archive.ubuntu.com/ubuntu focal/main amd64 libjs-jquery all 3.3.1~dfsg-3 [329 kB]
Get:3 http://us.archive.ubuntu.com/ubuntu focal/main amd64 python3-itsdangerous all 1.1.0-1 [14.6 kB]
Get:4 http://us.archive.ubuntu.com/ubuntu focal/main amd64 python3-markupsafe amd64 1.1.0-1build2 [13.9 kB]
Get:5 http://us.archive.ubuntu.com/ubuntu focal/main amd64 python3-jinja2 all 2.10.1-2 [95.5 kB]
Get:6 http://us.archive.ubuntu.com/ubuntu focal/main amd64 python3-werkzeug all 0.16.1+dfsg1-2 [183 kB]
Get:7 http://us.archive.ubuntu.com/ubuntu focal/main amd64 python3-flask all 1.1.1-2 [80.3 kB]
Get:8 http://us.archive.ubuntu.com/ubuntu focal/main amd64 python3-openssl all 19.0.0-1build1 [43.3 kB]
Get:9 http://us.archive.ubuntu.com/ubuntu focal/main amd64 python3-pyinotify all 0.9.6-1.2ubuntu1 [24.8 kB]
Fetched 790 kB in 0s (3,313 kB/s)
Selecting previously unselected package javascript-common.
(Reading database ... 229451 files and directories currently installed.)
Preparing to unpack .../0-javascript-common_11_all.deb ...
Unpacking javascript-common (11) ...
Selecting previously unselected package libjs-jquery.
Preparing to unpack .../1-libjs-jquery_3.3.1~dfsg-3_all.deb ...
Unpacking libjs-jquery (3.3.1~dfsg-3) ...
Selecting previously unselected package python3-itsdangerous.
Preparing to unpack .../2-python3-itsdangerous_1.1.0-1_all.deb ...
Unpacking python3-itsdangerous (1.1.0-1) ...
Selecting previously unselected package python3-markupsafe.
Preparing to unpack .../3-python3-markupsafe_1.1.0-1build2_amd64.deb ...
Unpacking python3-markupsafe (1.1.0-1build2) ...
Selecting previously unselected package python3-jinja2.
Preparing to unpack .../4-python3-jinja2_2.10.1-2_all.deb ...
Unpacking python3-jinja2 (2.10.1-2) ...
Selecting previously unselected package python3-werkzeug.
Preparing to unpack .../5-python3-werkzeug_0.16.1+dfsg1-2_all.deb ...
Unpacking python3-werkzeug (0.16.1+dfsg1-2) ...
Selecting previously unselected package python3-flask.
Preparing to unpack .../6-python3-flask_1.1.1-2_all.deb ...
Unpacking python3-flask (1.1.1-2) ...
Selecting previously unselected package python3-openssl.
Preparing to unpack .../7-python3-openssl_19.0.0-1build1_all.deb ...
Unpacking python3-openssl (19.0.0-1build1) ...
Selecting previously unselected package python3-pyinotify.
Preparing to unpack .../8-python3-pyinotify_0.9.6-1.2ubuntu1_all.deb ...
Unpacking python3-pyinotify (0.9.6-1.2ubuntu1) ...
Setting up javascript-common (11) ...
Setting up python3-openssl (19.0.0-1build1) ...
Setting up python3-pyinotify (0.9.6-1.2ubuntu1) ...
Setting up python3-itsdangerous (1.1.0-1) ...
Setting up python3-markupsafe (1.1.0-1build2) ...
Setting up python3-jinja2 (2.10.1-2) ...
Setting up libjs-jquery (3.3.1~dfsg-3) ...
Setting up python3-werkzeug (0.16.1+dfsg1-2) ...
Setting up python3-flask (1.1.1-2) ...
Create a directory by executing the following command in the terminal window on the vm-1:
$ mkdir -p $HOME/Projects/Flask
Create the following Python script called app.py in the directory just created directory $HOME/Projects/Flask:
from flask import Flask

app = Flask(__name__)

@app.route('/')
def index():
    return 'Welcome to Nmap !!!'

if __name__ == '__main__':
    app.run(host='192.168.1.33', port=8080)
To start the Python Flask service, execute the following command(s) in the terminal window on the vm-1:
$ cd $HOME/Projects/Flask
$ python3 app.py
The following would be a typical output:
 * Serving Flask app "app" (lazy loading)
 * Environment: production
   WARNING: This is a development server. Do not use it in a production deployment.
   Use a production WSGI server instead.
 * Debug mode: off
 * Running on http://192.168.1.33:8080/ (Press CTRL+C to quit)
We will install SSH server on vm-2. Open a terminal window on the vm-2 machine and execute the following command:
$ sudo apt install openssh-server -y
The following would be a typical output:
Reading package lists... Done
Building dependency tree
Reading state information... Done
The following packages were automatically installed and are no longer required:
  gnome-software-common libappstream-glib8 libgspell-1-2 libgspell-1-common libllvm10 libllvm11 linux-headers-5.4.0-58
  linux-headers-5.4.0-58-generic linux-image-5.4.0-58-generic linux-modules-5.4.0-58-generic linux-modules-extra-5.4.0-58-generic
Use 'sudo apt autoremove' to remove them.
The following additional packages will be installed:
  ncurses-term openssh-sftp-server ssh-import-id
Suggested packages:
  molly-guard monkeysphere ssh-askpass
The following NEW packages will be installed:
  ncurses-term openssh-server openssh-sftp-server ssh-import-id
0 upgraded, 4 newly installed, 0 to remove and 0 not upgraded.
Need to get 688 kB of archives.
After this operation, 6,010 kB of additional disk space will be used.
Get:1 http://us.archive.ubuntu.com/ubuntu focal/main amd64 ncurses-term all 6.2-0ubuntu2 [249 kB]
Get:2 http://us.archive.ubuntu.com/ubuntu focal-updates/main amd64 openssh-sftp-server amd64 1:8.2p1-4ubuntu0.3 [51.5 kB]
Get:3 http://us.archive.ubuntu.com/ubuntu focal-updates/main amd64 openssh-server amd64 1:8.2p1-4ubuntu0.3 [377 kB]
Get:4 http://us.archive.ubuntu.com/ubuntu focal/main amd64 ssh-import-id all 5.10-0ubuntu1 [10.0 kB]
Fetched 688 kB in 0s (2,458 kB/s)
Preconfiguring packages ...
Selecting previously unselected package ncurses-term.
(Reading database ... 229451 files and directories currently installed.)
Preparing to unpack .../ncurses-term_6.2-0ubuntu2_all.deb ...
Unpacking ncurses-term (6.2-0ubuntu2) ...
Selecting previously unselected package openssh-sftp-server.
Preparing to unpack .../openssh-sftp-server_1%3a8.2p1-4ubuntu0.3_amd64.deb ...
Unpacking openssh-sftp-server (1:8.2p1-4ubuntu0.3) ...
Selecting previously unselected package openssh-server.
Preparing to unpack .../openssh-server_1%3a8.2p1-4ubuntu0.3_amd64.deb ...
Unpacking openssh-server (1:8.2p1-4ubuntu0.3) ...
Selecting previously unselected package ssh-import-id.
Preparing to unpack .../ssh-import-id_5.10-0ubuntu1_all.deb ...
Unpacking ssh-import-id (5.10-0ubuntu1) ...
Setting up openssh-sftp-server (1:8.2p1-4ubuntu0.3) ...
Setting up openssh-server (1:8.2p1-4ubuntu0.3) ...
Creating config file /etc/ssh/sshd_config with new version
Creating SSH2 RSA key; this may take some time ...
3072 SHA256:zzEadhyqnZk1YGj5DmLjXvqCjMzf2sBaHh0nBe0lcCI root@u-vm-2 (RSA)
Creating SSH2 ECDSA key; this may take some time ...
256 SHA256:gP9ZA4YItMVuSBLrAUayZIB0ZcWvEV04DIHeawRvaS4 root@u-vm-2 (ECDSA)
Creating SSH2 ED25519 key; this may take some time ...
256 SHA256:/tVmodctN8U40cfZrUIOsqOyKGK7ew9956GUkCj979E root@u-vm-2 (ED25519)
Created symlink /etc/systemd/system/sshd.service → /lib/systemd/system/ssh.service.
Created symlink /etc/systemd/system/multi-user.target.wants/ssh.service → /lib/systemd/system/ssh.service.
rescue-ssh.target is a disabled or a static unit, not starting it.
Setting up ssh-import-id (5.10-0ubuntu1) ...
Attempting to convert /etc/ssh/ssh_import_id
Setting up ncurses-term (6.2-0ubuntu2) ...
Processing triggers for systemd (245.4-4ubuntu3.13) ...
Processing triggers for man-db (2.9.1-1) ...
Processing triggers for ufw (0.36-6) ...
Hands-on Nmap
In the terminal of the host, execute the following command to find the host ip address:
$ ip addr
The following would be a typical output:
1: lo: <LOOPBACK,UP,LOWER_UP> mtu 65536 qdisc noqueue state UNKNOWN group default qlen 1000
    link/loopback 00:00:00:00:00:00 brd 00:00:00:00:00:00
    inet 127.0.0.1/8 scope host lo
        valid_lft forever preferred_lft forever
    inet6 ::1/128 scope host
        valid_lft forever preferred_lft forever
2: enp6s0: <BROADCAST,MULTICAST,UP,LOWER_UP> mtu 1500 qdisc fq_codel state UP group default qlen 1000
    link/ether 77:88:cc:55:aa:33 brd ff:ff:ff:ff:ff:ff
    inet 192.168.1.53/24 brd 192.168.1.255 scope global noprefixroute enp6s0
        valid_lft forever preferred_lft forever
    inet6 fefe::3131:9494:c7c7:4141/64 scope link noprefixroute
        valid_lft forever preferred_lft forever
3: docker0: <NO-CARRIER,BROADCAST,MULTICAST,UP> mtu 1500 qdisc noqueue state DOWN group default
    link/ether 02:03:04:05:06:07 brd ff:ff:ff:ff:ff:ff
    inet 172.17.0.1/16 brd 172.17.255.255 scope global docker0
        valid_lft forever preferred_lft forever
From the Output.5 above, we infer the host ip address as 192.168.1.53.
To perform a basic scan of our host machine, execute the following command in the terminal of the host:
$ nmap 192.168.1.53
The following would be a typical output:
Starting Nmap 7.80 ( https://nmap.org ) at 2021-09-19 14:17 EDT
Nmap scan report for polarsparc (192.168.1.53)
Host is up (0.000082s latency).
Not shown: 998 closed ports
PORT    STATE SERVICE
139/tcp open  netbios-ssn
445/tcp open  microsoft-ds

Nmap done: 1 IP address (1 host up) scanned in 0.05 seconds
From Output.6 above, the scan shows the status of ports (open, closed, filtered, etc) that are detected on the specified target (in our case the host machine).
To perform the basic scan on multiple machines (the three VMs in our case), execute the following command in the terminal of the host:
$ nmap 192.168.1.33,34,35
Notice how we have specified the multiple targets - 192.168.1.33,34,35. This is equivalent to specifying the three VMs ip addresses 192.168.1.33, 192.168.1.34, 192.168.1.35.
The following would be a typical output:
Starting Nmap 7.80 ( https://nmap.org ) at 2021-09-19 14:26 EDT
Nmap scan report for 192.168.1.33
Host is up (0.00032s latency).
Not shown: 65534 closed ports
PORT     STATE SERVICE
8080/tcp open  http-proxy

Nmap scan report for 192.168.1.34
Host is up (0.00028s latency).
Not shown: 65534 closed ports
PORT   STATE SERVICE
22/tcp open  ssh

Nmap scan report for 192.168.1.35
Host is up (0.00030s latency).
All 65535 scanned ports on 192.168.1.35 are closed

Nmap done: 3 IP addresses (3 hosts up) scanned in 2.66 seconds
To perform the basic scan on a range of ip addresses, execute the following command in the terminal of the host:
$ nmap 192.168.1.10-100
Notice how we have specified the range of IP addresses - 192.168.1.10-100. This will include all the ip addresses starting from 192.168.1.10 through 192.168.1.100.
The following would be a typical output:
Starting Nmap 7.80 ( https://nmap.org ) at 2021-09-19 14:35 EDT
Nmap scan report for 192.168.1.32
Host is up (0.017s latency).
All 1000 scanned ports on 192.168.1.32 are closed

Nmap scan report for 192.168.1.33
Host is up (0.00011s latency).
Not shown: 999 closed ports
PORT     STATE SERVICE
8080/tcp open  http-proxy

Nmap scan report for 192.168.1.34
Host is up (0.00014s latency).
Not shown: 999 closed ports
PORT   STATE SERVICE
22/tcp open  ssh

Nmap scan report for 192.168.1.35
Host is up (0.00015s latency).
All 1000 scanned ports on 192.168.1.35 are closed

Nmap scan report for 192.168.1.46
Host is up (0.011s latency).
All 1000 scanned ports on 192.168.1.46 are closed

Nmap scan report for polarsparc (192.168.1.53)
Host is up (0.000045s latency).
Not shown: 998 closed ports
PORT    STATE SERVICE
139/tcp open  netbios-ssn
445/tcp open  microsoft-ds

Nmap scan report for 192.168.1.100
Host is up (0.014s latency).
Not shown: 999 closed ports
PORT     STATE SERVICE
8082/tcp open  blackice-alerts

Nmap done: 91 IP addresses (7 hosts up) scanned in 4.10 seconds
To perform a basic scan on a specified domain name, execute the following command in the terminal of the host:
$ nmap scanme.nmap.org
The following would be a typical output:
Starting Nmap 7.80 ( https://nmap.org ) at 2021-09-19 14:47 EDT
Nmap scan report for scanme.nmap.org (45.33.32.156)
Host is up (0.080s latency).
Other addresses for scanme.nmap.org (not scanned): 2600:3c01::f03c:91ff:fe18:bb2f
Not shown: 995 closed ports
PORT      STATE    SERVICE
22/tcp    open     ssh
25/tcp    filtered smtp
80/tcp    open     http
9929/tcp  open     nping-echo
31337/tcp open     Elite

Nmap done: 1 IP address (1 host up) scanned in 2.49 seconds
The following are some of the command-line options used for performing network scans using Nmap:
| Option | Description |
|---|---|
| -sP | to list each of the host(s) from the specified target(s) without performing port scans on the host targets |
| -sn | a light-touch option that list each of the host(s) from the specified target(s) without performing port scans on the host targets. By default, the reverse dns resolution is performed on the hosts to determine their host names |
| -sT | to determine the TCP network services on the host target, which under-the-hood uses the connect() system call |
| -sU | to determine the UDP network services on the host target. This option needs the elevated root (sudo) access |
| -sS | to determine the TCP network services on the host target using the SYN packet |
| -sA | to determine the TCP network services on the host target using the ACK packet. This is primarily to identify which ports are filtered by the firewall |
| -sO | to determine which IP protocols are supported by the host target. This option needs the elevated root (sudo) access |
| -sV | to determine the software used and its version of each of the network services on the host target |
| -O | to determine the operating system and its version running on the host target |
| --traceroute | to determine the route traversed through all the intermediary targets to reach the host target. This option needs the elevated root (sudo) access |
| -p- | to scan all the network ports |
| --top-ports <N> | to scan the top <N> commonly used network ports, where <N> is a number greater than 1 |
| -A | to determine the operating system, the software used for each of the network services plus their version information on the host target. This is equivalent to specifying the options -O -sV |
| --packet-trace | to report exactly what is going under-the-hood with respect to the packets being sent to the host target |
| --reason | to display the reason why a port is marked as open, closed, or filtered |
To perform a simple ping scan (and not perform any port scanning) on a range of ip addresses, execute the following command in the terminal of the host:
$ nmap -sP 192.168.1.30-50
The following would be a typical output:
Starting Nmap 7.80 ( https://nmap.org ) at 2021-09-19 14:53 EDT
Nmap scan report for 192.168.1.32
Host is up (0.0085s latency).
Nmap scan report for 192.168.1.33
Host is up (0.00035s latency).
Nmap scan report for 192.168.1.34
Host is up (0.00032s latency).
Nmap scan report for 192.168.1.35
Host is up (0.00059s latency).
Nmap scan report for 192.168.1.46
Host is up (0.030s latency).
Nmap done: 21 IP addresses (5 hosts up) scanned in 1.55 seconds
To perform an aggresive (deeper) scan to include the software and version information of the services on a specified target, execute the following command in the terminal of the host:
$ nmap -A 192.168.1.34
The following would be a typical output:
Starting Nmap 7.80 ( https://nmap.org ) at 2021-09-19 15:08 EDT
Nmap scan report for 192.168.1.34
Host is up (0.00098s latency).
Not shown: 999 closed ports
PORT   STATE SERVICE VERSION
22/tcp open  ssh     OpenSSH 8.2p1 Ubuntu 4ubuntu0.3 (Ubuntu Linux; protocol 2.0)
Service Info: OS: Linux; CPE: cpe:/o:linux:linux_kernel

Service detection performed. Please report any incorrect results at https://nmap.org/submit/ .
Nmap done: 1 IP address (1 host up) scanned in 0.61 seconds
To perform a traceroute to the host scanme.nmap.org, execute the following command in the terminal of the host:
$ sudo nmap --traceroute scanme.nmap.org
The following would be a typical output:
Starting Nmap 7.80 ( https://nmap.org ) at 2021-09-19 15:19 EDT
Nmap scan report for scanme.nmap.org (45.33.32.156)
Host is up (0.084s latency).
Other addresses for scanme.nmap.org (not scanned): 2600:3c01::f03c:91ff:fe18:bb2f
Not shown: 995 closed ports
PORT      STATE    SERVICE
22/tcp    open     ssh
25/tcp    filtered smtp
80/tcp    open     http
9929/tcp  open     nping-echo
31337/tcp open     Elite

TRACEROUTE (using port 80/tcp)
HOP RTT      ADDRESS
1   0.35 ms  _gateway (192.168.1.1)
2   ...
3   24.45 ms B4306.NWRKNJ-LCR-21.verizon-gni.net (130.81.27.40)
4   ...
5   23.71 ms 0.ae1.BR1.EWR6.ALTER.NET (140.222.237.223)
6   23.00 ms nyk-b2-link.ip.twelve99.net (80.239.192.36)
7   74.57 ms nyk-bb2-link.ip.twelve99.net (62.115.137.98)
8   76.69 ms sjo-b23-link.ip.twelve99.net (62.115.119.229)
9   79.13 ms linode-ic342731-sjo-b21.ip.twelve99-cust.net (62.115.172.133)
10  77.55 ms if-2-4.csw5-fnc1.linode.com (173.230.159.85)
11  76.61 ms scanme.nmap.org (45.33.32.156)

Nmap done: 1 IP address (1 host up) scanned in 5.86 seconds
To perform a scan of the top 5 common UDP ports, execute the following command in the terminal of the host:
$ sudo nmap --top-ports 5 -sU 192.168.1.34
The following would be a typical output:
Starting Nmap 7.80 ( https://nmap.org ) at 2021-09-19 15:29 EDT
Nmap scan report for 192.168.1.34
Host is up (0.00025s latency).

PORT    STATE         SERVICE
123/udp closed        ntp
137/udp closed        netbios-ns
138/udp closed        netbios-dgm
161/udp closed        snmp
631/udp open|filtered ipp
MAC Address: 08:00:27:57:FE:92 (Oracle VirtualBox virtual NIC)

Nmap done: 1 IP address (1 host up) scanned in 1.15 seconds
To perform a scan to determine the OS and the software each of the network services are running, execute the following command in the terminal of the host:
$ sudo nmap -sV -O 192.168.1.33
The following would be a typical output:
Starting Nmap 7.80 ( https://nmap.org ) at 2021-09-19 15:36 EDT
Nmap scan report for 192.168.1.33
Host is up (0.00017s latency).
Not shown: 999 closed ports
PORT     STATE SERVICE VERSION
8080/tcp open  http    Werkzeug httpd 0.16.1 (Python 3.8.10)
MAC Address: 08:00:27:DC:CF:C2 (Oracle VirtualBox virtual NIC)
No exact OS matches for host (If you know what OS is running on it, see https://nmap.org/submit/ ).
TCP/IP fingerprint:
OS:SCAN(V=7.80%E=4%D=9/20%OT=8080%CT=1%CU=35864%PV=Y%DS=1%DC=D%G=Y%M=080027
OS:%TM=61492399%P=x86_64-pc-linux-gnu)SEQ(SP=108%GCD=1%ISR=108%TI=Z%CI=Z%II
OS:=I%TS=A)OPS(O1=M5B4ST11NW7%O2=M5B4ST11NW7%O3=M5B4NNT11NW7%O4=M5B4ST11NW7
OS:%O5=M5B4ST11NW7%O6=M5B4ST11)WIN(W1=FE88%W2=FE88%W3=FE88%W4=FE88%W5=FE88%
OS:W6=FE88)ECN(R=Y%DF=Y%T=40%W=FAF0%O=M5B4NNSNW7%CC=Y%Q=)T1(R=Y%DF=Y%T=40%S
OS:=O%A=S+%F=AS%RD=0%Q=)T2(R=N)T3(R=N)T4(R=Y%DF=Y%T=40%W=0%S=A%A=Z%F=R%O=%R
OS:D=0%Q=)T5(R=Y%DF=Y%T=40%W=0%S=Z%A=S+%F=AR%O=%RD=0%Q=)T6(R=Y%DF=Y%T=40%W=
OS:0%S=A%A=Z%F=R%O=%RD=0%Q=)T7(R=Y%DF=Y%T=40%W=0%S=Z%A=S+%F=AR%O=%RD=0%Q=)U
OS:1(R=Y%DF=N%T=40%IPL=164%UN=0%RIPL=G%RID=G%RIPCK=G%RUCK=G%RUD=G)IE(R=Y%DF
OS:I=N%T=40%CD=S)

Network Distance: 1 hop
Service Info: OS: Linux; CPE: cpe:/o:linux:linux_kernel

OS and Service detection performed. Please report any incorrect results at https://nmap.org/submit/ .
Nmap done: 1 IP address (1 host up) scanned in 7.73 seconds
To display all the packets sent to a range of ports on a host target, execute the following command in the terminal of the host:
$ nmap -p135-140 --packet-trace 192.168.1.53
The following would be a typical output:
Starting Nmap 7.80 ( https://nmap.org ) at 2021-09-19 15:42 EDT
CONN (0.0328s) TCP localhost > 192.168.1.53:80 => Operation now in progress
CONN (0.0329s) TCP localhost > 192.168.1.53:443 => Operation now in progress
CONN (0.0329s) TCP localhost > 192.168.1.53:80 => Connection refused
CONN (0.0331s) TCP localhost > 192.168.1.53:139 => Operation now in progress
CONN (0.0331s) TCP localhost > 192.168.1.53:135 => Operation now in progress
CONN (0.0331s) TCP localhost > 192.168.1.53:136 => Operation now in progress
CONN (0.0332s) TCP localhost > 192.168.1.53:138 => Operation now in progress
CONN (0.0332s) TCP localhost > 192.168.1.53:140 => Operation now in progress
CONN (0.0332s) TCP localhost > 192.168.1.53:137 => Operation now in progress
CONN (0.0332s) TCP localhost > 192.168.1.53:139 => Connected
CONN (0.0332s) TCP localhost > 192.168.1.53:135 => Connection refused
CONN (0.0332s) TCP localhost > 192.168.1.53:136 => Connection refused
CONN (0.0332s) TCP localhost > 192.168.1.53:138 => Connection refused
CONN (0.0332s) TCP localhost > 192.168.1.53:140 => Connection refused
CONN (0.0332s) TCP localhost > 192.168.1.53:137 => Connection refused
Nmap scan report for polarsparc (192.168.1.53)
Host is up (0.000091s latency).

PORT    STATE  SERVICE
135/tcp closed msrpc
136/tcp closed profile
137/tcp closed netbios-ns
138/tcp closed netbios-dgm
139/tcp open   netbios-ssn
140/tcp closed emfis-data

Nmap done: 1 IP address (1 host up) scanned in 0.03 seconds
To display the reason for the state of a list of ports on a host target, execute the following command in the terminal of the host:
$ nmap -sT -p20,23,25,80 --reason 192.168.1.53
The following would be a typical output:
Starting Nmap 7.80 ( https://nmap.org ) at 2021-09-19 15:49 EDT
Nmap scan report for sringeri (192.168.1.53)
Host is up, received conn-refused (0.000062s latency).

PORT   STATE  SERVICE  REASON
20/tcp closed ftp-data conn-refused
23/tcp closed telnet   conn-refused
25/tcp closed smtp     conn-refused
80/tcp closed http     conn-refused

Nmap done: 1 IP address (1 host up) scanned in 0.04 seconds
References