Figure.1
| PolarSPARC |
Understanding OAuth2 and OpenID Connect
| Bhaskar S | 09/05/2020 |
Overview
There seems to be a lot of confusion around OAuth2 and OpenID Connect (OIDC for short). In this article, we will go on a journey to understand and clarify what OAuth2 and OIDC really are.
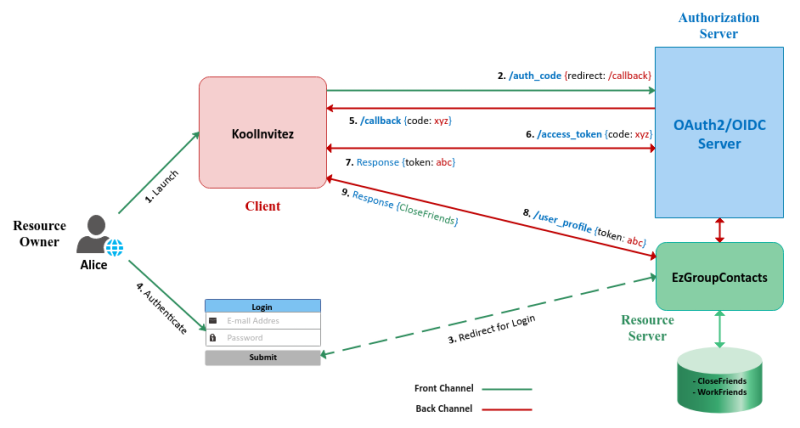
Alice is hosting a party and wants to send an invite to a select group of friends. She plans to send a digital invitation via a site called KoolInvitez. The site needs a list of emails to send out the invitation. Alice stores all her contacts (as a collection of groups) in a site called EzGroupContacts. How should Alice provide access to the group called 'CloseFriends' in EzGroupContacts to KoolInvitez to send the invites ??? Should Alice provide her credentials for EzGroupContacts to KoolInvitez so it can access the contacts in the group 'CloseFriends' ??? This is a security anti-pattern and *NOT* recommended. This is where OAuth2 comes in handy. Think of OAuth2 as a way of handing someone a Valet key, who will have limited access to perform their task. In other words, OAuth2 is an open standard for users to grant access to their information on a site or application to another site, but without revealing their credentials.
OIDC, on the other hand, is an extension on top of OAuth2, that is used to verify the identify of a user (authentication) in a standard way. As an example, there are many sites that do not have any user registration and rely on Google or Facebook for identity verification (authentication).
Before we go any further, let us define some terms that will be useful in the context of OAuth2 and OIDC as follows:
| Term | Description |
|---|---|
| Resource | Data or information that a user owns (Ex: the contact list 'CloseFriends') |
| Resource Owner | The owner of a Resource (Ex: Alice) |
| Resource Server | The server where the Resource is hosted (Ex: EzGroupContacts) |
| Client | An application or a site that needs access to a user Resource (Ex: KoolInvitez) |
| Authorization Server | The OAuth2/ODIC server where a user grants a consent to a Client, to access their Resource(s) |
| Access Token | A security token which the Client can present to the Resource Server to get access to a user's Resource |
| Front Channel | Requests coming from a user agent (such as a web browser) to a server |
| Back Channel | Requests coming from a server to another server. This is done for security reasons |
The basic *FUNDAMENTAL* flow of OAuth2 is referred to as the Authorization Code flow and all the other flows are variations of this basic flow. The Authorization Code flow works as follows:
1 :: the Resource Owner launches the Client to initiate the flow
2 :: the Client makes a request to the Authorization Server from the Front Channel for an authorization code (/auth_code) passing in an URL to respond back to (/callback ) at the Client
3 :: the Authorization Server redirects the Resource Owner to the Resource Server for user authentication and access grant
4 :: the Resource Owner enters valid credentials that is verified by the Resource Server and redirects back to the Authorization Server
5 :: the Authorization Server generates an Authorization Code and responds back to the Client with the authorization code on the Back Channel at the specified URL (/callback)
6 :: the Client makes a request to the Authorization Server for an Access Token through the Back Channel
7 :: the Authorization Server responds back to the Client with an Access Token on the Back Channel
8 :: the Client uses the Access Token to make a request to access the Resource at the Resource Server
9 :: the Resource Server responds with the data associated with the Resource
The following diagram illustrates the basic Authorization Code flow:
NOTE :: In some cases, the Authorization Server and the Resource Server may be ONE.
Installation and Setup
The installation will be on a Ubuntu 20.04 LTS based Linux desktop.
Ensure Docker is installed on the system. Else, follow the instructions provided in the article Introduction to Docker to complete the installation.
There are few open source implementations of the Authorization Server that implement the OAuth2/OIDC standards as follows:
For our setup and demonstration, we will use the Keycloak Authorization Server in conjuction with the PostgreSQL database.
Check the latest stable version for Postgres docker image. Version 12.4 was the latest at the time of this article.
To download the latest docker image for Postgres, execute the following command:
$ docker pull postgres:12.4
The following would be a typical output:
12.4: Pulling from library/postgres
bf5952930446: Pull complete
9577476abb00: Pull complete
2bd105512d5c: Pull complete
b1cd21c26e81: Pull complete
34a7c86cf8fc: Pull complete
274e7b0c38d5: Pull complete
3e831b350d37: Pull complete
38fa0d496534: Pull complete
c989da35e5c0: Pull complete
26dc6fdd7b2d: Pull complete
3c5032512cf3: Pull complete
26910ececf99: Pull complete
0339413523e8: Pull complete
d61df7db53da: Pull complete
Digest: sha256:9f325740426d14a92f71013796d98a50fe385da64a7c5b6b753d0705add05a21
Status: Downloaded newer image for postgres:12.4
docker.io/library/postgres:12.4
Check the latest stable version for Keycloak docker image. Version 11.0.1 was the latest at the time of this article.
To download the latest docker image for Keycloak, execute the following command:
$ docker pull jboss/keycloak:11.0.1
The following would be a typical output:
11.0.1: Pulling from jboss/keycloak
41ae95b593e0: Pull complete
f20f68829d13: Pull complete
6c304f8c55f0: Pull complete
7db1d4725e09: Pull complete
59cf4c955406: Pull complete
Digest: sha256:d7cb114cdb5dcc4b2c9b56ac7b827249596491db02bb82177edb42413056aa13
Status: Downloaded newer image for jboss/keycloak:11.0.1
docker.io/jboss/keycloak:11.0.1
To create a new bridge network called my-iam-net, execute the following command:
$ docker network create my-iam-net
The following would be a typical output:
64852330d28ade21943e0d8acfcf91fe4037c4f378d40c97f5b902e70674003d
We will store the database files in the directory $HOME/Downloads/DATA/postgres on the host.
To start the Postgres database, execute the following command:
$ docker run -d --rm --name postgres --net my-iam-net -e POSTGRES_DB=keycloak -e POSTGRES_USER=keycloak -e POSTGRES_PASSWORD=keycloak\$123 -p 5432:5432 -v $HOME/Downloads/DATA/postgres:/var/lib/postgresql/data postgres:12.4
The following would be a typical output:
26e000434238aea7a1f6cace9be81d243a3a37f6ab7cfdef3625ed03b0e296f1
To check the Postgres database logs, execute the following command:
$ docker logs postgres
The following would be a typical output:
...
...
...
PostgreSQL init process complete; ready for start up.

2020-08-29 17:07:00.296 UTC [1] LOG:  starting PostgreSQL 12.4 (Debian 12.4-1.pgdg100+1) on x86_64-pc-linux-gnu, compiled by gcc (Debian 8.3.0-6) 8.3.0, 64-bit
2020-08-29 17:07:00.296 UTC [1] LOG:  listening on IPv4 address "0.0.0.0", port 5432
2020-08-29 17:07:00.296 UTC [1] LOG:  listening on IPv6 address "::", port 5432
2020-08-29 17:07:00.299 UTC [1] LOG:  listening on Unix socket "/var/run/postgresql/.s.PGSQL.5432"
2020-08-29 17:07:00.316 UTC [65] LOG:  database system was shut down at 2020-08-29 17:07:00 UTC
2020-08-29 17:07:00.321 UTC [1] LOG:  database system is ready to accept connections
Logs in the article have been trimmed to just show the pieces relevant to the context
The lines with three dots '...' indicates code that has been truncated
To start the Keycloak OAuth2/ODIC server, execute the following command:
$ docker run --name keycloak --net my-iam-net -e DB_VENDOR=POSTGRES -e DB_DATABASE=keycloak -e DB_SCHEMA=public -e DB_ADDR=postgres -e DB_PORT=5432 -e DB_USER=keycloak -e DB_PASSWORD=keycloak\$123 -e KEYCLOAK_USER=admin -e KEYCLOAK_PASSWORD=kc_admin\$123 -p 8080:8080 jboss/keycloak:11.0.1
The following would be a typical output:
Added 'admin' to '/opt/jboss/keycloak/standalone/configuration/keycloak-add-user.json', restart server to load user
-b 0.0.0.0
=========================================================================

  Using PostgreSQL database

=========================================================================

17:12:51,436 INFO  [org.jboss.modules] (CLI command executor) JBoss Modules version 1.10.1.Final
17:12:51,486 INFO  [org.jboss.msc] (CLI command executor) JBoss MSC version 1.4.11.Final
17:12:51,494 INFO  [org.jboss.threads] (CLI command executor) JBoss Threads version 2.3.3.Final
17:12:51,585 INFO  [org.jboss.as] (MSC service thread 1-2) WFLYSRV0049: Keycloak 11.0.1 (WildFly Core 12.0.3.Final) starting
17:12:51,668 INFO  [org.jboss.vfs] (MSC service thread 1-7) VFS000002: Failed to clean existing content for temp file provider of type temp. Enable DEBUG level log to find what caused this
...
...
...
The batch executed successfully
17:12:55,936 INFO  [org.jboss.as] (MSC service thread 1-3) WFLYSRV0050: Keycloak 11.0.1 (WildFly Core 12.0.3.Final) stopped in 14ms
=========================================================================

  JBoss Bootstrap Environment

  JBOSS_HOME: /opt/jboss/keycloak

  JAVA: java

  JAVA_OPTS:  -server -Xms64m -Xmx512m -XX:MetaspaceSize=96M -XX:MaxMetaspaceSize=256m -Djava.net.preferIPv4Stack=true -Djboss.modules.system.pkgs=org.jboss.byteman -Djava.awt.headless=true  --add-exports=java.base/sun.nio.ch=ALL-UNNAMED --add-exports=jdk.unsupported/sun.misc=ALL-UNNAMED --add-exports=jdk.unsupported/sun.reflect=ALL-UNNAMED

=========================================================================

17:12:56,646 INFO  [org.jboss.modules] (main) JBoss Modules version 1.10.1.Final
17:12:57,052 INFO  [org.jboss.msc] (main) JBoss MSC version 1.4.11.Final
17:12:57,059 INFO  [org.jboss.threads] (main) JBoss Threads version 2.3.3.Final
17:12:57,151 INFO  [org.jboss.as] (MSC service thread 1-2) WFLYSRV0049: Keycloak 11.0.1 (WildFly Core 12.0.3.Final) starting
17:12:57,258 INFO  [org.jboss.vfs] (MSC service thread 1-4) VFS000002: Failed to clean existing content for temp file provider of type temp. Enable DEBUG level log to find what caused this
...
...
...
17:13:12,265 INFO  [org.wildfly.extension.undertow] (ServerService Thread Pool -- 65) WFLYUT0021: Registered web context: '/auth' for server 'default-server'
17:13:12,334 INFO  [org.jboss.as.server] (ServerService Thread Pool -- 46) WFLYSRV0010: Deployed "keycloak-server.war" (runtime-name : "keycloak-server.war")
17:13:12,381 INFO  [org.jboss.as.server] (Controller Boot Thread) WFLYSRV0212: Resuming server
17:13:12,384 INFO  [org.jboss.as] (Controller Boot Thread) WFLYSRV0025: Keycloak 11.0.1 (WildFly Core 12.0.3.Final) started in 16060ms - Started 687 of 992 services (703 services are lazy, passive or on-demand)
17:13:12,385 INFO  [org.jboss.as] (Controller Boot Thread) WFLYSRV0060: Http management interface listening on http://127.0.0.1:9990/management
17:13:12,386 INFO  [org.jboss.as] (Controller Boot Thread) WFLYSRV0051: Admin console listening on http://127.0.0.1:9990
Missing any of the options will result in the following exception:
17:10:55,400 ERROR [org.jboss.as.controller.management-operation] (Controller Boot Thread) WFLYCTL0013: Operation ("add") failed - address: ([("subsystem" => "microprofile-metrics-smallrye")]): java.lang.NullPointerException
Rather than execute the two docker commands individually, one can use the following docker-compose file:
The variables POSTGRES_PASSWORD and KEYCLOAK_PASSWORD are defined in a file called vars.env as follows:
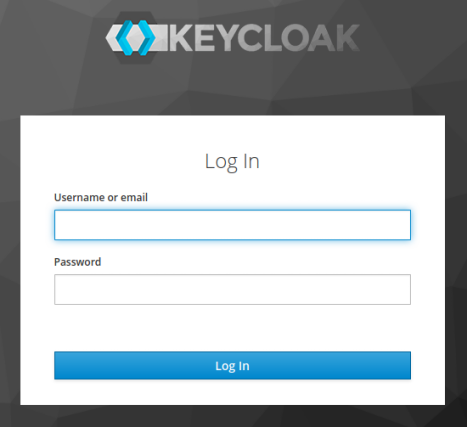
Launch a web browser and open the URL http://localhost:8080/auth/admin. It will prompt us with a login screen as shown in the following illustration:
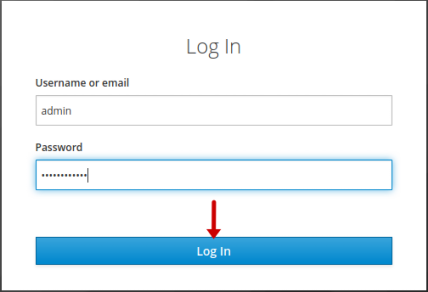
Enter the username of admin and password of kc_admin$123 and click on the Log In button as shown in the illustration below:
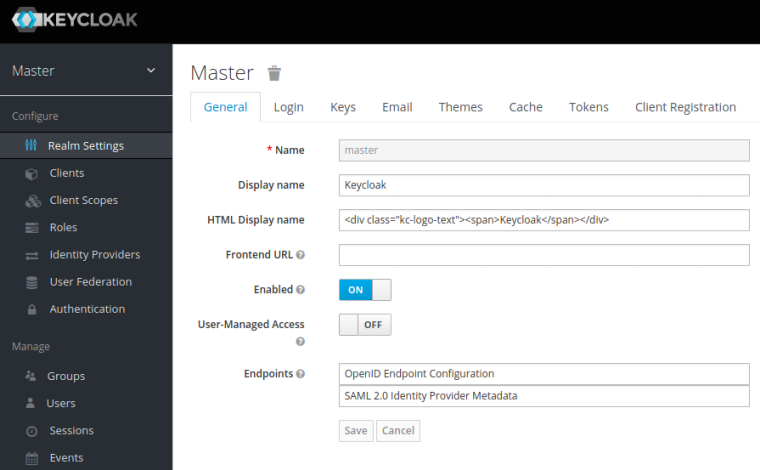
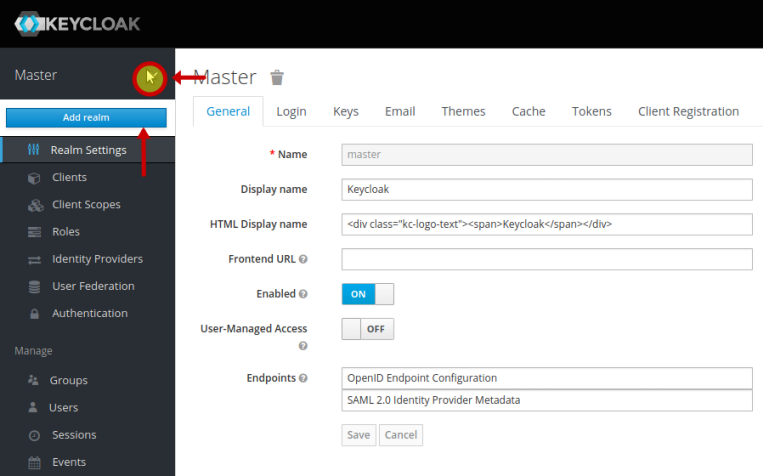
On successful login, it will take us to the Master realm page as shown in the illustration below:
A Realm is like a namespace where all the instance setup objects reside. We need to create a new realm for our setup. To create a new realm click on Master dropdown (on the top left-hand corner) and click on the Add realm button as shown in the illustration below:
We will create a new realm called Testing for our setup and click on the Create button as shown in the illustration below:

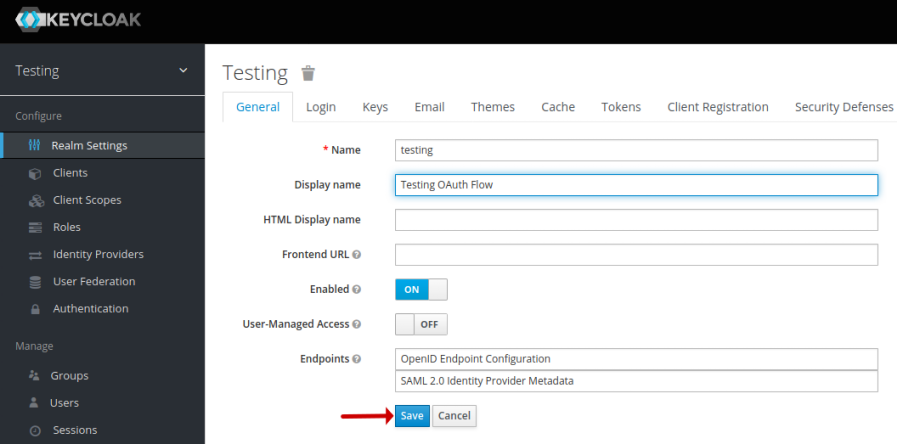
On successful creation, it will take us to the Testing realm page, where we enter the Display name, leave the remaining options as is, and click on the Save button as shown in the illustration below:
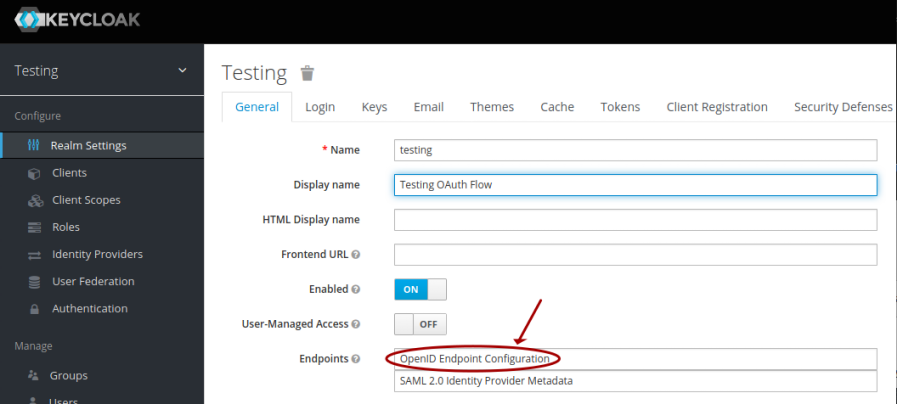
On the Testing realm page, click on OpenID Endpoint Configuration as shown in the illustration below:
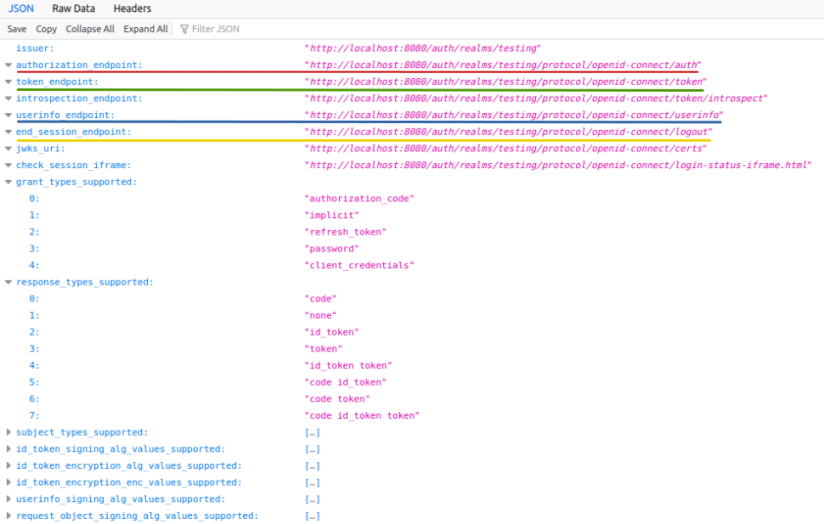
This will take us to the Endpoint Configuration page, where we can make a note of the various URL endpoints for our demonstration later, as shown in the illustration below:
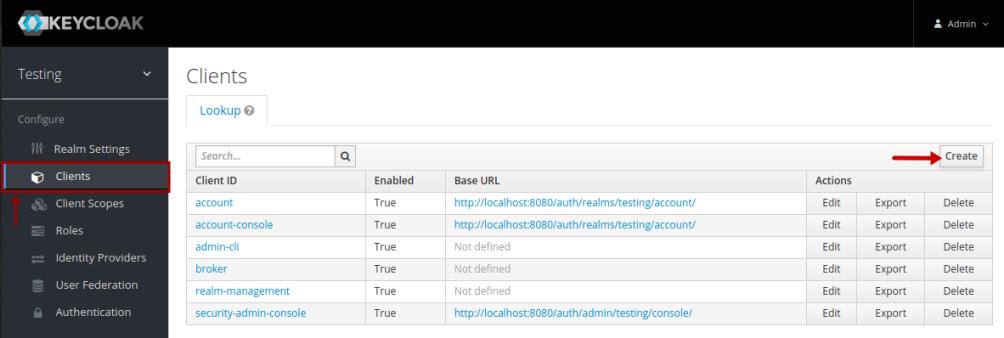
Every application that interacts with Keycloak needs to be pre-registered. To create a new client, click on the Clients option (on the left-hand side), and the click on the Create button as shown in the illustration below:
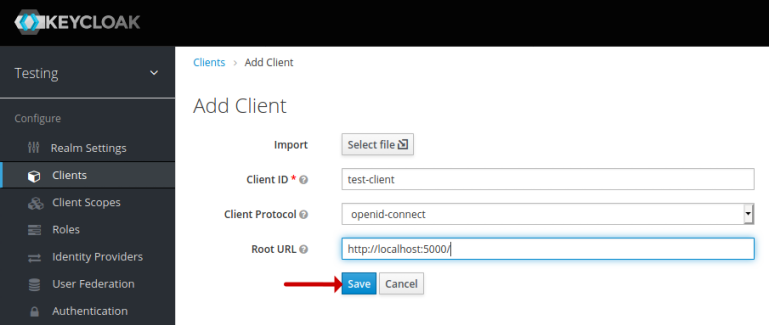
On the Add Client page, we will enter a new Client ID called test-client, enter the Root URL to be http://localhost:5000/, and then click on the Save button as shown in the illustration below:
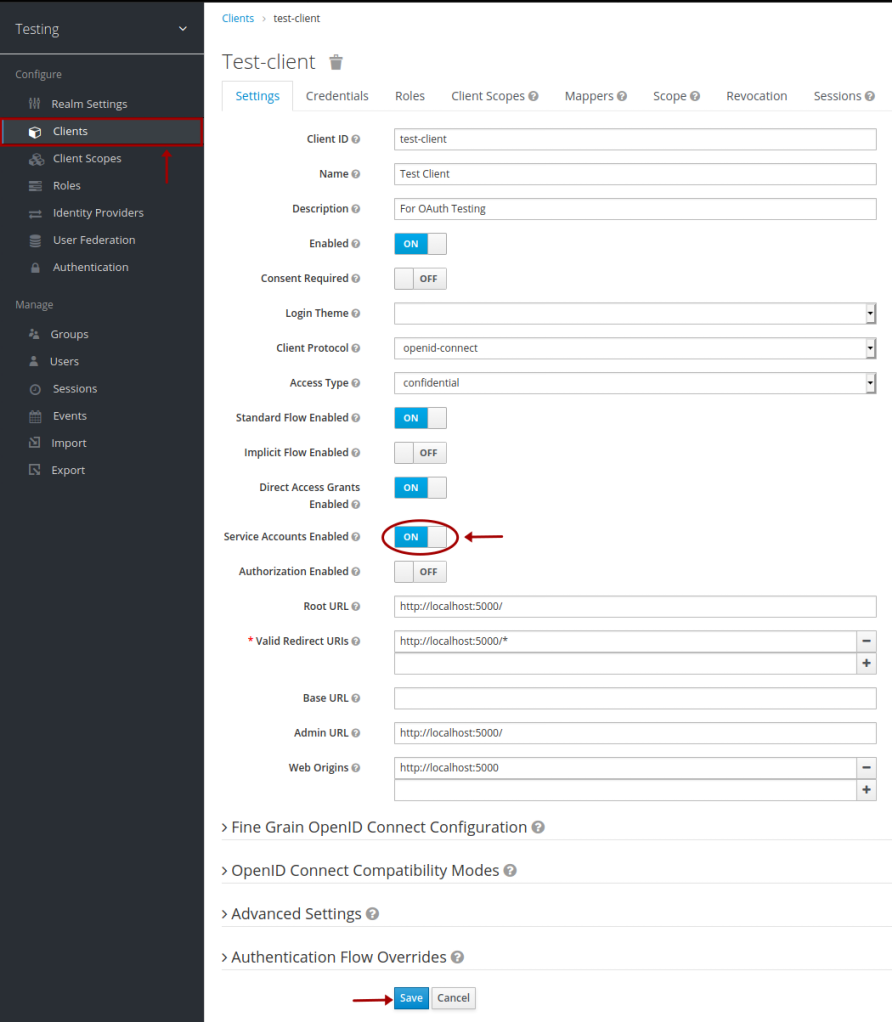
On successful creation, it will take us to the Test-client client page, where we enter the Name, Description, Valid Redirect URIs, leave the remaining options as is, and click on the Save button as shown in the illustration below:
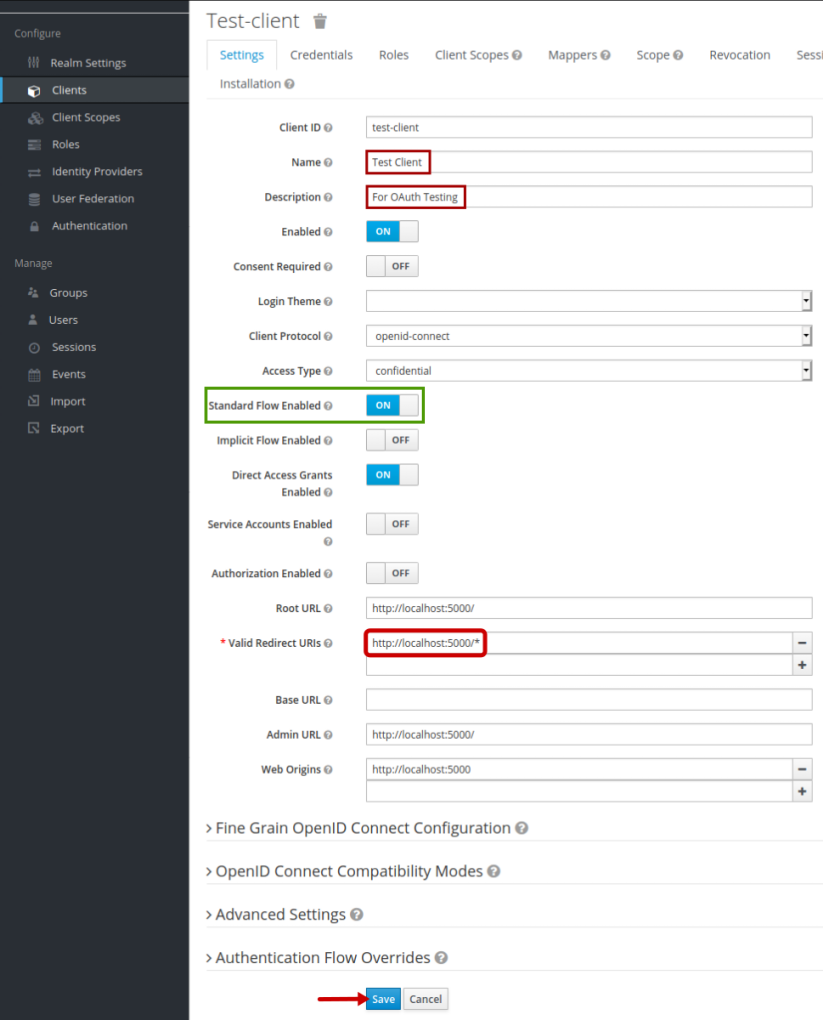
In Figure.12 above, the option Standard Flow Enabled (enclosed within a rectangle) is what enables the OAuth2 flow.
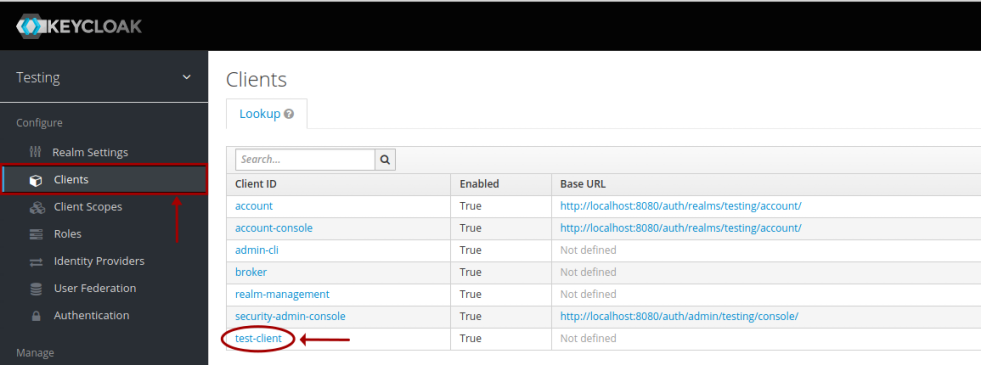
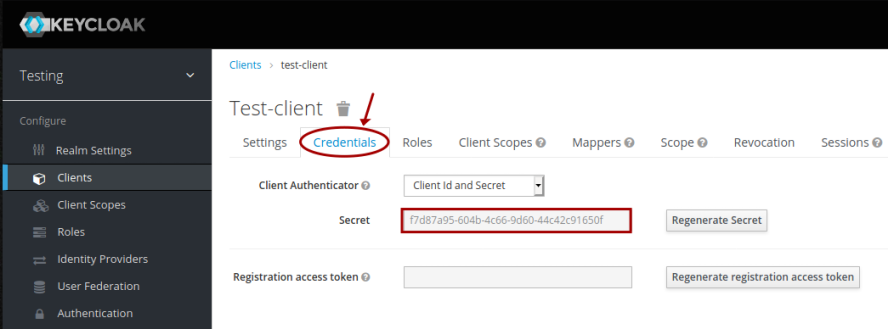
We need to make a note of the secret token associated with the just created client test-client. To do that, click on the Clients option (on the left-hand side) and then click on the client ID test-client from the list of clients as shown in the illustration below:
This will take us to the Test-client client page. Click on the Credentials tab, and make a note of the client Secret as shown in the illustration below:
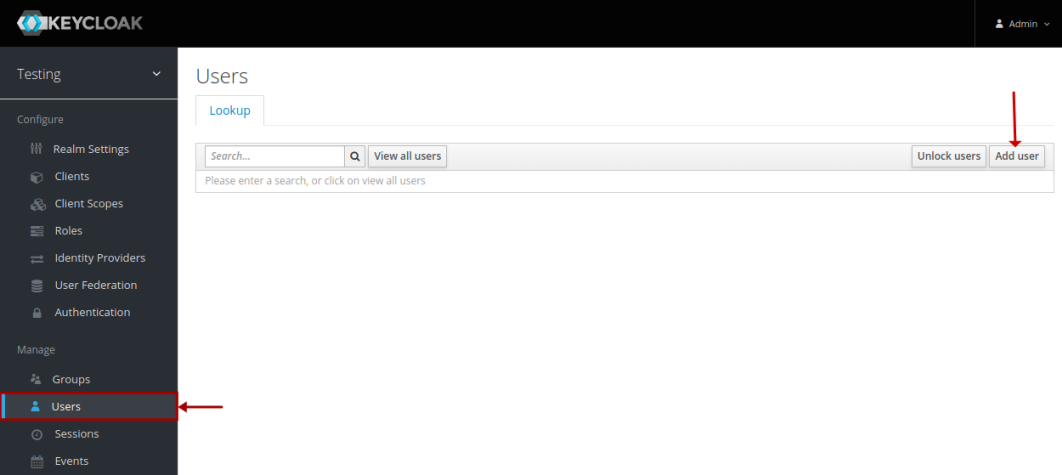
For the OAuth2 flow to work in Keycloak, we need to pre-registered a user (Resource Owner). To create a new user, click on the Users option (on the left-hand side), and the click on the Add user button (top right-hand corner) as shown in the illustration below:
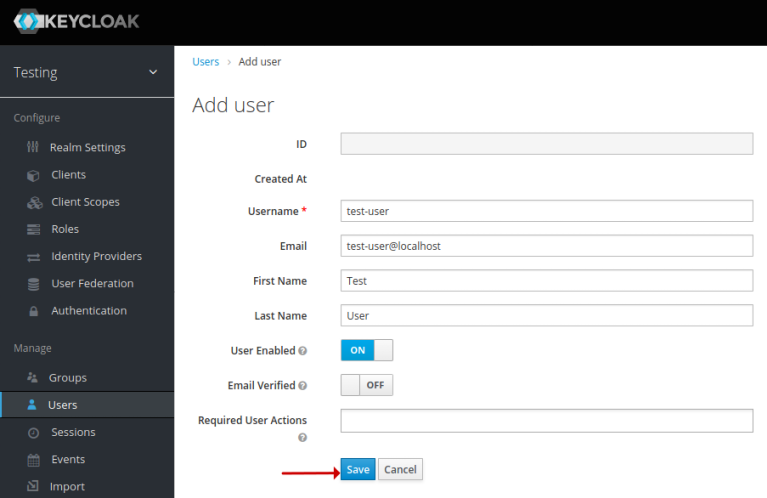
On successful creation, it will take us to the Add user page, where we enter the Username called test-user, with an Email of test-user@localhost, with a First Name of Test, with a Last Name of User, leave the remaining options as is, and click on the Save button as shown in the illustration below:
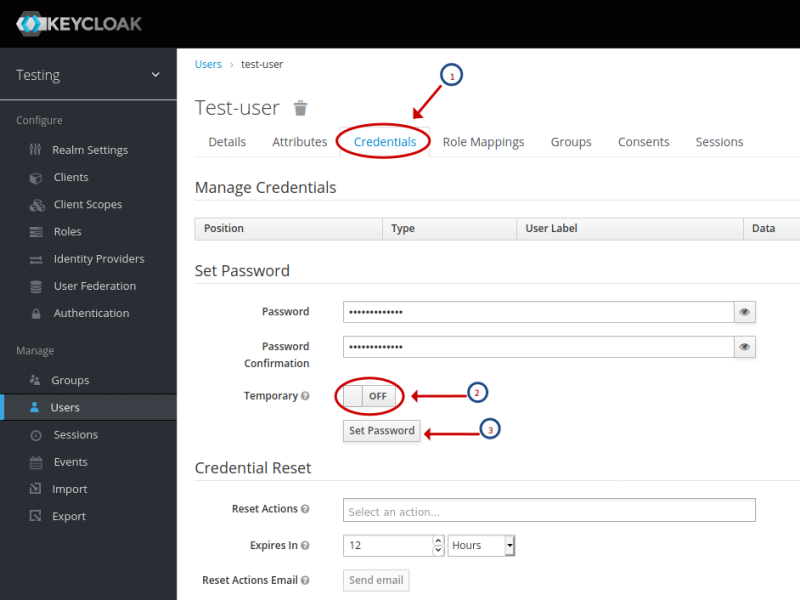
Next, we need to set a user credential (password) for the newly created user test-user. To set the user password, click on the Credentials tab (circled 1), enter a Password of test-user$123, re-enter the same password in Confirmation, turn OFF the option Temporary (circled 2), and click on the Set password button (circled 3) as shown in the illustration below:
This completes the installation and setup for the demonstration of the OAuth2 flow.
Hands-on OAuth2 Authorization Code Flow
We will use Python to implement the Client (as a standalone webserver) and display the data elements of the OAuth2 Authorization Code flow on a simple HTML page.
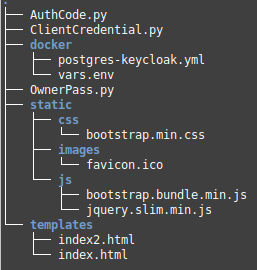
The following is the directory structure for the Client source code:
The following is the listing of the HTML file for the Authorization Code flow:
The following is the listing of the Python Client for the Authorization Code flow:
To start the Python Client AuthCode.py, execute the following command:
$ python ./OAuth2/AuthCode.py
The following would be a typical output:
* Serving Flask app "AuthCode" (lazy loading)
* Environment: production
  WARNING: This is a development server. Do not use it in a production deployment.
  Use a production WSGI server instead.
* Debug mode: on
* Running on http://127.0.0.1:5000/ (Press CTRL+C to quit)
* Restarting with stat
* Debugger is active!
* Debugger PIN: 251-255-341
Now, launch a web browser and open the URL http://localhost:5000. We will land on a page as shown in the illustration below:
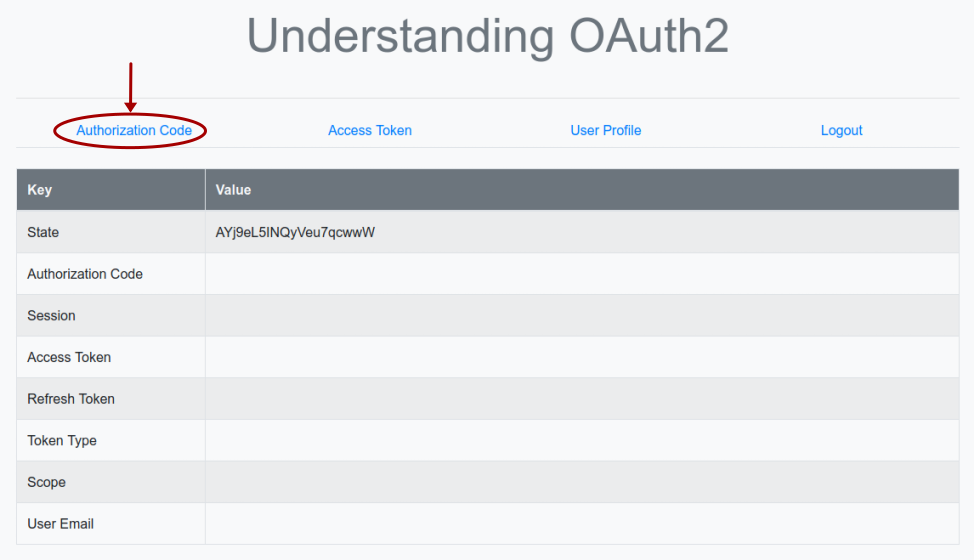
Clicking on the item Authorization Code triggers the execution of the Python method authenticate(), which sends a HTTP redirect request to the URL endpoint http://localhost:8080/auth/realms/testing/protocol/openid-connect/auth on the Keycloak Authorization Server.
The following is the screenshot of the HTTP redirect request captured via Wireshark:

Notice the use of request_type=code for the OAuth2 Authorization Code flow.
In our setup, the Keycloak instance acts as both the Authorization Server and the Resource Server. Once the Keycloak Authorization Server receives the authorization code request, it redirects the user (Resource Owner) to authenticate as shown in the illustration below:
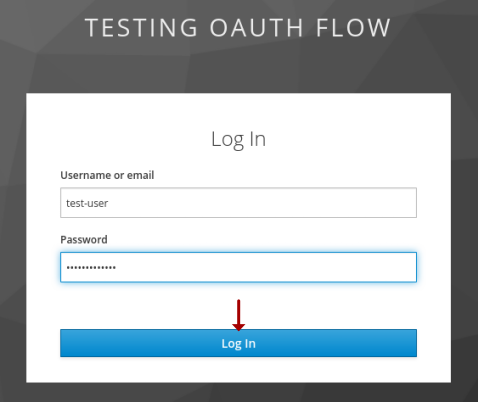
Enter the username of test-user and password of test-user$123 and click on the Log In button.
On successful authentication, the Keycloak Authorization Server responds back on the callback URL of the Python Client http://localhost:5000/callback with a valid authorization code.
The following is the screenshot of the HTTP callback response captured via Wireshark:

Notice the authorization code code=835f7a9... being sent to the Client.
The browser now refreshes and we will land on a page as shown in the illustration below:
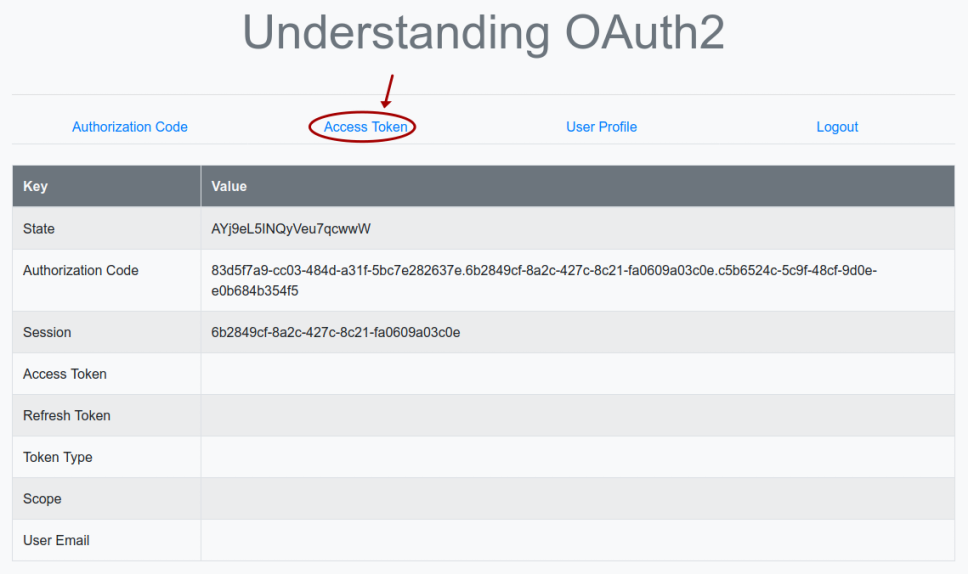
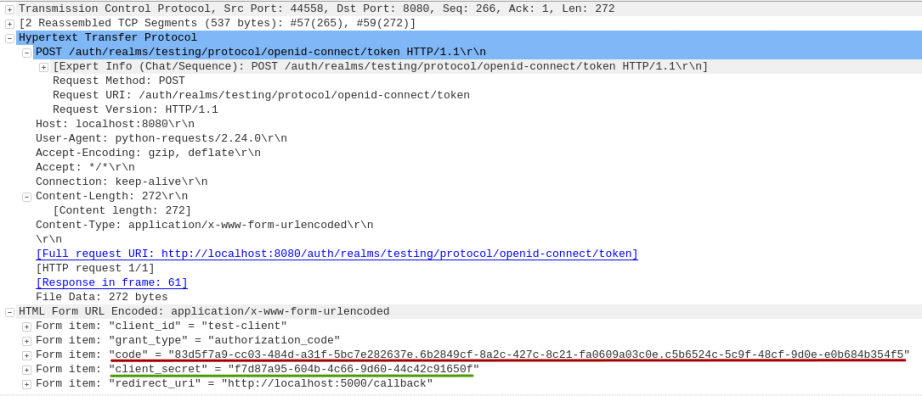
Clicking on the item Access Token triggers the execution of the Python method token(), which sends a HTTP POST request (with the authorization code and the Client secret) to the URL endpoint http://localhost:8080/auth/realms/testing/protocol/openid-connect/token on the Keycloak Authorization Server.
The following is the screenshot of the HTTP token request captured via Wireshark:
On success, the Keycloak Authorization Server responds back with an Access Token to the Python Client.
The following is the screenshot of the HTTP token response captured via Wireshark:
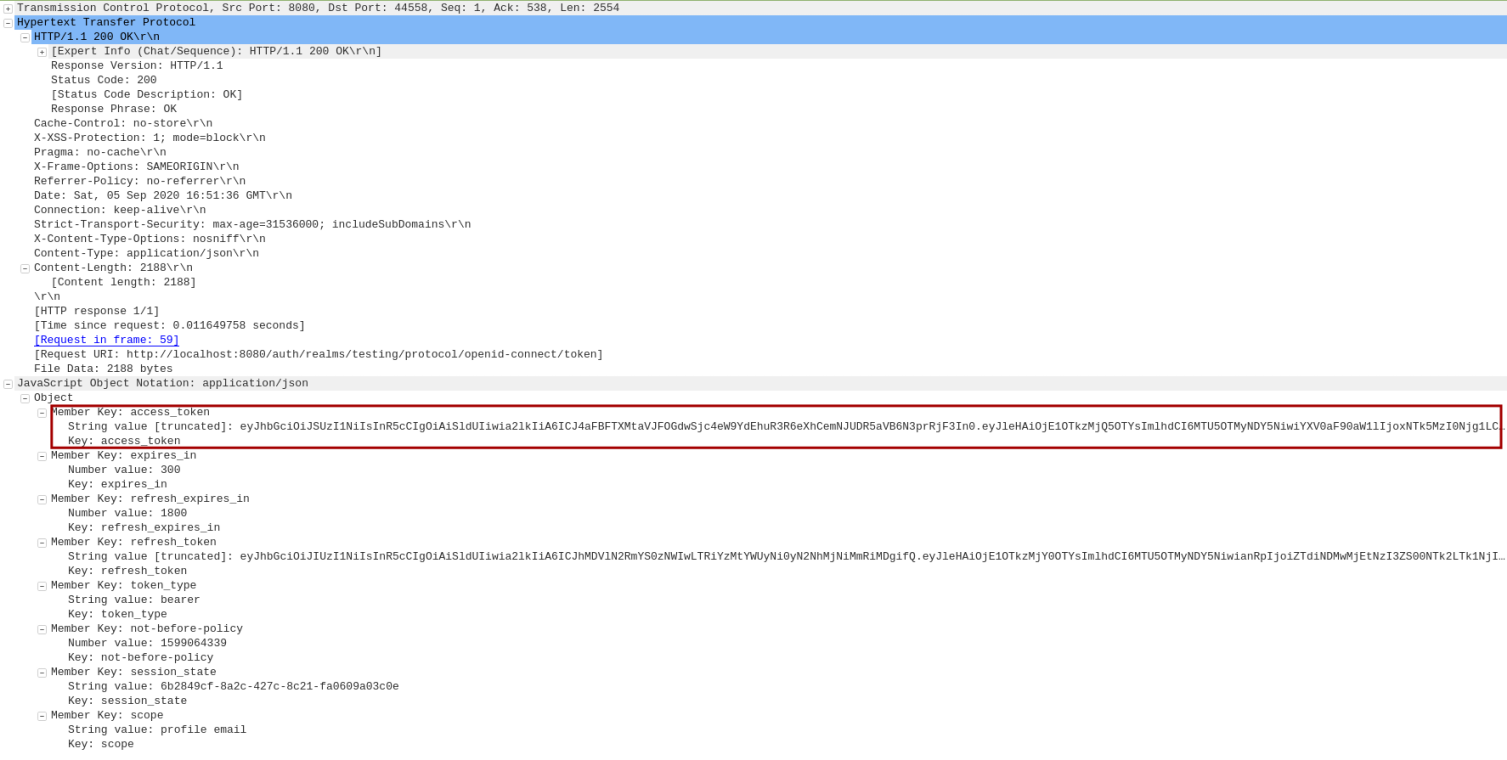
Notice the access_token eyJhbGc... being sent to the Client.
The browser now refreshes and we will land on a page as shown in the illustration below:
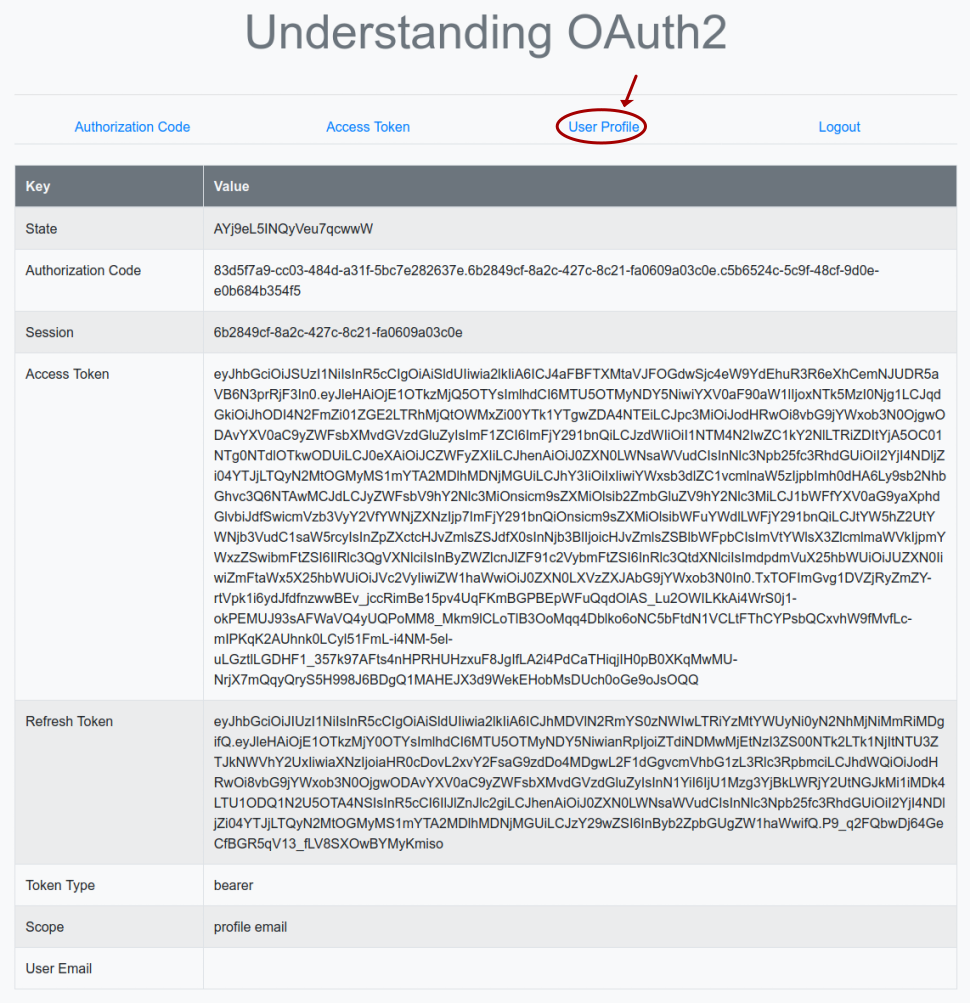
Clicking on the item User Profile triggers the execution of the Python method profile(), which sends a HTTP request (with the access token in the HTTP Authorization header as a Bearer token) to the URL endpoint http://localhost:8080/auth/realms/testing/protocol/openid-connect/userinfo on the Keycloak Resource Server.
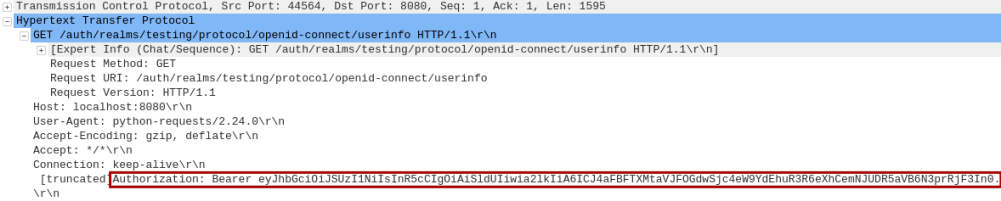
The following is the screenshot of the HTTP user profile request captured via Wireshark:
On success, the Keycloak Resource Server responds back with the profile information of the user (Resource Owner) which includes their email-id to the Python Client.
The following is the screenshot of the HTTP user profile response captured via Wireshark:
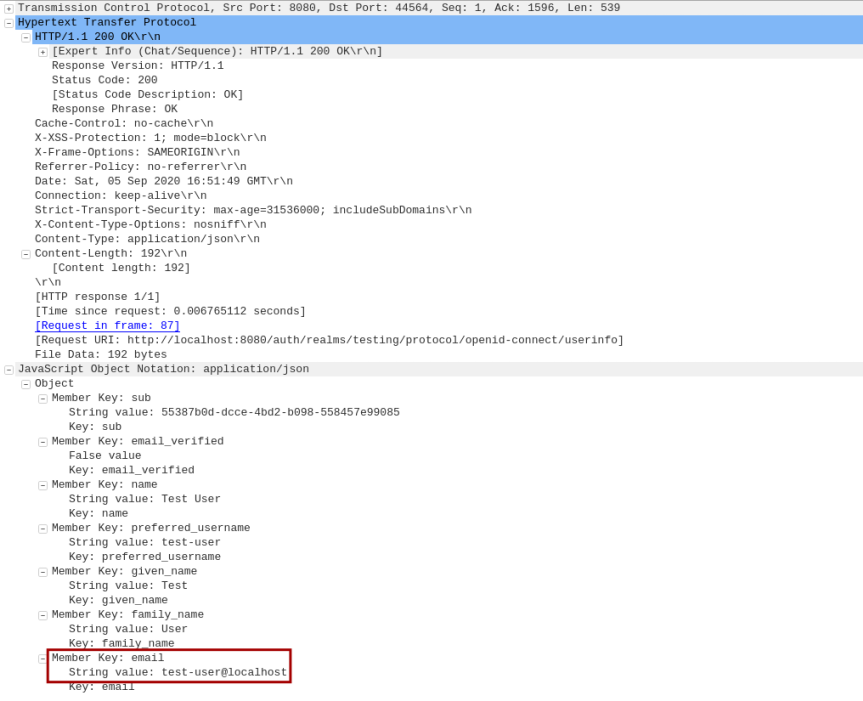
Notice the email test-user@localhost being sent to the Client.
The browser now refreshes and we will land on a page as shown in the illustration below:
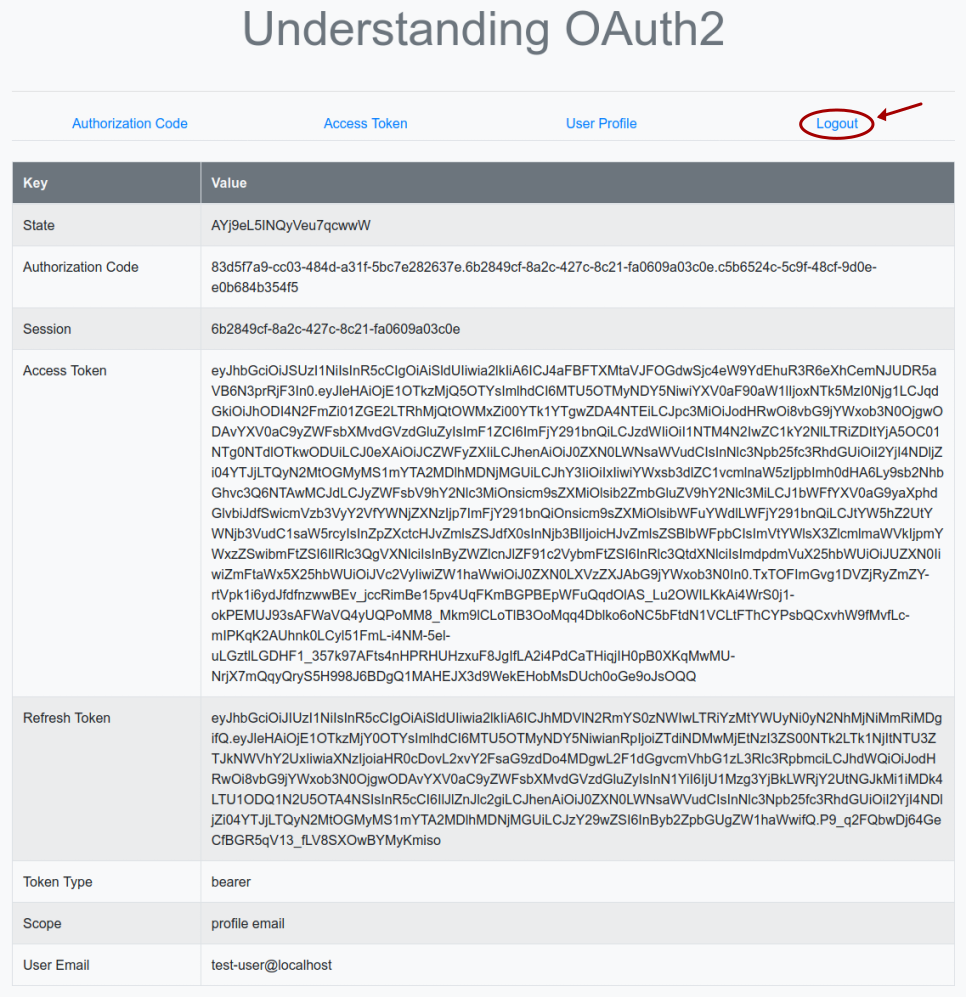
Clicking on the item Logout triggers the execution of the Python method logout(), which sends a HTTP request to the URL endpoint http://localhost:8080/auth/realms/testing/protocol/openid-connect/logout on the Keycloak Authorization Server to logout and terminate the active user session and invalidating the Access Token.
OAuth2 Implicit Grant Flow
The Implicit Grant flow is a simplified and *LESS* secure version of the OAuth2 flow, primarily targeted for a single-page JavaScript based application, to get an Access Token directly without getting an Authorization Code first and then exchaning for an Access Token. All interactions happen only via the Front Channel. The Implicit Grant flow is vulnerable to Access Token leakage (the token is returned in the URL and will be logged in the web browser's history) and replay attack (malicious reuse of an Access Token by an attacker). The Implicit Grant flow works as follows:
1 :: the Resource Owner launches the JavaScript Client application to initiate the flow
2 :: the Client makes a request to the Authorization Server from the Front Channel for an access token (skipping the authorization code step) passing in a request_type=token and a URL to respond back to (/callback) at the Client
3 :: the Authorization Server redirects the Resource Owner to the Resource Server for user authentication and access grant
4 :: the Resource Owner enters valid credentials that is verified by the Resource Server and redirects back to the Authorization Server
5 :: the Authorization Server directly generates an Access Token and responds back to the Client with the Access Token as a *FRAGMENT ID* in the specified URL ( /callback). This allows the JavaScript application in the web browser to have access to the token from the URL, but prevent the web browser from sending the Access Token to the web server
6 :: the Client uses the Access Token to make a request to access the Resource at the Resource Server
7 :: the Resource Server responds with the data associated with the Resource
We will *NOT* demonstrate this flow in this article.
OAuth2 Resource Owner Password Flow
The Resource Owner Password flow is targeted for use-cases where the Client is trusted by the user (Resource Owner) or migrating legacy Clients (using direct authentication schemes such as HTTP Basic or Digest) to get an Access Token directly in exchange for the username/password of the Resource Owner without getting an Authorization Code first and then exchaning for an Access Token. All interactions happen only via the Back Channel. The Resource Owner Password flow works as follows:
1 :: the Resource Owner launches the Client application to initiate the flow
2 :: the Client makes a request to the Authorization Server through the Back Channel for an access token (skipping the authorization code step) passing in a grant_type=password, the client id and secret, along with the username and password of the Resource Owner
3 :: the Authorization Server validates the Resource Owner credential and on success generates an Access Token and responds back to the Client (with the Access Token)
4 :: the Client uses the Access Token to make a request to access the Resource at the Resource Server
5 :: the Resource Server responds with the data associated with the Resource
The Resource Owner Password flow is *NOT* recommended as it uses the user's (Resource Owner) username and password on behalf of the user, which is impersonation (no way to know if the request was initiated by the Resource Owner or an attacker).
The following is the listing of the HTML file for both the Resource Owner Password and Client Credentials flows:
The following is the listing of the Python Client for the Resource Owner Password flows:
Stop the Python Client AuthCode.py if is already running, and start the Python Client OwnerPass.py to see this flow in action.
The following illustration shows the browser page after going through the items Access Token and User Profile:
OAuth2 Client Credentials Flow
The Client Credentials flow is targeted for use-cases where the Client is a service as well as a Resource Owner and wants to get an Access Token to access its own Resource. All interactions happen only via the Back Channel. The Client Credentials flow works as follows:
1 :: the Client makes a request to the Authorization Server through the Back Channel for an access token (skipping the authorization code step) passing in a grant_type=client_credentials along with the client id (service account) and secret
2 :: the Authorization Server validates the service account and on success generates an Access Token and responds back to the Client (with the Access Token)
3 :: the Client uses the Access Token to make a request to access its Resource at the Resource Server
4 :: the Resource Server responds with the data associated with the Resource
Before we proceed, we need to make a small change in the Test-client client page. We need to enable the option Service Accounts Enabled and click on the Save button as shown in the illustration below:
The following is the listing of the Python Client for the Client Credentials flow:
Stop the Python Client AuthCode.py or OwnerPass.py if is already running, and start the Python Client ClientCredential.py to see this flow in action.
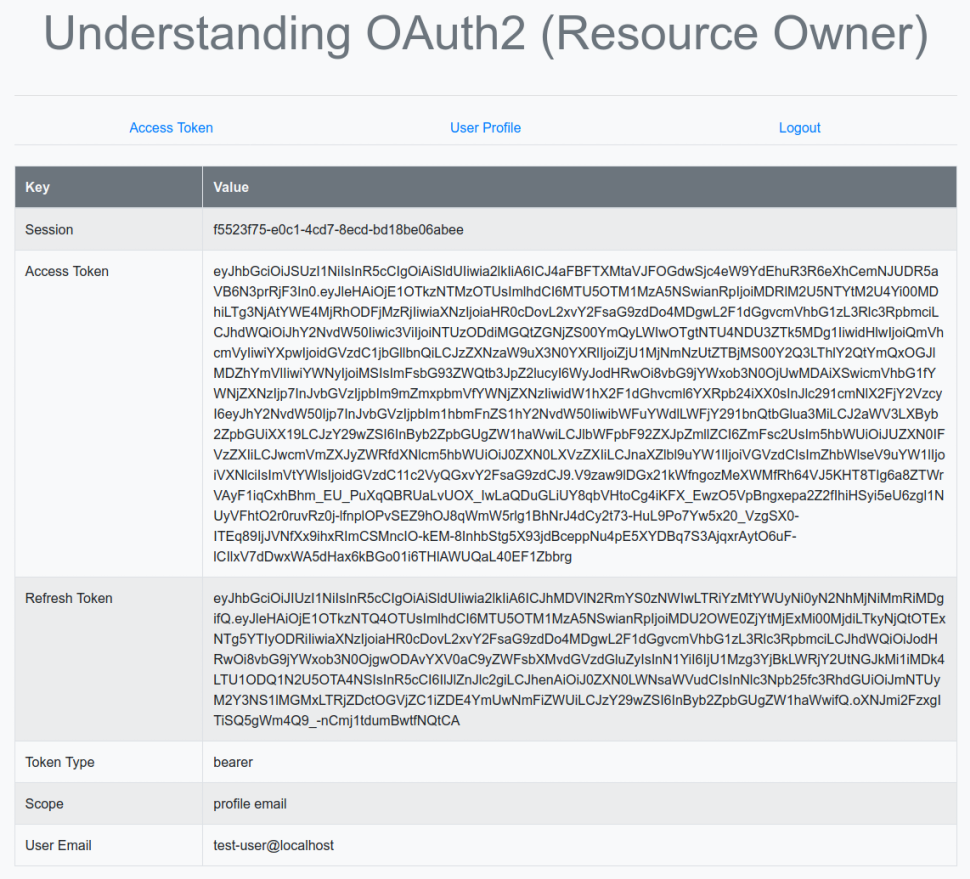
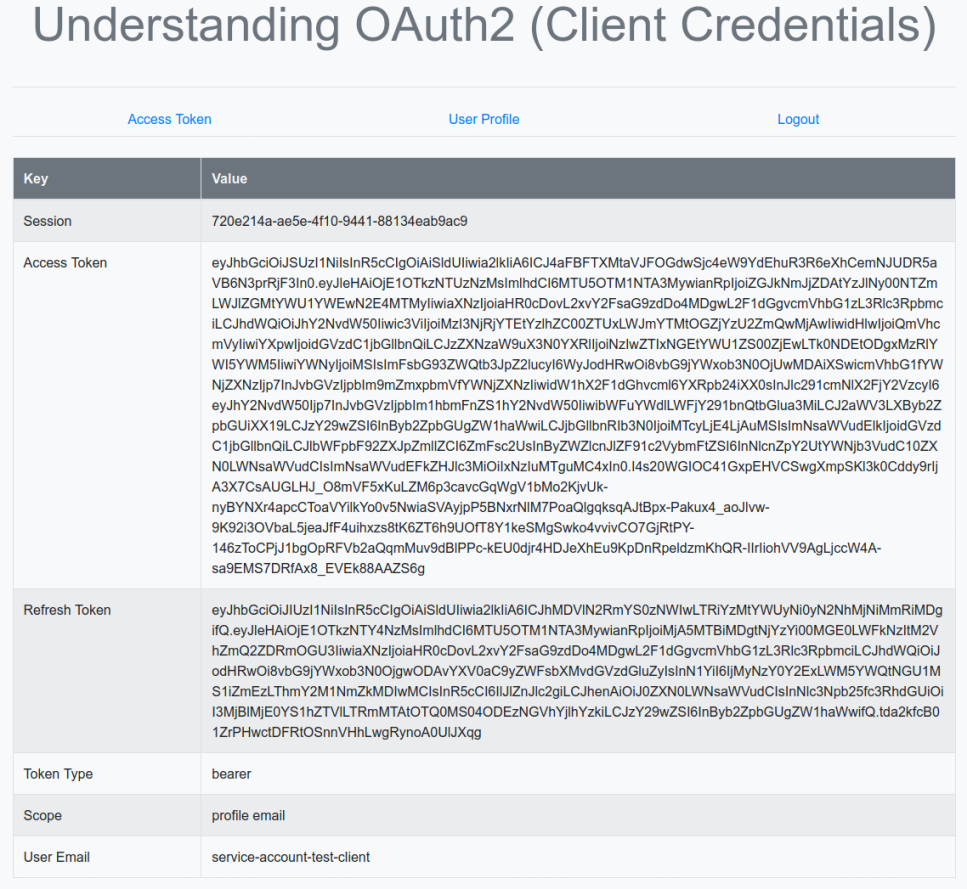
The following illustration shows the browser page after going through the items Access Token and User Profile:
This concludes our practical hands-on approach to understanding the OAuth2 and OpenID Connect standards.
The code in this article is to understand OAuth2 and OIDC flows - it is PURELY for learning purposes.
References
The OAuth 2.0 Authorization Framework
OAuth 2.0 Security Best Current Practice
OAuth 2.0 and OpenID Connect (in plain English)