
| PolarSPARC |
| Bhaskar S | 11/08/2020 |
Overview
In networking, a Tunnel is used to encapsulate a communication protocol that is not supported by the network inside a protocol that is supported by the network.
The following are some of terms used in this article:
| Term | Description |
|---|---|
| SSH | short for Secure SHell is a protocol that sets up an encrypted connection between two nodes over an unsecured network using a Client-Server architecture |
| SSH Server | a server that listens on the TCP port 22 for incoming SSH client requests, then authenticates those client requests, and provides a command prompt |
| SSH Client | a client used to connect to the remote SSH Server on a specific network node |
| SSH Tunnel | a method of encapsulating and transmitting arbitrary networking data over an encrypted SSH connection between a client node and a server node |
| SSH Port Forwarding | another name for SSH Tunnel |
So, why do we need tunneling ??? The following are some of the reasons:
To allow access to legacy applications or unsecure services such as IMAP, POP3, VNC, etc
To implement a virtual private network (VPN)
To allow access to services behind a firewall
There are 3 types of SSH Tunnel options as listed below:
Local Port Forwarding
Remote Port Forwarding
Dynamic Port Forwarding
We will discuss and demonstrate each of the above options in the following sections.
Setup
The setup will be on a Ubuntu 20.04 LTS based Linux desktop. For the demonstrations, we will create an environment with 3 virtual machines running on the hypervisor VirtualBox.
The following diagram illustrates the environment setup:
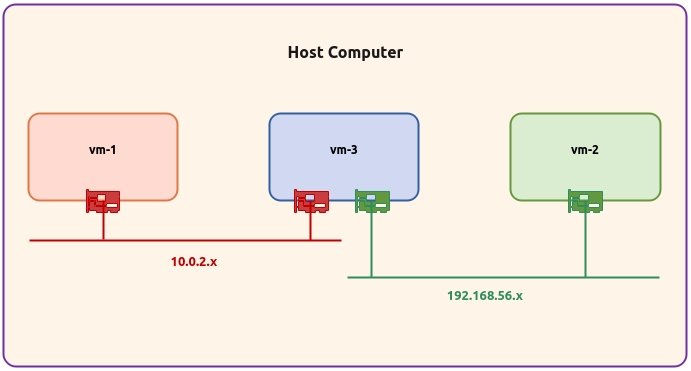
The following are some of the highlights of the 3 virtual machines:
vm-1 :: 1 vCPU, 2GB RAM, 20GB storage, Ubuntu 20.04 OS, and uses a single virtual network interface with NAT networking (10.0.2.15)
vm-2 :: 1 vCPU, 2GB RAM, 20GB storage, Ubuntu 20.04 OS, and uses a single virtual network interface with Host-only networking (192.168.56.104)
vm-3 :: 1 vCPU, 2GB RAM, 20GB storage, Ubuntu 20.04 OS, and uses a two separate virtual network interfaces - one with NAT networking (10.0.2.4) and the other with Host-only networking (192.168.56.103)
Open a Terminal window in each of the 3 virtual machines vm-1 thru vm-3 and install Python Flask, Net Tools, and SSH Server by executing the following command:
$ sudo apt install python3-flask net-tools openssh-server -y
The following would be a typical output:
Reading package lists... Done
Building dependency tree
Reading state information... Done
The following additional packages will be installed:
  javascript-common libjs-jquery ncurses-term openssh-sftp-server python3-itsdangerous python3-jinja2 python3-markupsafe
  python3-openssl python3-pyinotify python3-werkzeug ssh-import-id
Suggested packages:
  apache2 | lighttpd | httpd molly-guard monkeysphere ssh-askpass python-flask-doc python-jinja2-doc python-openssl-doc
  python3-openssl-dbg python-pyinotify-doc ipython3 python-werkzeug-doc python3-lxml python3-termcolor python3-watchdog
The following NEW packages will be installed:
  javascript-common libjs-jquery ncurses-term net-tools openssh-server openssh-sftp-server python3-flask python3-itsdangerous
  python3-jinja2 python3-markupsafe python3-openssl python3-pyinotify python3-werkzeug ssh-import-id
0 upgraded, 14 newly installed, 0 to remove and 0 not upgraded.
Need to get 1,478 kB of archives.
After this operation, 9,096 kB of additional disk space will be used.
Get:1 http://us.archive.ubuntu.com/ubuntu focal/main amd64 javascript-common all 11 [6,066 B]
Get:2 http://us.archive.ubuntu.com/ubuntu focal/main amd64 libjs-jquery all 3.3.1~dfsg-3 [329 kB]
Get:3 http://us.archive.ubuntu.com/ubuntu focal/main amd64 ncurses-term all 6.2-0ubuntu2 [249 kB]
Get:4 http://us.archive.ubuntu.com/ubuntu focal/main amd64 net-tools amd64 1.60+git20180626.aebd88e-1ubuntu1 [196 kB]
Get:5 http://us.archive.ubuntu.com/ubuntu focal-updates/main amd64 openssh-sftp-server amd64 1:8.2p1-4ubuntu0.1 [51.5 kB]
Get:6 http://us.archive.ubuntu.com/ubuntu focal-updates/main amd64 openssh-server amd64 1:8.2p1-4ubuntu0.1 [377 kB]
Get:7 http://us.archive.ubuntu.com/ubuntu focal/main amd64 python3-itsdangerous all 1.1.0-1 [14.6 kB]
Get:9 http://us.archive.ubuntu.com/ubuntu focal/main amd64 python3-markupsafe amd64 1.1.0-1build2 [13.9 kB]
Get:9 http://us.archive.ubuntu.com/ubuntu focal/main amd64 python3-jinja2 all 2.10.1-2 [95.5 kB]
Get:10 http://us.archive.ubuntu.com/ubuntu focal/main amd64 python3-werkzeug all 0.16.1+dfsg1-2 [183 kB]
Get:11 http://us.archive.ubuntu.com/ubuntu focal/main amd64 python3-flask all 1.1.1-2 [80.3 kB]
Get:12 http://us.archive.ubuntu.com/ubuntu focal/main amd64 python3-openssl all 19.0.0-1build1 [43.3 kB]
Get:13 http://us.archive.ubuntu.com/ubuntu focal/main amd64 python3-pyinotify all 0.9.6-1.2ubuntu1 [24.8 kB]
Get:14 http://us.archive.ubuntu.com/ubuntu focal/main amd64 ssh-import-id all 5.10-0ubuntu1 [10.0 kB]
Fetched 1,478 kB in 0s (5,095 kB/s)
Preconfiguring packages ...
Selecting previously unselected package javascript-common.
(Reading database ... 192970 files and directories currently installed.)
Preparing to unpack .../00-javascript-common_11_all.deb ...
Unpacking javascript-common (11) ...
Selecting previously unselected package libjs-jquery.
Preparing to unpack .../01-libjs-jquery_3.3.1~dfsg-3_all.deb ...
Unpacking libjs-jquery (3.3.1~dfsg-3) ...
Selecting previously unselected package ncurses-term.
Preparing to unpack .../02-ncurses-term_6.2-0ubuntu2_all.deb ...
Unpacking ncurses-term (6.2-0ubuntu2) ...
Preparing to unpack .../net-tools_1.60+git20180626.aebd88e-1ubuntu1_amd64.deb ...
Unpacking net-tools (1.60+git20180626.aebd88e-1ubuntu1) ...
Selecting previously unselected package openssh-sftp-server.
Preparing to unpack .../03-openssh-sftp-server_1%3a8.2p1-4ubuntu0.1_amd64.deb ...
Unpacking openssh-sftp-server (1:8.2p1-4ubuntu0.1) ...
Selecting previously unselected package openssh-server.
Preparing to unpack .../04-openssh-server_1%3a8.2p1-4ubuntu0.1_amd64.deb ...
Unpacking openssh-server (1:8.2p1-4ubuntu0.1) ...
Selecting previously unselected package python3-itsdangerous.
Preparing to unpack .../05-python3-itsdangerous_1.1.0-1_all.deb ...
Unpacking python3-itsdangerous (1.1.0-1) ...
Selecting previously unselected package python3-markupsafe.
Preparing to unpack .../06-python3-markupsafe_1.1.0-1build2_amd64.deb ...
Unpacking python3-markupsafe (1.1.0-1build2) ...
Selecting previously unselected package python3-jinja2.
Preparing to unpack .../07-python3-jinja2_2.10.1-2_all.deb ...
Unpacking python3-jinja2 (2.10.1-2) ...
Selecting previously unselected package python3-werkzeug.
Preparing to unpack .../08-python3-werkzeug_0.16.1+dfsg1-2_all.deb ...
Unpacking python3-werkzeug (0.16.1+dfsg1-2) ...
Selecting previously unselected package python3-flask.
Preparing to unpack .../09-python3-flask_1.1.1-2_all.deb ...
Unpacking python3-flask (1.1.1-2) ...
Selecting previously unselected package python3-openssl.
Preparing to unpack .../10-python3-openssl_19.0.0-1build1_all.deb ...
Unpacking python3-openssl (19.0.0-1build1) ...
Selecting previously unselected package python3-pyinotify.
Preparing to unpack .../11-python3-pyinotify_0.9.6-1.2ubuntu1_all.deb ...
Unpacking python3-pyinotify (0.9.6-1.2ubuntu1) ...
Selecting previously unselected package ssh-import-id.
Preparing to unpack .../12-ssh-import-id_5.10-0ubuntu1_all.deb ...
Unpacking ssh-import-id (5.10-0ubuntu1) ...
Setting up javascript-common (11) ...
Setting up net-tools (1.60+git20180626.aebd88e-1ubuntu1) ...
Setting up openssh-sftp-server (1:8.2p1-4ubuntu0.1) ...
Setting up openssh-server (1:8.2p1-4ubuntu0.1) ...
Creating config file /etc/ssh/sshd_config with new version
Creating SSH2 RSA key; this may take some time ...
3072 SHA256:OVmIaDeM2PCBtB6O5tddPIC3q4nuZVdqfcs/7A3QM5A root@vm-3 (RSA)
Creating SSH2 ECDSA key; this may take some time ...
256 SHA256:qDrGgauXE9LwZ6S1j4fjbY0LIPyrL+YSU8iq+PbR7jM root@vm-3 (ECDSA)
Creating SSH2 ED25519 key; this may take some time ...
256 SHA256:WBk+gqOXD47VoAJrw+JeZLxQlzBWdaKFRxi5xfPAkYg root@vm-3 (ED25519)
Created symlink /etc/systemd/system/sshd.service → /lib/systemd/system/ssh.service.
Created symlink /etc/systemd/system/multi-user.target.wants/ssh.service → /lib/systemd/system/ssh.service.
rescue-ssh.target is a disabled or a static unit, not starting it.
Setting up python3-openssl (19.0.0-1build1) ...
Setting up ssh-import-id (5.10-0ubuntu1) ...
Attempting to convert /etc/ssh/ssh_import_id
Setting up python3-pyinotify (0.9.6-1.2ubuntu1) ...
Setting up python3-itsdangerous (1.1.0-1) ...
Setting up python3-markupsafe (1.1.0-1build2) ...
Setting up python3-jinja2 (2.10.1-2) ...
Setting up libjs-jquery (3.3.1~dfsg-3) ...
Setting up ncurses-term (6.2-0ubuntu2) ...
Setting up python3-werkzeug (0.16.1+dfsg1-2) ...
Setting up python3-flask (1.1.1-2) ...
Processing triggers for systemd (245.4-4ubuntu3.3) ...
Processing triggers for man-db (2.9.1-1) ...
Processing triggers for ufw (0.36-6) ...
Local Port Forwarding
Assuming vm-3 is hosting a useful web application on 10.0.2.4, it is *ONLY* accessible within the 10.0.2.x network. What if a client on the vm-2 wants to access the web application ???
In this situation, one could use Local Port Forwarding SSH Tunnel option to allow the client vm-2 running on 192.168.56.104 to access the web application server running on the 10.0.2.x network.
The following is the code for the simple Python based web application:
To start the simple Python web application on vm-3, execute the following command in the Terminal for vm-3:
$ python3 Web.py 10.0.2.4 8080
The following would be a typical output:
* Serving Flask app "Web" (lazy loading)
* Environment: production
  WARNING: This is a development server. Do not use it in a production deployment.
  Use a production WSGI server instead.
* Debug mode: off
* Running on http://10.0.2.4:8080/ (Press CTRL+C to quit)
To list all the TCP ports listening for a connection on vm-2, execute the following command:
$ netstat -tlnp
The following would be the typical output:
(Not all processes could be identified, non-owned process info
will not be shown, you would have to be root to see it all.)
Active Internet connections (only servers)
Proto Recv-Q Send-Q Local Address           Foreign Address         State       PID/Program name
tcp        0      0 127.0.0.1:631           0.0.0.0:*               LISTEN      -
tcp        0      0 127.0.0.53:53           0.0.0.0:*               LISTEN      -
tcp        0      0 0.0.0.0:22              0.0.0.0:*               LISTEN      -
tcp6       0      0 ::1:631                 :::*                    LISTEN      -
tcp6       0      0 :::22                   :::*                    LISTEN      -
To setup the Local Port Forwarding SSH Tunnel on vm-2, execute the following command in the Terminal for vm-2 (which will prompt the user for authentication on the remote SSH Server running on 192.168.56.103):
$ ssh -L 8080:10.0.2.4:8080 192.168.56.103
With Local Port Forwarding SSH Tunnel option, any request on a specified local port 8080 on the client 192.168.56.104 is tunneled to the remote SSH Server running on 192.168.56.103, which is then transparently forwarded to the desired target 10.0.2.4.
The general format for the -L option is: [bind-address]:local-port:target-host:target-port, where the [bind-address] is optional. If not specified (like in the above example), it uses localhost as the default.
Now, let us list all the TCP ports listening for a connection on vm-2, execute the following command:
$ netstat -tlnp
The following would be the typical output:
(Not all processes could be identified, non-owned process info
will not be shown, you would have to be root to see it all.)
Active Internet connections (only servers)
Proto Recv-Q Send-Q Local Address           Foreign Address         State       PID/Program name
tcp        0      0 127.0.0.1:631           0.0.0.0:*               LISTEN      -
tcp        0      0 127.0.0.1:8080          0.0.0.0:*               LISTEN      3247/ssh
tcp        0      0 127.0.0.53:53           0.0.0.0:*               LISTEN      -
tcp        0      0 0.0.0.0:22              0.0.0.0:*               LISTEN      -
tcp6       0      0 ::1:631                 :::*                    LISTEN      -
tcp6       0      0 ::1:8080                :::*                    LISTEN      3247/ssh
tcp6       0      0 :::22                   :::*                    LISTEN      -
From the Output.4 above, we see that the SSH Tunnel is listening on the port 8080 on the client 192.168.56.104.
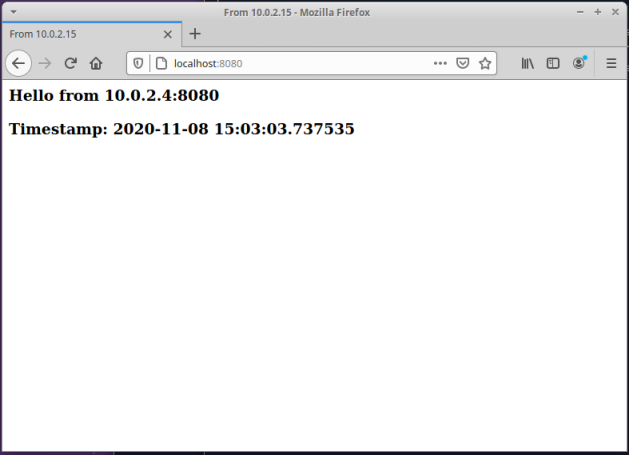
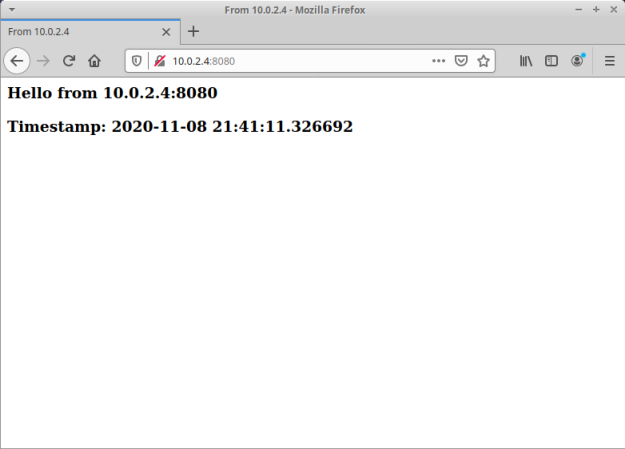
Launch a browser on vm-2 and open the URL http://localhost:8080/.
The following diagram illustrates the screenshot of the browser:
Terminate the SSH Tunnel on vm-2 by executing the following command:
$ exit
Refresh the browser on vm-2.
The following diagram illustrates the screenshot of the browser:
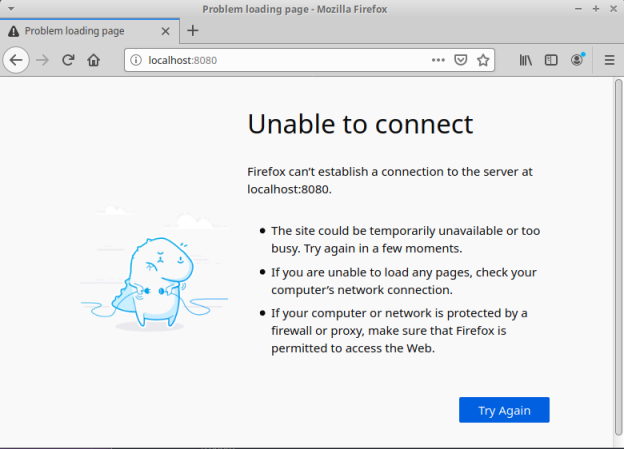
PERFECT !!! The setup works as expected.
Remote Port Forwarding
Assume vm-1 is hosting the same web application on 10.0.2.15. It is *ONLY* accessible within the 10.0.2.x network. What if a client on the vm-2 wants to access the web application ???
vm-1 is using NAT networking which implies it can access nodes outside its network while *NOT* the other way around
In this situation, one could use Remote Port Forwarding SSH Tunnel option (the reverse of Local Port Forwarding SSH Tunnel) to allow the client vm-2 on 192.168.56.104 access to the web application running on 10.0.2.15. In other words, the SSH Tunnel will be setup from the SSH Server to the client.
Typically, Remote Port Forwarding SSH Tunnel option is used to give access to an internal service to an external user or an external service.
We will reuse the same code listed above for the simple Python based web application in this demonstration.
To start the simple Python web application on vm-1, execute the following command in the Terminal for vm-1:
$ python3 Web.py 10.0.2.15 8080
The following would be a typical output:
* Serving Flask app "Web" (lazy loading)
* Environment: production
  WARNING: This is a development server. Do not use it in a production deployment.
  Use a production WSGI server instead.
* Debug mode: off
* Running on http://10.0.2.15:8080/ (Press CTRL+C to quit)
To list all the TCP ports listening for a connection on vm-2, execute the following command:
$ netstat -tlnp
The result should be similar to the one in Output.3 above.
To setup the Remote Port Forwarding SSH Tunnel on vm-1, execute the following command in the Terminal for vm-1 (which will prompt the user for authentication on the remote SSH Server running on 192.168.56.104):
$ ssh -R 8080:10.0.2.15:8080 192.168.56.104
With Remote Port Forwarding SSH Tunnel option, any request on a specified remote port 8080 on the client 192.168.56.104 is tunneled to the SSH Server running on 10.0.2.15, which is then transparently forwarded to the desired target on 10.0.2.15.
The general format for the -R option is: [bind-address]:remote-port:target-host:target-port, where the [bind-address] is optional. If not specified (like in the above example), it uses localhost as the default.
Now, let us list all the TCP ports listening for a connection on vm-2, execute the following command:
$ netstat -tlnp
The result should be similar to the one in Output.4 above.
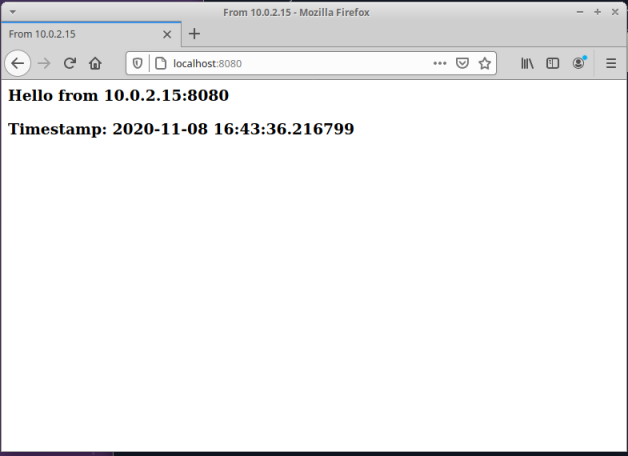
Launch a browser on vm-2 and open the URL http://localhost:8080/.
The following diagram illustrates the screenshot of the browser:
Terminate the SSH Tunnel on vm-1 by executing the following command:
$ exit
Refresh the browser on vm-2.
The following diagram illustrates the screenshot of the browser:
AWESOME !!! The setup works as expected.
Dynamic Port Forwarding
Going back to our first demonstration, assume vm-3 is hosting the useful web application on 10.0.2.4. It is *ONLY* accessible within the 10.0.2.x network. In addition, given that vm-3 is also on the 192.168.56.x network (second interface), it can access the web application. Is there a way for the client on vm-2 access the web application (other than Local Port Forwarding SSH Tunnel option) ???
The answer is *YES* - it can using the Dynamic Port Forwarding SSH Tunnel option.
We will reuse the same code listed above for the simple Python based web application in this demonstration.
To start the simple Python web application on vm-3, execute the following command in the Terminal for vm-3:
$ python3 Web.py 10.0.2.4 8080
The result should be similar to the one in Output.2 above.
To setup the Dynamic Port Forwarding SSH Tunnel on vm-2, execute the following command in the Terminal for vm-2 (which will prompt the user for authentication on the remote SSH Server running on 192.168.56.103):
$ ssh -D 8080 192.168.56.103
The Dynamic Port Forwarding SSH Tunnel option automatically sets up a SOCKS proxy on the client vm-2. Once the browser is configured to use the SOCKS proxy, all requests are routed through the proxy to the SSH Server, which then transparently forwards the request to the desired target on 10.0.2.4.
The general format for the -D option is: [bind-address]:local-port, where the [bind-address] is optional. If not specified (like in the above example), it uses localhost as the default.
Now, let us list all the TCP ports listening for a connection on vm-2, execute the following command:
$ netstat -tlnp
The result should be similar to the one in Output.4 above.
Launch a browser on vm-2 and open the URL http://10.0.2.4:8080/.
The following diagram illustrates the screenshot of the browser:
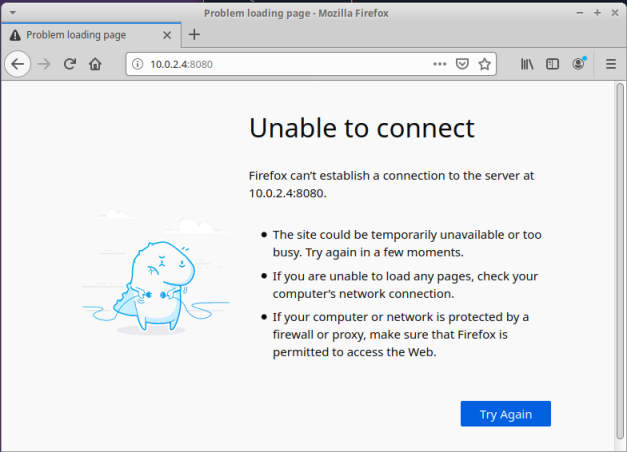
This was expected as we have not yet configured the browser to use the SOCKS proxy.
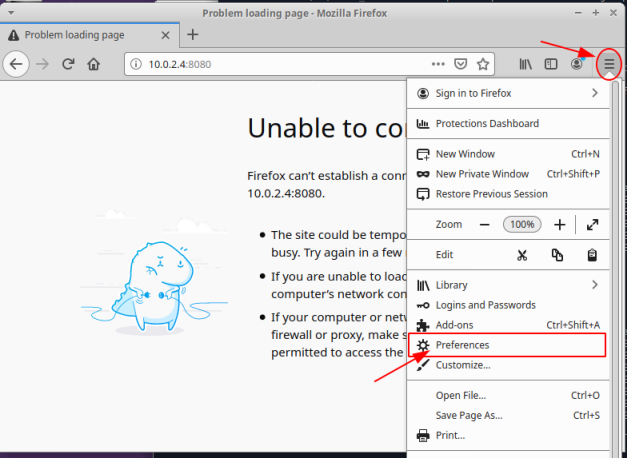
Click on the three horizontal lines (top right-hand corner) and then on the Preferences option as shown in the illustration below:
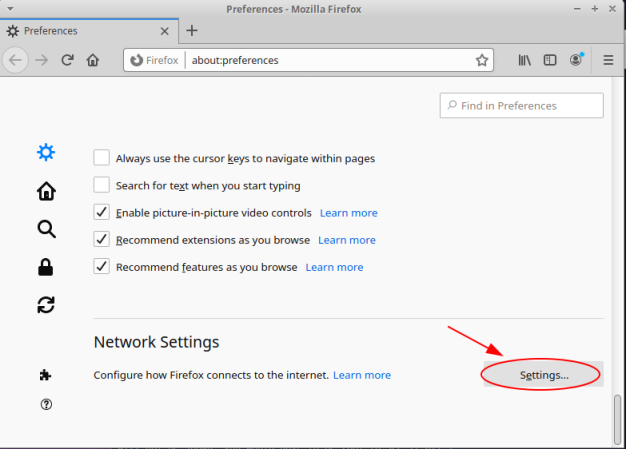
Scroll down and click on the Settings button as shown in the illustration below:
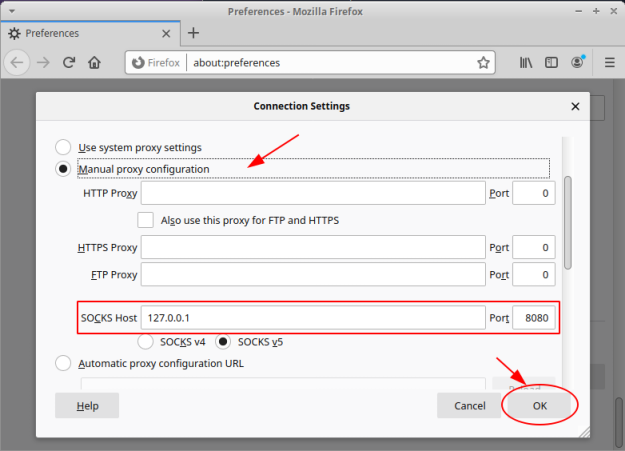
Select the Manual proxy configuration option, enter the details for the SOCKS Host and Port, and finally click the OK button as shown in the illustration below:
Open the URL http://10.0.2.4:8080/ in a new tab of the browser.
The following diagram illustrates the screenshot of the browser:
WALLA !!! The setup works as expected.
References