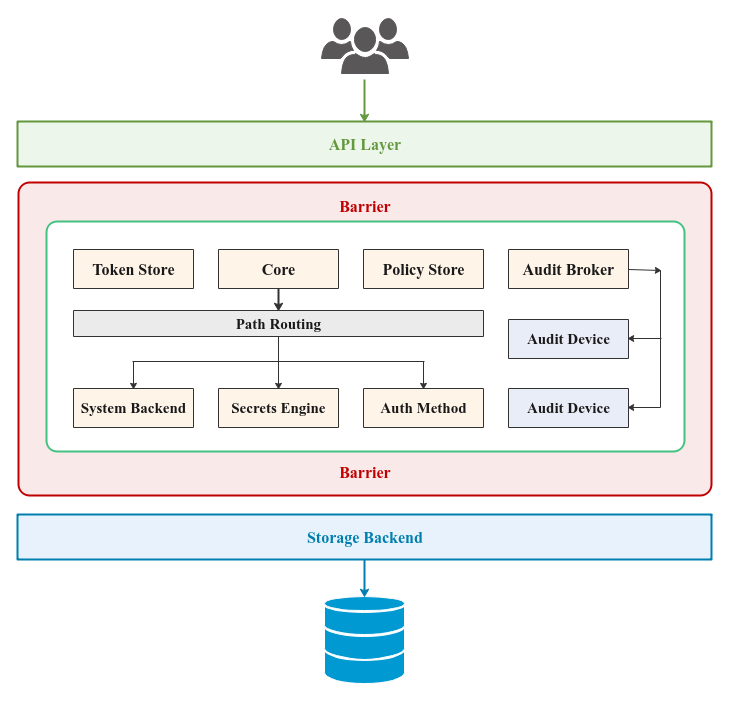
Figure-1
| PolarSPARC |
Hands-on with HashiCorp Vault
| Bhaskar S | 01/01/2021 |
Overview
Time and again we have observed many application developers store credentials such as access tokens, database passwords, certificates, etc., in configuration files that is open and visible to all. Is there a secure way to store and control access to these sensitive assets ???
This is where HashiCorp Vault comes in handy to help Enterprises centrally store, allow access, and deploy secrets across applications, systems, and infrastructure. This becomes even more critical as more and more Enterprises are heading towards the Cloud (be it private or public).
The following are some of the key features of Vault:
Controlled Access :: client access is granted only after successful authentication and verification of client operation against the access policy
Encrypted Storage :: secrets are encrypted (using an encryption key) prior to storing them on the persistent storage backend
Dynamic Secrets :: when the appropriate plugin is configured, can dynamically generate secrets for popular relational databases, public cloud providers, etc
Secrets Lifecycle :: dynamically created secrets have a lease associated with them and at the end of the lease, they are revoked and destroyed, unless the lease is renewed by client
Audit Trail :: all client activity is logged to an audit device for regulatory purposes
The following illustration depicts the high-level architectural components of Vault:
When Vault is setup for the first time, it needs to be INITIALIZED. As part of the initialization process, Vault generates a Master Key which is broken up into a certain number of Key Shares (default is 5). A certain number of these Key Shares, referred to as Key Threshold (default is 3), can be combined to form the Master Key. The Master Key is NEVER persisted in any store - it ONLY resides in the memory. In addition, a root access token is also generated, using which one gets full access to Vault.
Let us expand on each of the components from the Figure-1 above:
API Layer :: one can interact with Vault either using the command line interface (CLI) or using a well-defined set of HTTP API endpoints. In either case, under-the-hood they go through this layer for access
Storage Backend :: responsible for the persistent storage of all the encrypted secrets so that they are available even after restart(s). The officially supported backends are - Filesystem , Consul, and Raft. There are plethora of 3rd-party backends that can be used, such as, etcd, PostgreSQL, MySQL, MSSQL, DynamoDB, etc., to name a few
Barrier :: it is a secure shield around the core of Vault. When Vault is started, it is in a Sealed state (locked). One has to Unseal (or unlock) the Barrier before one can interact with the core components of Vault. The unseal operation happens with the Key Threshold number of Key Shares, which regenerates the Master Key. The Master Key is then used to regenerate the Encryption Key. All data passing through the Barrier (either in via the API Layer or out to the Storage Backend) is encrypted using the Encryption Key
Path Routing :: in Vault resources are referred to by their associated Path. When a client makes a request to perform some operation (providing a Path as a parameter), the request is routed to the appropriate component by Path Routing based on the Path prefix
Audit Device :: responsible for keeping a detailed log of all the activities - requests and responses to/from the Vault
Auth Method :: used for authenticating clients (applications, systems, or users) that want to access and interact with Vault. The default Auth Method is token based. There is also the user-password based option in Vault. In addition, Vault can integrate with LDAP, Kerberos, Github, etc., to name a few
Secrets Engine :: responsible for managing the secrets - generating a dynamic secret or storing a client provided secret (after encrypting the secret). The simplest is the Key-Value (kv) Secrets Engine that persists client provided secrets in the Storage Backend (after encryption). There are two variants of kv Secrets Engine - v1 (non-versioned) and v2 (versioned with metadata). When a Secrets Engine is enabled, it is mounted at a certain Path. There are a variety of Secrets Engine options available
System Backend :: used for configuring and managing the internal components of Vault at runtime. It is mounted at the Path /sys
Policy Store :: used for storing a named collection of access control policy rules. A policy rule allows or denies some operation on a Path. Policies provide a declarative way to grant or deny access to certain Paths and operations in Vault. By default, there are two built-in named policies defined within Vault - default policy and the root policy
Token Store :: responsible for creating and storing tokens in Vault and mounted at the Path /auth/token. Clients can authenticate to Vault using an access token. When a client successfully authenticates with a user-password or through any external identity provider (such as Github), Vault generates and swaps it for a new token so that the client can attach the token in future interactions with the Vault. Attached to the token are the access control policies that govern what operations the client can perform
Audit Broker :: responsible for capturing and fanning out the trail of all activity in Vault to the configured Audit Devices
Core :: is the workhorse of Vault that manages the flow of all the requests/responses through the Path Routing, ensures created tokens have a lease associated with them and are stored in the Token Store, ensures associated policies from the Policy Store are enforced, and ensures all activity is logged via the Audit Broker
Environment Setup
The setup will be on a Ubuntu 20.04 LTS based Linux desktop. For the demonstrations, we will create an environment with 3 virtual machines running on the hypervisor VirtualBox.
The following diagram illustrates the virtual machines environment setup:
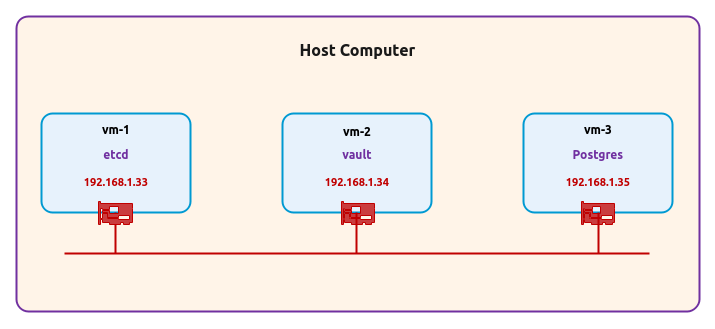
The following are some of the highlights of the 3 virtual machines:
vm-1 :: 1 vCPU, 2GB RAM, 20GB storage, Ubuntu 20.04 OS, and uses a single virtual network interface with Bridge networking and will host the Storage Backend
vm-2 :: 1 vCPU, 2GB RAM, 20GB storage, Ubuntu 20.04 OS, and uses a single virtual network interface with Bridge networking and will host the Vault server
vm-3 :: 1 vCPU, 2GB RAM, 20GB storage, Ubuntu 20.04 OS, and uses a single virtual network interface with Bridge and will host the Postgres database
Open a Terminal window for each of the 3 virtual machines vm-1 thru vm-3 to install/setup the pre-requisites.
In the Terminal for vm-1, we will download and setup the 3rd-party Storage Backend called etcd, which is a popular cloud native distributed and reliable key-value store.
At the time of this article, the latest version of etcd was v3.4.14. For the setup, execute the following commands:
$ mkdir -p $HOME/Apps/etcd
$ sudo apt-get install curl -y
$ curl -L https://storage.googleapis.com/etcd/v3.4.14/etcd-v3.4.14-linux-amd64.tar.gz -o $HOME/Downloads/etcd-v3.4.14-linux-amd64.tar.gz
$ cd $HOME/Downloads
$ gunzip ./etcd-v3.4.14-linux-amd64.tar.gz
$ tar xvf ./etcd-v3.4.14-linux-amd64.tar
$ cp ./etcd-v3.4.14-linux-amd64/etcd* $HOME/Apps/etcd
$ cd $HOME/Apps/etcd
At this point, we should have the two executables etcd and etcdctl in the current directory $HOME/Apps/etcd.
Copy the contents of the following configuration to a YAML file called ps-etcd-conf.yml in the current directory $HOME/Apps/etcd.
#
# @Author: Bhaskar S
# @Blog:   https://www.polarsparc.com
# @Date:   01 Jan 2021
#

# This is the configuration file for the etcd server.

# Human-readable name for this member.
name: 'ps-etcd-server'

# Path to the data directory.
data-dir: ./data

# List of comma separated URLs to listen on for peer traffic.
listen-peer-urls: http://0.0.0.0:2380

# List of comma separated URLs to listen on for client traffic.
listen-client-urls: http://0.0.0.0:2379

# List of this member's peer URLs to advertise to the rest of the cluster.
# The URLs needed to be a comma-separated list.
initial-advertise-peer-urls: http://192.168.1.33:2380

# List of this member's client URLs to advertise to the public.
# The URLs needed to be a comma-separated list.
advertise-client-urls: http://192.168.1.33:2379

# Initial cluster configuration for bootstrapping.
initial-cluster: ps-etcd-server=http://192.168.1.33:2380

# Enable debug-level logging for etcd.
debug: false

logger: zap
To start the etcd server, execute the following command:
$ ./etcd --config-file ./ps-etcd-conf.yml
The following would be a typical output:
{"level":"info","ts":"2020-12-31T11:20:38.271-0500","caller":"etcdmain/config.go:307","msg":"loaded server configuration, other configuration command line flags and environment variables will be ignored if provided","path":"./ps-etcd-conf.yml"}
{"level":"info","ts":"2020-12-31T11:20:38.271-0500","caller":"embed/etcd.go:117","msg":"configuring peer listeners","listen-peer-urls":["http://0.0.0.0:2380"]}
{"level":"info","ts":"2020-12-31T11:20:38.271-0500","caller":"embed/etcd.go:127","msg":"configuring client listeners","listen-client-urls":["http://0.0.0.0:2379"]}
{"level":"info","ts":"2020-12-31T11:20:38.271-0500","caller":"embed/etcd.go:302","msg":"starting an etcd server","etcd-version":"3.4.14","git-sha":"8a03d2e96","go-version":"go1.12.17","go-os":"linux","go-arch":"amd64","max-cpu-set":1,"max-cpu-available":1,"member-initialized":false,"name":"ps-etcd-server","data-dir":"./data","wal-dir":"","wal-dir-dedicated":"","member-dir":"data/member","force-new-cluster":false,"heartbeat-interval":"100ms","election-timeout":"1s","initial-election-tick-advance":true,"snapshot-count":100000,"snapshot-catchup-entries":5000,"initial-advertise-peer-urls":["http://192.168.1.33:2380"],"listen-peer-urls":["http://0.0.0.0:2380"],"advertise-client-urls":["http://192.168.1.33:2379"],"listen-client-urls":["http://0.0.0.0:2379"],"listen-metrics-urls":[],"cors":["*"],"host-whitelist":["*"],"initial-cluster":"ps-etcd-server=http://192.168.1.33:2380","initial-cluster-state":"new","initial-cluster-token":"etcd-cluster","quota-size-bytes":2147483648,"pre-vote":false,"initial-corrupt-check":false,"corrupt-check-time-interval":"0s","auto-compaction-mode":"","auto-compaction-retention":"0s","auto-compaction-interval":"0s","discovery-url":"","discovery-proxy":""}
2020-12-31 13:40:38.271868 W | pkg/fileutil: check file permission: directory "./data" exist, but the permission is "drwxrwxr-x". The recommended permission is "-rwx------" to prevent possible unprivileged access to the data.
{"level":"info","ts":"2020-12-31T11:20:38.277-0500","caller":"etcdserver/backend.go:80","msg":"opened backend db","path":"data/member/snap/db","took":"5.825856ms"}
{"level":"info","ts":"2020-12-31T11:20:38.285-0500","caller":"etcdserver/raft.go:486","msg":"starting local member","local-member-id":"35ef855791ca152c","cluster-id":"c4385a52ed4a8e11"}
{"level":"info","ts":"2020-12-31T11:20:38.286-0500","caller":"raft/raft.go:1530","msg":"35ef855791ca152c switched to configuration voters=()"}
{"level":"info","ts":"2020-12-31T11:20:38.286-0500","caller":"raft/raft.go:700","msg":"35ef855791ca152c became follower at term 0"}
{"level":"info","ts":"2020-12-31T11:20:38.286-0500","caller":"raft/raft.go:383","msg":"newRaft 35ef855791ca152c [peers: [], term: 0, commit: 0, applied: 0, lastindex: 0, lastterm: 0]"}
{"level":"info","ts":"2020-12-31T11:20:38.286-0500","caller":"raft/raft.go:700","msg":"35ef855791ca152c became follower at term 1"}
{"level":"info","ts":"2020-12-31T11:20:38.286-0500","caller":"raft/raft.go:1530","msg":"35ef855791ca152c switched to configuration voters=(3886471614598616364)"}
{"level":"warn","ts":"2020-12-31T11:20:38.297-0500","caller":"auth/store.go:1366","msg":"simple token is not cryptographically signed"}
{"level":"info","ts":"2020-12-31T11:20:38.304-0500","caller":"etcdserver/quota.go:98","msg":"enabled backend quota with default value","quota-name":"v3-applier","quota-size-bytes":2147483648,"quota-size":"2.1 GB"}
{"level":"info","ts":"2020-12-31T11:20:38.307-0500","caller":"etcdserver/server.go:803","msg":"starting etcd server","local-member-id":"35ef855791ca152c","local-server-version":"3.4.14","cluster-version":"to_be_decided"}
{"level":"info","ts":"2020-12-31T11:20:38.316-0500","caller":"etcdserver/server.go:669","msg":"started as single-node; fast-forwarding election ticks","local-member-id":"35ef855791ca152c","forward-ticks":9,"forward-duration":"900ms","election-ticks":10,"election-timeout":"1s"}
{"level":"info","ts":"2020-12-31T11:20:38.317-0500","caller":"embed/etcd.go:579","msg":"serving peer traffic","address":"[::]:2380"}
{"level":"info","ts":"2020-12-31T11:20:38.318-0500","caller":"embed/etcd.go:244","msg":"now serving peer/client/metrics","local-member-id":"35ef855791ca152c","initial-advertise-peer-urls":["http://192.168.1.33:2380"],"listen-peer-urls":["http://0.0.0.0:2380"],"advertise-client-urls":["http://192.168.1.33:2379"],"listen-client-urls":["http://0.0.0.0:2379"],"listen-metrics-urls":[]}
{"level":"info","ts":"2020-12-31T11:20:38.318-0500","caller":"raft/raft.go:1530","msg":"35ef855791ca152c switched to configuration voters=(3886471614598616364)"}
{"level":"info","ts":"2020-12-31T11:20:38.318-0500","caller":"membership/cluster.go:392","msg":"added member","cluster-id":"c4385a52ed4a8e11","local-member-id":"35ef855791ca152c","added-peer-id":"35ef855791ca152c","added-peer-peer-urls":["http://192.168.1.33:2380"]}
{"level":"info","ts":"2020-12-31T11:20:39.186-0500","caller":"raft/raft.go:923","msg":"35ef855791ca152c is starting a new election at term 1"}
{"level":"info","ts":"2020-12-31T11:20:39.186-0500","caller":"raft/raft.go:713","msg":"35ef855791ca152c became candidate at term 2"}
{"level":"info","ts":"2020-12-31T11:20:39.186-0500","caller":"raft/raft.go:824","msg":"35ef855791ca152c received MsgVoteResp from 35ef855791ca152c at term 2"}
{"level":"info","ts":"2020-12-31T11:20:39.186-0500","caller":"raft/raft.go:765","msg":"35ef855791ca152c became leader at term 2"}
{"level":"info","ts":"2020-12-31T11:20:39.186-0500","caller":"raft/node.go:325","msg":"raft.node: 35ef855791ca152c elected leader 35ef855791ca152c at term 2"}
{"level":"info","ts":"2020-12-31T11:20:39.187-0500","caller":"etcdserver/server.go:2528","msg":"setting up initial cluster version","cluster-version":"3.4"}
{"level":"info","ts":"2020-12-31T11:20:39.191-0500","caller":"membership/cluster.go:558","msg":"set initial cluster version","cluster-id":"c4385a52ed4a8e11","local-member-id":"35ef855791ca152c","cluster-version":"3.4"}
{"level":"info","ts":"2020-12-31T11:20:39.191-0500","caller":"api/capability.go:76","msg":"enabled capabilities for version","cluster-version":"3.4"}
{"level":"info","ts":"2020-12-31T11:20:39.191-0500","caller":"etcdserver/server.go:2560","msg":"cluster version is updated","cluster-version":"3.4"}
{"level":"info","ts":"2020-12-31T11:20:39.191-0500","caller":"etcdserver/server.go:2037","msg":"published local member to cluster through raft","local-member-id":"35ef855791ca152c","local-member-attributes":"{Name:ps-etcd-server ClientURLs:[http://192.168.1.33:2379]}","request-path":"/0/members/35ef855791ca152c/attributes","cluster-id":"c4385a52ed4a8e11","publish-timeout":"7s"}
{"level":"info","ts":"2020-12-31T11:20:39.192-0500","caller":"embed/serve.go:139","msg":"serving client traffic insecurely; this is strongly discouraged!","address":"[::]:2379"}
Open a new Terminal on vm-1 and execute the following command to check the version:
$ ETCDCTL_API=3 ./etcdctl version
The following would be a typical output:
etcdctl version: 3.4.14
API version: 3.4
In the new Terminal on vm-1, execute the following command to check the cluster members:
$ ETCDCTL_API=3 ./etcdctl --endpoints=http://192.168.1.33:2379 member list
The following would be a typical output:
35ef855791ca152c, started, ps-etcd-server, http://192.168.1.33:2380, http://192.168.1.33:2379, false
In the new Terminal on vm-1, execute the following command to store some arbitrary key-value in etcd:
$ ETCDCTL_API=3 ./etcdctl put token "ae1b310ef86p034ef22"
The following would be a typical output:
OK
In the new Terminal on vm-1, execute the following command to retrieve the arbitrary key-value from etcd:
$ ETCDCTL_API=3 ./etcdctl get token
The following would be a typical output:
token
ae1b310ef86p034ef22
PERFECT !!! The etcd setup works as expected.
Moving on, in the Terminal for vm-2, we will download and setup Vault.
At the time of this article, the latest version of Vault was v1.6.1. For the setup, execute the following commands:
$ mkdir -p $HOME/Apps/vault
$ sudo apt-get install curl jq -y
$ curl -L https://releases.hashicorp.com/vault/1.6.1/vault_1.6.1_linux_amd64.zip -o $HOME/Downloads/vault_1.6.1_linux_amd64.zip
$ cd $HOME/Downloads
$ unzip ./vault_1.6.1_linux_amd64.zip
$ cp ./vault $HOME/Apps/vault
$ cd $HOME/Apps/vault
At this point, we should have the one executable vault in the current directory $HOME/Apps/vault.
Copy the contents of the following HashiCorp Configuration Language (HCL) based configuration file called ps-vault-conf.hcl in the current directory $HOME/Apps/vault.
#
# @Author: Bhaskar S
# @Blog:   https://www.polarsparc.com
# @Date:   01 Jan 2021
#

storage "etcd" {
  address  = "http://192.168.1.33:2379"
  etcd_api = "v3"
}

listener "tcp" {
  address     = "192.168.1.34:8200"
  tls_disable = 1
}

disable_mlock = true

api_addr = "http://192.168.1.34:8200"
cluster_name = "ps-vault-server"
cluster_addr = "https://192.168.1.34:8201"

ui = true
To start the Vault server, execute the following command:
$ ./vault server -config=ps-vault-conf.hcl -log-level=info
The following would be a typical output:
==> Vault server configuration:

        Api Address: http://192.168.1.34:8200
                Cgo: disabled
    Cluster Address: https://192.168.1.34:8201
         Go Version: go1.15.4
         Listener 1: tcp (addr: "192.168.1.34:8200", cluster address: "192.168.1.34:8201", max_request_duration: "1m30s", max_request_size: "33554432", tls: "disabled")
          Log Level: info
              Mlock: supported: true, enabled: false
      Recovery Mode: false
            Storage: etcd (HA disabled)
            Version: Vault v1.6.1
        Version Sha: 6d2db3f033e02e70202bef9ec896360062b88b03

==> Vault server started! Log data will stream in below:

2020-12-31T11:25:09.151-0500 [INFO]  proxy environment: http_proxy= https_proxy= no_proxy=
This is a fresh setup of Vault and hence needs to be INITIALIZED for the first time only.
Open a new Terminal on vm-2 and execute the following commands to initialize Vault:
$ export VAULT_ADDR='http://192.168.1.34:8200'
$ ./vault operator init
The following would be a typical output:
Unseal Key 1: XX3yeN2mV3BbZo3Izz6V3BnmUfPiyBbHUAsrnv49e0Qd
Unseal Key 2: zsBxnrQiEgSTR7RMIm9f/jukcYwYizIeSisaNv8ZTPgG
Unseal Key 3: MSvczb8YXMlbRwNpWMSDnuWCnc7S0yss6oRMDINvxXCw
Unseal Key 4: g26TABEhtGxTySup8pkRYW2elIkn7ErPAxfhWM9Hc4A4
Unseal Key 5: WzwAsDyxnyI8O1HKekYAdzaBUa8vJiwMk+zQPF6wYrAC

Initial Root Token: s.ELjcgaF2DbVQuCGGmXpFmVH7

Vault initialized with 5 key shares and a key threshold of 3. Please securely
distribute the key shares printed above. When the Vault is re-sealed,
restarted, or stopped, you must supply at least 3 of these keys to unseal it
before it can start servicing requests.

Vault does not store the generated master key. Without at least 3 key to
reconstruct the master key, Vault will remain permanently sealed!

It is possible to generate new unseal keys, provided you have a quorum of
existing unseal keys shares. See "vault operator rekey" for more information.
Notice the 5 Key Shares and the root token displayed in the Output.7 above. One needs to safe-guard these keys and token.
In the first Terminal on vm-2 where the Vault server is running, we will see the following additional output:
2020-12-31T11:26:48.620-0500 [INFO]  core: security barrier not initialized
2020-12-31T11:26:48.634-0500 [INFO]  core: security barrier initialized: stored=1 shares=5 threshold=3
2020-12-31T11:26:48.643-0500 [INFO]  core: post-unseal setup starting
2020-12-31T11:26:48.666-0500 [INFO]  core: loaded wrapping token key
2020-12-31T11:26:48.666-0500 [INFO]  core: successfully setup plugin catalog: plugin-directory=
2020-12-31T11:26:48.668-0500 [INFO]  core: no mounts; adding default mount table
2020-12-31T11:26:48.672-0500 [INFO]  core: successfully mounted backend: type=cubbyhole path=cubbyhole/
2020-12-31T11:26:48.673-0500 [INFO]  core: successfully mounted backend: type=system path=sys/
2020-12-31T11:26:48.673-0500 [INFO]  core: successfully mounted backend: type=identity path=identity/
2020-12-31T11:26:48.690-0500 [INFO]  core: successfully enabled credential backend: type=token path=token/
2020-12-31T11:26:48.692-0500 [INFO]  core: restoring leases
2020-12-31T11:26:48.692-0500 [INFO]  rollback: starting rollback manager
2020-12-31T11:26:48.695-0500 [INFO]  expiration: lease restore complete
2020-12-31T11:26:48.706-0500 [INFO]  identity: entities restored
2020-12-31T11:26:48.707-0500 [INFO]  identity: groups restored
2020-12-31T11:26:48.710-0500 [INFO]  core: usage gauge collection is disabled
2020-12-31T11:26:48.711-0500 [INFO]  core: post-unseal setup complete
2020-12-31T11:26:48.715-0500 [INFO]  core: root token generated
2020-12-31T11:26:48.716-0500 [INFO]  core: pre-seal teardown starting
2020-12-31T11:26:48.716-0500 [INFO]  rollback: stopping rollback manager
2020-12-31T11:26:48.716-0500 [INFO]  core: pre-seal teardown complete
In the second Terminal on vm-2, execute the following command to check the status of Vault:
$ ./vault status
The following would be a typical output:
Key                Value
---                -----
Seal Type          shamir
Initialized        true
Sealed             true
Total Shares       5
Threshold          3
Unseal Progress    0/3
Unseal Nonce       n/a
Version            1.6.1
Storage Type       etcd
HA Enabled         false
As is evident from the Output.9, the Barrier of Vault is in the sealed state and no operations will be permitted. Also, notice the Storage Backend used - it is etcd.
EXCELLENT !!! The Vault setup works as expected.
The Vault server can also be started in a development mode using the -dev option as shown below:

  $ ./vault server -dev

In this mode, the Storage Backend is entirely in-memory and the server is automatically initialized and unsealed
Moving on, in the Terminal for vm-3, we will setup the popular SQL database Postgres to run in Docker.
Ensure Docker is installed on the system. Else, follow the instructions provided in the article Introduction to Docker to complete the installation.
Check the latest stable version for Postgres docker image. Version 12.5 was the latest at the time of this article.
To download the latest docker image for Postgres, execute the following command in the Terminal for vm-3:
$ docker pull postgres:12.5
The following would be a typical output:
12.5: Pulling from library/postgres
68ced04f60ab: Pull complete
59f4081d08e6: Pull complete
74fc17f00df0: Pull complete
8e5e30d57895: Pull complete
a1fd179b16c6: Pull complete
7496d9eb4150: Pull complete
0328931819fd: Pull complete
8acde85a664a: Pull complete
38e831e7d2d3: Pull complete
582b4ba3b134: Pull complete
cbf69ccc1db5: Pull complete
1e1f3255b2e0: Pull complete
c1c0cedd64ec: Pull complete
6adde56874ed: Pull complete
Digest: sha256:110d3325db02daa6e1541fdd37725fcbecb7d51411229d922562f208c51d35cc
Status: Downloaded newer image for postgres:12.5
docker.io/library/postgres:12.5
We need to specifiy a directory on the host that will be mounted as a data volume for the Postgres database.
To create a data directory on the host, execute the following command in the Terminal for vm-3:
$ mkdir -p $HOME/Apps/postgres
Now, we will need to initialze and start the Postgres database.
To initialze and start the Postgres database, execute the following command in the Terminal for vm-3:
$ docker run -d --rm --name postgres-12.5 -e POSTGRES_USER=polarsparc -e POSTGRES_PASSWORD=polarsparc\$123 -p 192.168.1.35:5432:5432 -v $HOME/Apps/postgres:/var/lib/postgresql/data postgres:12.5
The following would be a typical output:
a2dadd7c4e2e0ac5a7c776b75b4942c8429a96665aa6aa7965c9617eef724701
To check the Postgres database log, execute the following command in the Terminal for vm-3:
$ docker logs postgres-12.5
The following would be a typical output:
...SNIP...
2020-12-31 11:28:54.433 UTC [1] LOG:  starting PostgreSQL 12.5 (Debian 12.5-1.pgdg100+1) on x86_64-pc-linux-gnu, compiled by gcc (Debian 8.3.0-6) 8.3.0, 64-bit
2020-12-31 11:28:54.435 UTC [1] LOG:  listening on IPv4 address "0.0.0.0", port 5432
2020-12-31 11:28:54.436 UTC [1] LOG:  listening on IPv6 address "::", port 5432
2020-12-31 11:28:54.443 UTC [1] LOG:  listening on Unix socket "/var/run/postgresql/.s.PGSQL.5432"
2020-12-31 11:28:54.466 UTC [65] LOG:  database system was shut down at 2020-12-29 20:57:54 UTC
2020-12-31 11:28:54.472 UTC [1] LOG:  database system is ready to accept connections
Finally, we will need to create the database called my_dev_db. For that we need to enter the docker shell by executing the following command in the Terminal for vm-3:
$ docker exec -it postgres-12.5 sh
The shell prompt will change to #
We need to enter the psql shell by executing the following command:
# psql -U polarsparc
The following would be a typical output:
psql (12.5 (Debian 12.5-1.pgdg100+1))
Type "help" for help.
The shell prompt will change to polarsparc=#
Execute the following command:
polarsparc=# CREATE ROLE dev_role NOINHERIT;
Next, execute the following command:
polarsparc=# CREATE DATABASE my_dev_db;
Then, execute the following command:
polarsparc=# GRANT ALL PRIVILEGES ON DATABASE my_dev_db TO dev_role;
To exit psql, execute the following command:
polarsparc=# \q
Finally, to exit docker shell, execute the following command:
# exit
AWESOME !!! This completes the Postgres setup.
Hands-on with HashiCorp Vault
Before we can perform any operations in Vault, one needs to first unseql the Barrier and the login to Vault using the root token.
In the second Terminal on vm-2 and execute the following command:
$ ./vault operator unseal
This will prompt us to enter one of the Key Shares. We will pick the Unseal Key 1 in this case.
The following would be a typical output:
Key                Value
---                -----
Seal Type          shamir
Initialized        true
Sealed             true
Total Shares       5
Threshold          3
Unseal Progress    1/3
Unseal Nonce       cc14b215-7ba0-993d-c3fb-abf13305deb2
Version            1.6.1
Storage Type       etcd
HA Enabled         false
REMEMBER we will need at least 3 (Key Thresold) keys before the Barrier is unsealed. The above was the first one.
Execute the following command the second time:
$ ./vault operator unseal
This will again prompt us to enter one of the Key Shares. This time we will pick Unseal Key 3.
The following would be a typical output:
Key                Value
---                -----
Seal Type          shamir
Initialized        true
Sealed             true
Total Shares       5
Threshold          3
Unseal Progress    2/3
Unseal Nonce       cc14b215-7ba0-993d-c3fb-abf13305deb2
Version            1.6.1
Storage Type       etcd
HA Enabled         false
Execute the following command the third (and last) time:
$ ./vault operator unseal
This will again prompt us to enter one of the Key Shares. This time we will pick Unseal Key 5.
The following would be a typical output:
Key             Value
---             -----
Seal Type       shamir
Initialized     true
Sealed          false
Total Shares    5
Threshold       3
Version         1.6.1
Storage Type    etcd
Cluster Name    vault-cluster-586b9d85
Cluster ID      c43ea8d3-e9f3-ff1d-1549-de4e17e3a141
HA Enabled      false
In the first Terminal on vm-2 where the Vault server is running, we will see the following additional output:
2020-12-31T11:30:17.259-0500 [INFO]  core.cluster-listener.tcp: starting listener: listener_address=192.168.1.34:8201
2020-12-31T11:30:17.259-0500 [INFO]  core.cluster-listener: serving cluster requests: cluster_listen_address=192.168.1.34:8201
2020-12-31T11:30:17.260-0500 [INFO]  core: post-unseal setup starting
2020-12-31T11:30:17.265-0500 [INFO]  core: loaded wrapping token key
2020-12-31T11:30:17.265-0500 [INFO]  core: successfully setup plugin catalog: plugin-directory=
2020-12-31T11:30:17.274-0500 [INFO]  core: successfully mounted backend: type=system path=sys/
2020-12-31T11:30:17.275-0500 [INFO]  core: successfully mounted backend: type=identity path=identity/
2020-12-31T11:30:17.275-0500 [INFO]  core: successfully mounted backend: type=cubbyhole path=cubbyhole/
2020-12-31T11:30:17.282-0500 [INFO]  core: successfully enabled credential backend: type=token path=token/
2020-12-31T11:30:17.284-0500 [INFO]  core: restoring leases
2020-12-31T11:30:17.284-0500 [INFO]  rollback: starting rollback manager
2020-12-31T11:30:17.285-0500 [INFO]  expiration: lease restore complete
2020-12-31T11:30:17.286-0500 [INFO]  identity: entities restored
2020-12-31T11:30:17.291-0500 [INFO]  identity: groups restored
2020-12-31T11:30:17.296-0500 [INFO]  core: usage gauge collection is disabled
2020-12-31T11:30:17.297-0500 [INFO]  core: post-unseal setup complete
2020-12-31T11:30:17.297-0500 [INFO]  core: vault is unsealed
WALLA !!! The Barrier has been unsealed.
In the second Terminal on vm-2 and execute the following command to login to Vault:
$ ./vault login
This will prompt us to enter a token. We will use the Initial root token to authenticate.
The following would be a typical output:
Success! You are now authenticated. The token information displayed below
is already stored in the token helper. You do NOT need to run "vault login"
again. Future Vault requests will automatically use this token.

Key                  Value
---                  -----
token                s.ELjcgaF2DbVQuCGGmXpFmVH7
token_accessor       dvqbPLOE6xq9esYc9lcXmjbL
token_duration       -
token_renewable      false
token_policies       ["root"]
identity_policies    []
policies             ["root"]
To list all the Auth Methods enabled, execute the following command in the second Terminal on vm-2:
$ ./vault auth list
The following would be a typical output:
Path      Type     Accessor               Description
----      ----     --------               -----------
token/    token    auth_token_16934c45    token based credentials
From Output.19 above, only the token based Auth Method is enabled, which is the default.
To list all the Secrets Engines enabled, execute the following command in the second Terminal on vm-2:
$ ./vault secrets list
The following would be a typical output:
Path          Type         Accessor              Description
----          ----         --------              -----------
cubbyhole/    cubbyhole    cubbyhole_56dbdfca    per-token private secret storage
identity/     identity     identity_a9b26092     identity store
sys/          system       system_a2c9881a       system endpoints used for control, policy and debugging
To enable the simple key-value (kv) Secrets Engine at the path /secret, execute the following command in the second Terminal on vm-2:
$ ./vault secrets enable -path=secret kv
The following would be a typical output:
Success! Enabled the kv secrets engine at: secret/
In the first Terminal on vm-2 where the Vault server is running, we will see the following additional output:
2020-12-31T11:32:20.386-0500 [INFO]  core: successful mount: namespace= path=secret/ type=kv
2020-12-31T11:32:46.582-0500 [INFO]  core: mount tuning of options: path=secret/ options=map[version:2]
2020-12-31T11:32:46.587-0500 [INFO]  secrets.kv.kv_68898e16: collecting keys to upgrade
2020-12-31T11:32:46.589-0500 [INFO]  secrets.kv.kv_68898e16: done collecting keys: num_keys=1
2020-12-31T11:32:46.589-0500 [INFO]  secrets.kv.kv_68898e16: upgrading keys finished
Once again, let us list all the Secrets Engines enabled by executing the following command in the second Terminal on vm-2:
$ ./vault secrets list
The following would be a typical output:
Path          Type         Accessor              Description
----          ----         --------              -----------
cubbyhole/    cubbyhole    cubbyhole_56dbdfca    per-token private secret storage
identity/     identity     identity_a9b26092     identity store
secret/       kv           kv_d724bada           n/a
sys/          system       system_a2c9881a       system endpoints used for control, policy and debugging
From Output.23 above, we observe the just enabled kv Secrets Engine mounted at the path secret/.
To list all the secrets stored at the path secret/, execute the following command in the second Terminal on vm-2:
$ ./vault kv list secret
The following would be a typical output:
No value found at secret/
To store some arbitrary secret at the path secret/, execute the following command in the second Terminal on vm-2:
$ ./vault kv put secret/my-secret password="S3cr3t\$K3y!"
The following would be a typical output:
Success! Data written to: secret/my-secret
To retrieve the arbitrary secret stored at the path secret/my-secret, execute the following command in the second Terminal on vm-2:
$ ./vault kv get secret/my-secret
The following would be a typical output:
====== Data ======
Key         Value
---         -----
password    S3cr3t$K3y!
By default, the kv Secrets Engine is the version 1 engine with no versioning. Only verion 2 engine supports versioning and metadata.
To enable versioning for the Secrets Engine at the path secret/, execute the following command in the second Terminal on vm-2:
$ ./vault kv enable-versioning secret
The following would be a typical output:
Success! Tuned the secrets engine at: secret/
Once again, to retrieve the arbitrary secret stored at the path secret/my-secret, execute the following command in the second Terminal on vm-2:
$ ./vault kv get secret/my-secret
The following would be a typical output:
====== Metadata ======
Key              Value
---              -----
created_time     2020-12-31T11:34:12.329237498Z
deletion_time    n/a
destroyed        false
version          1

====== Data ======
Key         Value
---         -----
password    S3cr3t$K3y!
From the Output.28 above, we see the metadata information along with the version number displayed.
To update the arbitrary secret at the path secret/my-secret, execute the following command in the second Terminal on vm-2:
$ ./vault kv put secret/my-secret password="Simpl3#K3y!"
The following would be a typical output:
Key              Value
---              -----
created_time     2020-12-31T11:34:12.329237498Z
deletion_time    n/a
destroyed        false
version          2
From the Output.29 above, we see the updated metadata information along with the updated version number displayed.
Once again, to retrieve the arbitrary secret stored at the path secret/my-secret, execute the following command in the second Terminal on vm-2:
$ ./vault kv get secret/my-secret
The following would be a typical output:
====== Metadata ======
Key              Value
---              -----
created_time     2020-12-31T11:34:12.329237498Z
deletion_time    n/a
destroyed        false
version          2

====== Data ======
Key         Value
---         -----
password    Simpl3#K3y!
To retrieve the arbitrary secret stored at the path secret/my-secret using the HTTP API, execute the following command in the second Terminal on vm-2:
$ curl -H "X-Vault-Token: s.ELjcgaF2DbVQuCGGmXpFmVH7" http://192.168.1.34:8200/v1/secret/data/my-secret | jq
The following would be a typical output:
{
  "request_id": "26723b95-47c2-3d27-7caa-8bf0cdda43d0",
  "lease_id": "",
  "renewable": false,
  "lease_duration": 0,
  "data": {
    "data": {
      "password": "Simpl3#K3y!"
    },
    "metadata": {
      "created_time": "2020-12-31T11:34:12.329237498Z",
      "deletion_time": "",
      "destroyed": false,
      "version": 2
    }
  },
  "wrap_info": null,
  "warnings": null,
  "auth": null
}
To soft delete the arbitrary secret at the path secret/my-secret, execute the following command in the second Terminal on vm-2:
$ ./vault kv delete secret/my-secret
The following would be a typical output:
Success! Data deleted (if it existed) at: secret/my-secret
Once again, to retrieve the arbitrary secret stored at the path secret/my-secret, execute the following command in the second Terminal on vm-2:
$ ./vault kv get secret/my-secret
The following would be a typical output:
====== Metadata ======
Key              Value
---              -----
created_time     2020-12-31T11:34:12.329237498Z
deletion_time    2020-12-31T11:36:23.194899664Z
destroyed        false
version          2
From the Output.33 above, we see the updated metadata information along with the deletion time displayed.
To list the currently deployed policies on the Vault, execute the following command in the second Terminal on vm-2:
$ ./vault policy list
The following would be a typical output:
default
root
To display the access rules defined in default policy, execute the following command in the second Terminal on vm-2:
$ ./vault policy read default
The following would be a typical output:
# Allow tokens to look up their own properties
path "auth/token/lookup-self" {
    capabilities = ["read"]
}

# Allow tokens to renew themselves
path "auth/token/renew-self" {
    capabilities = ["update"]
}

# Allow tokens to revoke themselves
path "auth/token/revoke-self" {
    capabilities = ["update"]
}

# Allow a token to look up its own capabilities on a path
path "sys/capabilities-self" {
    capabilities = ["update"]
}

# Allow a token to look up its own entity by id or name
path "identity/entity/id/{{identity.entity.id}}" {
  capabilities = ["read"]
}
path "identity/entity/name/{{identity.entity.name}}" {
  capabilities = ["read"]
}

# Allow a token to look up its resultant ACL from all policies. This is useful
# for UIs. It is an internal path because the format may change at any time
# based on how the internal ACL features and capabilities change.
path "sys/internal/ui/resultant-acl" {
    capabilities = ["read"]
}

# Allow a token to renew a lease via lease_id in the request body; old path for
# old clients, new path for newer
path "sys/renew" {
    capabilities = ["update"]
}
path "sys/leases/renew" {
    capabilities = ["update"]
}

# Allow looking up lease properties. This requires knowing the lease ID ahead
# of time and does not divulge any sensitive information.
path "sys/leases/lookup" {
    capabilities = ["update"]
}

# Allow a token to manage its own cubbyhole
path "cubbyhole/*" {
    capabilities = ["create", "read", "update", "delete", "list"]
}

# Allow a token to wrap arbitrary values in a response-wrapping token
path "sys/wrapping/wrap" {
    capabilities = ["update"]
}

# Allow a token to look up the creation time and TTL of a given
# response-wrapping token
path "sys/wrapping/lookup" {
    capabilities = ["update"]
}

# Allow a token to unwrap a response-wrapping token. This is a convenience to
# avoid client token swapping since this is also part of the response wrapping
# policy.
path "sys/wrapping/unwrap" {
    capabilities = ["update"]
}

# Allow general purpose tools
path "sys/tools/hash" {
    capabilities = ["update"]
}
path "sys/tools/hash/*" {
    capabilities = ["update"]
}

# Allow checking the status of a Control Group request if the user has the
# accessor
path "sys/control-group/request" {
    capabilities = ["update"]
}
Now, we will demonstrate one of the INTERESTING features of Vault - the generation and automatic revokation of a temporary access token.
Let us first store some arbitrary secret at the path secret/top-secret by executing the following command in the second Terminal on vm-2:
$ ./vault kv put secret/top-secret password="G0lden#K3y!"
The following would be a typical output:
Success! Data written to: secret/top-secret
To generate an ephemeral token that is valid for 1 minute, execute the following command in the second Terminal on vm-2:
$ ./vault token create -ttl 1m
The following would be a typical output:
Key                  Value
        ---                  -----
token                s.YQ0gCWVNZEQGLuoPmW9UG4es
token_accessor       KujhEGCMUKYHOK2dhR6wSY8c
token_duration       1m
token_renewable      true
token_policies       ["root"]
identity_policies    []
policies             ["root"]
To retrieve the arbitrary secret stored at the path secret/top-secret, execute the following command in the second Terminal on vm-2:
$ VAULT_TOKEN="s.YQ0gCWVNZEQGLuoPmW9UG4es" ./vault kv get secret/top-secret
The following would be a typical output:
====== Metadata ======
Key              Value
---              -----
created_time     2020-12-31T11:41:01.027018677Z
deletion_time    n/a
destroyed        false
version          1

====== Data ======
Key         Value
---         -----
password    G0lden#K3y!
Wait for about a minute and in the first Terminal on vm-2 where the Vault server is running, we will see the following additional output:
2020-12-31T11:42:01.538-0500 [INFO] expiration: revoked lease: lease_id=auth/token/create/h29d3d2bdc894604c79eccd7e5cf8b28b7f874bd515589e62cf245d0ad4381b3c
Once again, to retrieve the arbitrary secret stored at the path secret/top-secret, execute the following command in the second Terminal on vm-2:
$ VAULT_TOKEN="s.YQ0gCWVNZEQGLuoPmW9UG4es" ./vault kv get secret/top-secret
The following would be a typical output:
Error making API request.

URL: GET http://192.168.1.34:8200/v1/sys/internal/ui/mounts/secret/top-secret
Code: 403. Errors:

* permission denied
BINGO !!! The ephemeral token was revoked as expected.
Now for the FINALE, we will demonstrate the dynamic secrets creation and automatic revokation capability of Vault for the Postgres database.
First, we need to enable the Database Secrets Engine (for generating the database credentials dynamically) by executing the following command in the second Terminal on vm-2:
$ ./vault secrets enable database
The following would be a typical output:
Success! Enabled the database secrets engine at: database/
In the first Terminal on vm-2 where the Vault server is running, we will see the following additional output:
2020-12-31T11:46:58.316-0500 [INFO]  secrets.database.database_ae606b34: initializing database rotation queue
2020-12-31T11:46:58.317-0500 [INFO]  core: successful mount: namespace= path=database/ type=database
2020-12-31T11:46:58.330-0500 [INFO]  secrets.database.database_ae606b34: populating role rotation queue
2020-12-31T11:46:58.334-0500 [INFO]  secrets.database.database_ae606b34: starting periodic ticker
Once again, let us list all the Secrets Engines enabled by executing the following command in the second Terminal on vm-2:
$ ./vault secrets list
The following would be a typical output:
Path          Type         Accessor              Description
----          ----         --------              -----------
cubbyhole/    cubbyhole    cubbyhole_56dbdfca    per-token private secret storage
database/     database     database_af307901     n/a
identity/     identity     identity_a9b26092     identity store
secret/       kv           kv_d724bada           n/a
sys/          system       system_a2c9881a       system endpoints used for control, policy and debugging
From Output.43 above, we observe the just enabled Database Secrets Engine mounted at the path database/.
Next, we need to configure the Database Secrets Engine to interact with the Postgres database through the postgresql-database-plugin plugin interface.
To configure the Database Secrets Engine with the plugin, the connection URL and the user/password credentials for the Postgres database, execute the following command in the second Terminal on vm-2:
$ ./vault write database/config/my_dev_db \
plugin_name=postgresql-database-plugin \
connection_url="postgresql://{{username}}:{{password}}@192.168.1.35:5432/my_dev_db?sslmode=disable" \
allowed_roles="dev_role" \
username="polarsparc" \
password="polarsparc\$123"
There will be NO output.
Next, we need to associate the Postgres plugin with a role in Vault. A Vault role is a logical name that maps to the dynamically generated database credentials. The credentials generation are expressed as SQL statements and assigned to the Vault role. The SQL statements dynamically create a new role and then grant that role the permissions that are defined in the associated Postgres role dev_role.
To create the Vault role called dev_role and associate the SQL statements for the creation of dynamic database credentials (with an expiry of 5 mins), execute the following command in the second Terminal on vm-2:
$ ./vault write database/roles/dev_role \
db_name=my_dev_db \
creation_statements="CREATE ROLE \"{{name}}\" WITH LOGIN PASSWORD '{{password}}' VALID UNTIL '{{expiration}}' INHERIT; \
  GRANT dev_role TO \"{{name}}\";" \
default_ttl="5m" \
max_ttl="10m"
The following would be a typical output:
Success! Data written to: database/roles/dev_role
To request an ephemeral database credential that is valid for 5 mins, execute the following command in the second Terminal on vm-2:
$ ./vault read database/creds/dev_role
The following would be a typical output:
Key                Value
---                -----
lease_id           database/creds/dev_role/wEaRzHEtVuiCFFyqsuQp2CM8
lease_duration     5m
lease_renewable    true
password           -i0QEYUY1OS66HoOrsF1
username           v-root-dev_role-pIfKVMpcU7Cj42crwllF-1609333873
To test the dynamically created database credentials, execute the following command in the Terminal for vm-3:
$ docker exec -it postgres-12.5 sh
The shell prompt will change to #
We need to enter the psql shell by executing the following command:
# psql -d my_dev_db -U v-root-dev_role-pIfKVMpcU7Cj42crwllF-1609333873
The shell prompt will change to my_dev_db=>
Execute the following command:
my_dev_db=> SELECT usename, valuntil FROM pg_user;
The following would be a typical output:
                     usename                     |        valuntil
-------------------------------------------------+------------------------
 polarsparc                                      |
 v-root-dev_role-pIfKVMpcU7Cj42crwllF-1609333873 | 2020-12-31 11:53:18+00
(2 rows)
To exit psql, execute the following command:
polarsparc=# \q
Wait for about 5 mins anhd in the first Terminal on vm-2 where the Vault server is running, we will see the following additional output:
2020-12-31T11:53:18.138-0500 [INFO] expiration: revoked lease: lease_id=database/creds/dev_role/wEaRzHEtVuiCFFyqsuQp2CM8
Re-enter the psql shell by executing the following command:
# psql -d my_dev_db -U v-root-dev_role-pIfKVMpcU7Cj42crwllF-1609333873
The following would be a typical output:
psql: error: FATAL: role "v-root-dev_role-pIfKVMpcU7Cj42crwllF-1609333873" does not exist
HOORAY !!! The dynamically generated database credentials was revoked as expected.
References