Figure.1
| PolarSPARC |
Introduction to Vert.x - Part 1
| Bhaskar S | 05/04/2019 |
Overview
We live in a highly connected world where customers on one hand expect the services they use to be always ON and up and running, while on the other hand also demand useful and functional capabilities. This means building distributed applications that evolve over time and are elastic, scalable, fault-tolerant, and responsive from the get-go. As a result, we are hearing terms like Microservices, Loosely-Coupled, Shared-Nothing, Reactive etc. Among these Reactive seems to be very popular and interesting.
So, what is a Reactive System ???
Reative Systems is an architectural pattern for building distributed applications in such a way that the application is composed from a set of domain-specific atomic services (microservices) that interact with each other via asynchronous message passing (loosely-coupled). This implies that one can scale (elasticity) each of the atomic services independently (based on workload) to achieve resilience and fault-tolerance, in addition to evolving the capabilities of the atomic services over a period of time.
In other words, Reactive Systems (according to the Reactive Manifesto) exhibit the following four properties:
Responsive ⇨ application responds in a timely manner
Resilient ⇨ application is responsive despite system failures
Elastic ⇨ application is responsive under varying load consitions
Message Driven ⇨ application components interact via asynchronous messaging
There are many reactive frameworks/platforms in Java, but in this article series, we will focus on one of the popular Java toolkits (lightweight library) called Vert.x from the Eclipse foundation. The following are some of the features of Vert.x:
Is an open-source, general purpose, event-driven, and non-blocking toolkit (a set of JAR files) for developing reactive applications on the JVM
Is polyglot in the sense one can use any of the following programming languages - Java, JavaScript, Groovy, Ruby, Scala, Kotlin
Is a lightweight, high-performance library with APIs for writing asynchronous network, web, messaging, and data access applications
Basic Concepts
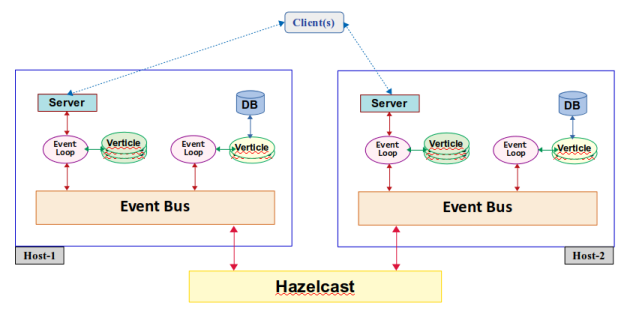
The following is an example high level architectural view of Vert.x:
Let us explain some of of the core concepts from the illustration in Figure.1 above.
Every action generates an Event in Vert.x. For example, users (or clients) making a service request via a REST endpoint or a REST service implementation querying a database, etc. Any of these actions generates an Event. Generated Event(s) are dispatched via an Event Loop by a single Thread to the appropriate target.
The target of deployment in Vert.x is called a Verticle. It is instance(s) of Verticle(s) that process the Event(s) from the Event Loop. In other words, a Verticle is what encapsulates the processing logic. It is the chunk of code that gets deployed as a unit and gets executed by Vert.x when the associated Event(s) are generated.
Vert.x by default creates multiple Event Loops ⇨ equal to 2 times the number of CPU cores on a host machine. When a Verticle is deployed, it receives Event(s) from exactly one instance of the Event Loop via a single Thread and so there is no worry of state mutation due to concurrency, thus avoiding any kind of synchronization.
Vert.x supports deploying multiple instances of the same Verticle. In such a case, the Event(s) from the Event Loop are distributed evenly to the Verticle instance(s) in a round-robin fashion.
Different Verticle(s) communicate with each other via the Event Bus using asynchronous message passing. It is the messaging backbone in Vert.x. As an example, as illustrated in Figure.1 above, one could deploy a webservice (Server) Verticle that interacts with another Verticle that provides access to data in a database (DB).
One Verticle instance can publish a message to a named destination address (basic string name) that could be consumed by another Verticle instance(s) via the Event Bus. The Event Bus supports the 3 types of message passing patterns:
Event Bus in a distributed clustered mode allows for Verticle instances running on different JVM processes (across different hosts) to discover and communicate with each other. The default clustering solution offered is Hazelcast.
Setup
The setup will be on a Ubuntu 18.04 LTS based Linux desktop. Ensure at least Java 8 or above is installed and setup. Also, ensure Apache Maven is installed and setup.
The following is the listing of the Maven project file pom.xml that will be used:
Hands-on with Vert.x - 1
We will get started with a basic Hello World style example to get the ball rolling.
The following is the listing for Sample01.java:
Let us explain and understand the code from Sample01 listed above.
Every Verticle implementation must extend the base class io.vertx.core.AbstractVerticle. It provides two lifecycle methods - start() and stop().
The factory method Vertx.vertx() creates a non-clustered instance of the Vert.x environment.
The interface io.vertx.core.Future is not the same as the one from core Java java.util.concurrent.Future. This interface represents the result of an action that may not have completed yet. To indicate successful completion of an action, invoke the method complete().
The inner class com.polarsparc.Vertx.Sample01.HelloVerticle implements a simple Verticle by overriding the start() and stop() methods. Both the methods invoke the Futute.complete() method once the basic logging action executes.
In the main() method, we first create an instance of Vert.x environment. Then, we deploy an instance of HelloVerticle in the created environment. Remember that Vert.x is non-blocking and event-driven. Hence the reason we provide a lambda expression as the callback handler to the deployVerticle() method (2nd parameter). The lambda expression is an interface of type io.vertx.core.Handler<E>, where <E> is of type io.vertx.core.AsyncResult<String>. The type AsyncResult encapsulates the results of the async deployment operation.
If the deployment succeeds, the method succeeded() on the callback argument AsyncResult returns a true. If the deployment fails, the method cause() on AsyncResult returns a Throwable describing the failure.
The method result() on the callback argument AsyncResult returns the deployment id of the successfully deployed Verticle. One can use this deployment id to undeploy the Verticle by invoking the method undeploy() on the Vert.x environment.
Executing the Java program Sample01 listed above should generate an output similar to the following:
May 04, 2019 7:45:43 PM com.polarsparc.Vertx.Sample01$HelloVerticle start
INFO: Welcome to the world of Vert.x !!!
May 04, 2019 7:45:43 PM com.polarsparc.Vertx.Sample01 lambda$0
INFO: Deployed instance ID: ff5d7107-b483-4c07-b968-57753c2ad554
May 04, 2019 7:45:43 PM com.polarsparc.Vertx.Sample01 lambda$0
INFO: Getting ready to undeploy...
May 04, 2019 7:45:43 PM com.polarsparc.Vertx.Sample01$HelloVerticle stop
INFO: Goodbye from Vert.x !!!
May 04, 2019 7:45:43 PM com.polarsparc.Vertx.Sample01 lambda$1
INFO: Undeployed instance ID: ff5d7107-b483-4c07-b968-57753c2ad554
Moving on to the next example, we will demonstrate deploying a simple HTTP server and accessing it via a browser.
The following is the listing for Sample02.java:
Let us explain and understand the code from Sample02 listed above.
In addition to exposing the 2 lifecycle methods, the base class io.vertx.core.AbstractVerticle also provides access to the protected member variable called vertx which is the Vert.x environment.
The inner class com.polarsparc.Vertx.Sample02.HttpServerVerticle overrides the start() method and makes use of the protected member variable vertx to create the HTTP server.
The method createHttpServer() call on vertx creates an instance of the class io.vertx.rxjava.core.http.HttpServer which encapsulates the HTTP server.
The call to the method requestHandler() on the instance of HttpServer takes a lambda expression as the callback handler, which is invoked each time the HTTP endpoint is accessed. The lambda expression is an interface of type io.vertx.core.Handler<E>, where <E> is of type io.vertx.rxjava.core.http.HttpServerRequest.
The call to the method response() on the instance of HttpServerRequest returns an instance of type io.vertx.rxjava.core.http.HttpServerResponse, which is used to write the response back to the HTTP client.
The call to the method listen() on the instance of HttpServer takes two arguments - a network port number of 8080 and a lambda expression as the callback handler, which is invoked once the HTTP server has started. The lambda expression is an interface of type io.vertx.core.Handler<E>, where <E> is of type io.vertx.core.AsyncResult< HttpServer>.
Executing the Java program Sample02 listed above should generate an output similar to the following:
May 05, 2019 2:00:42 PM com.polarsparc.Vertx.Sample02$HttpServerVerticle start
INFO: Started http server on localhost:8080...
May 05, 2019 2:00:42 PM com.polarsparc.Vertx.Sample02 lambda$0
INFO: Deployed instance ID: 66946917-0485-4356-9eeb-e4c42f099445
Launch a browser and access the url http://localhost:8080.
The following screenshot would be the typical view:
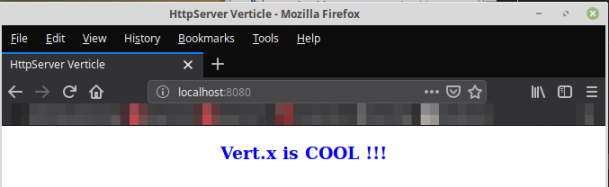
When the HTTP server responds back to the browser, it should generate the following additional output:
May 05, 2019 2:01:12 PM com.polarsparc.Vertx.Sample02$HttpServerVerticle lambda$0
INFO: Request from port: 42262
More to be covered in the next part of this series ...
References