Figure-2.1
Taste of Android :: Part-2
| Bhaskar S | 05/04/2013 |
Android Application Development - I
Let us jump right into an example to jumpstart the understanding of Android application development. The following paragraphs will detail what it takes to build the Tip Calculator application.
When we go to a restaurant, we are served by a waiter or waitress. In the end, when we are about to pay for the food, we also want to tip the waiter or waitress. Based on the quality of service we received, we will tip them 20%, 15%, or 10% of the total amount.
Without much further ado, let us begin the development of the Tip Calculator Android application.
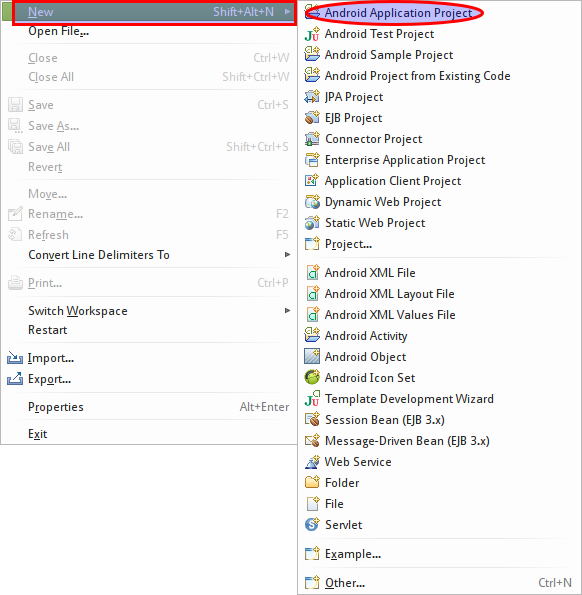
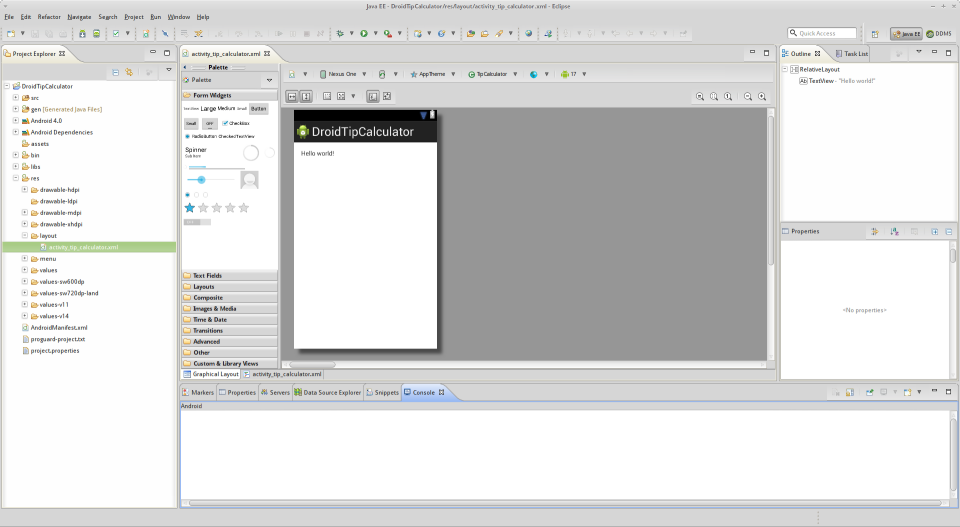
In Eclipse, select the File menu item, then click on the New sub-item, and then select the Android Application Project item as shown in the following figure 2.1 below:
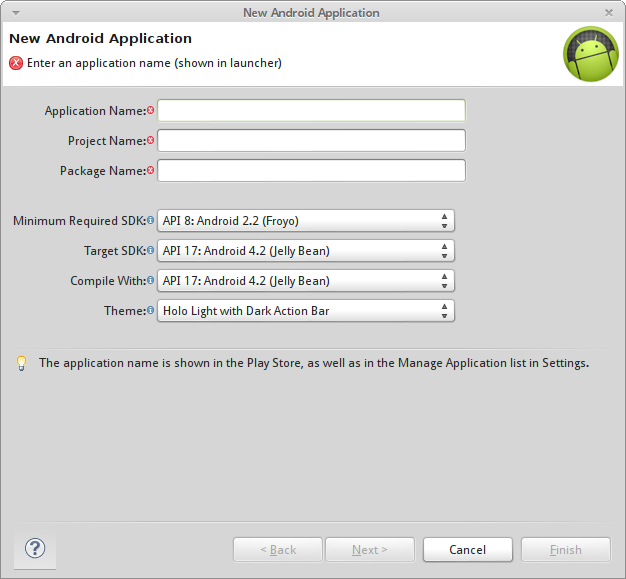
Clicking on the Android Application Project item will launch the New Android Application window as shown in the following figure 2.2 below:
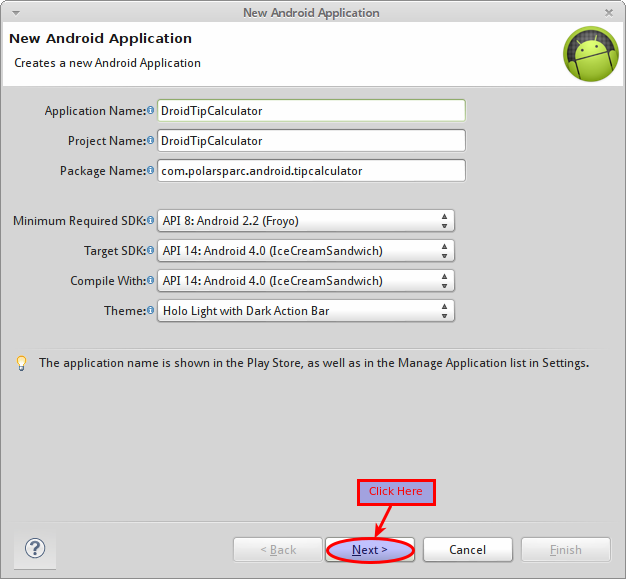
Our application is called DroidTipCalculator. Complete the project information details and click on the Next button as shown in the following figure 2.3 below:
This will bring us to the Configure Project screen as shown in the following figure 2.4 below:
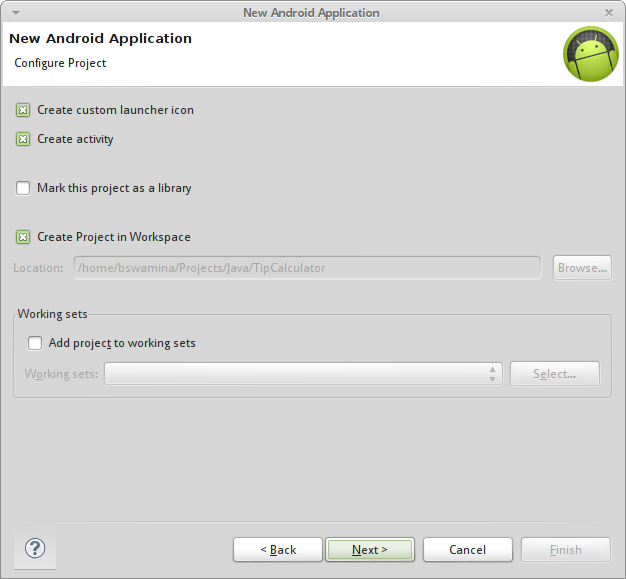
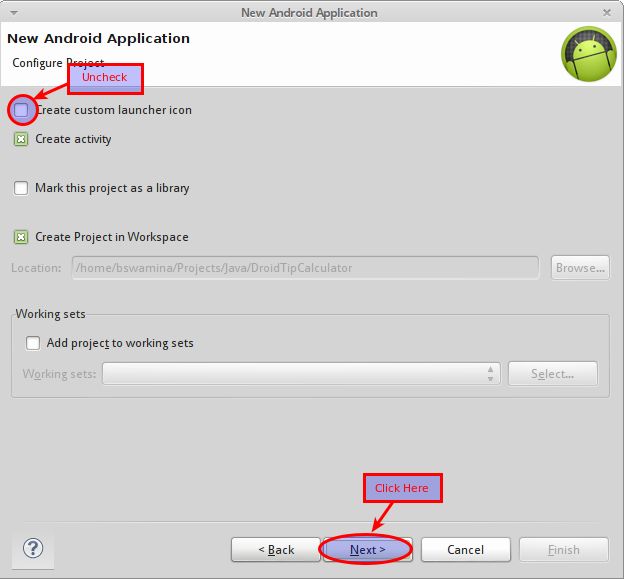
In the Configure Project screen, uncheck the Create custom launcher icon option and click on the Next button as shown in the following figure 2.5 below:
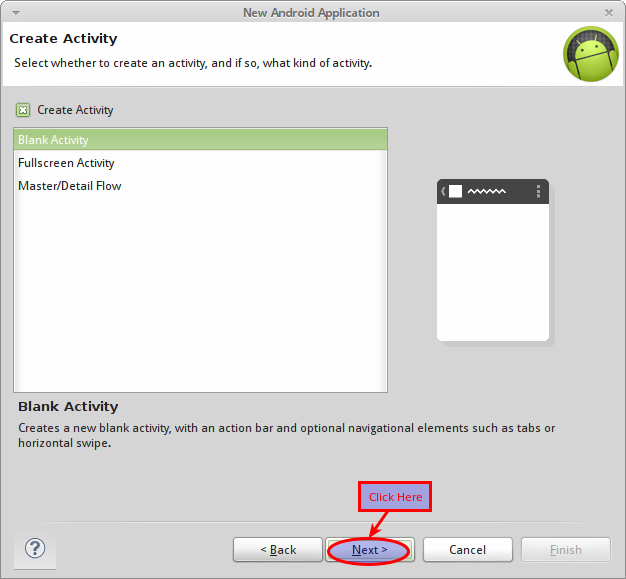
This will bring us to the Create Activity screen. An Activity is the user interface screen of the Android application on an Android device through which an user interacts with the application. Associated with the Activity is the layout of all the visual components or widgets such as the text, buttons, etc. For the simple Tip Calculator application we will have only one Activity and hence one layout. Select the Blank Activity from the list and click on the Next button as shown in the following figure 2.6 below:
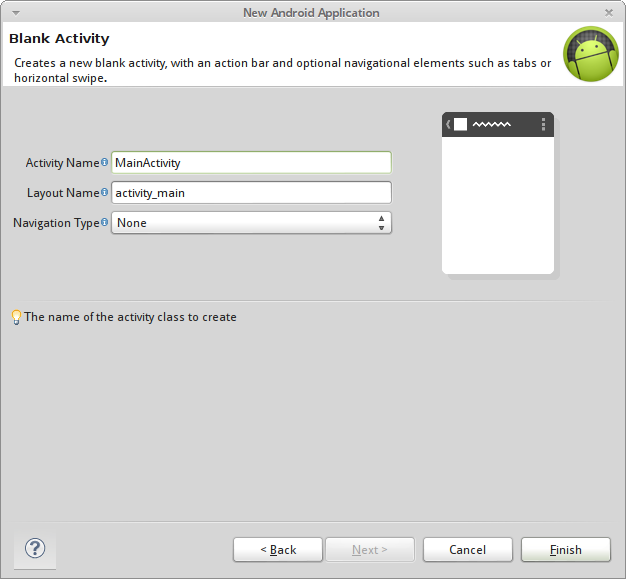
This will bring us to the Blank Activity screen as shown in the following figure 2.7 below:
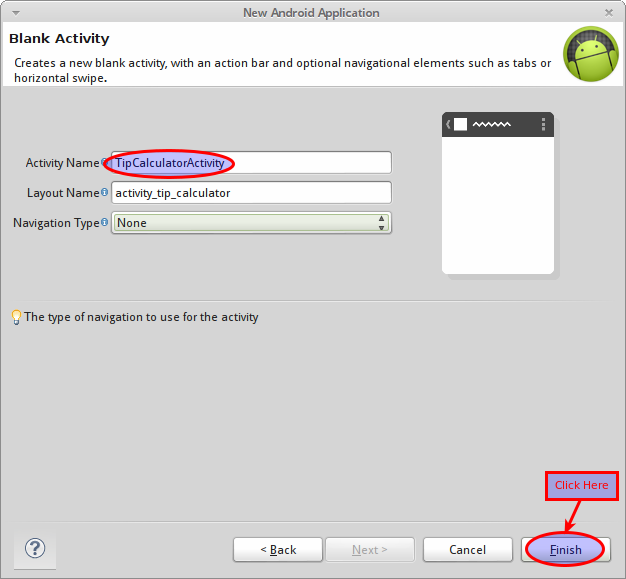
Change the Activity Name and Layout Name and click on the Finish button as shown in the following figure 2.8 below:
This will create the basic DroidTipCalculator project elements and we will be in the Eclipse IDE as shown in the following figure 2.9 below:
Now let us look at the Android project structure using the Eclipse Project Explorer for the newly created DroidTipCalculator project.
An Android project is made up of a number of files and directories. The following are some of the important ones:
AndroidManifest.xml :: contains various information about the Android application such as the package name, the main application Activity, the minimum Android version, etc
src :: contains the java code file(s) related to the various Activity
gen :: contains the java code file(s) generated by Android
res :: contains the application resources such as images, layouts, values, etc in the respective sub-directories
res/layout :: contains XML file(s) that define the application screen layout(s)
res/values :: contains XML file(s) that define the various constants such as string values, dimensional values, etc
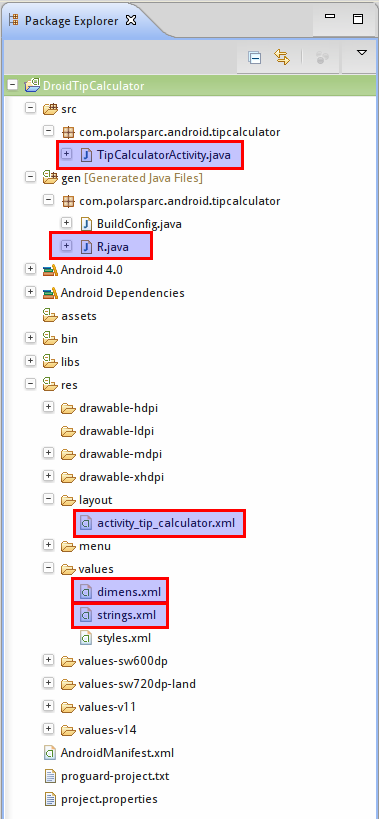
The following figure 2.10 of the Eclipse Project Explorer highlights some of the important files in the DroidTipCalculator project:
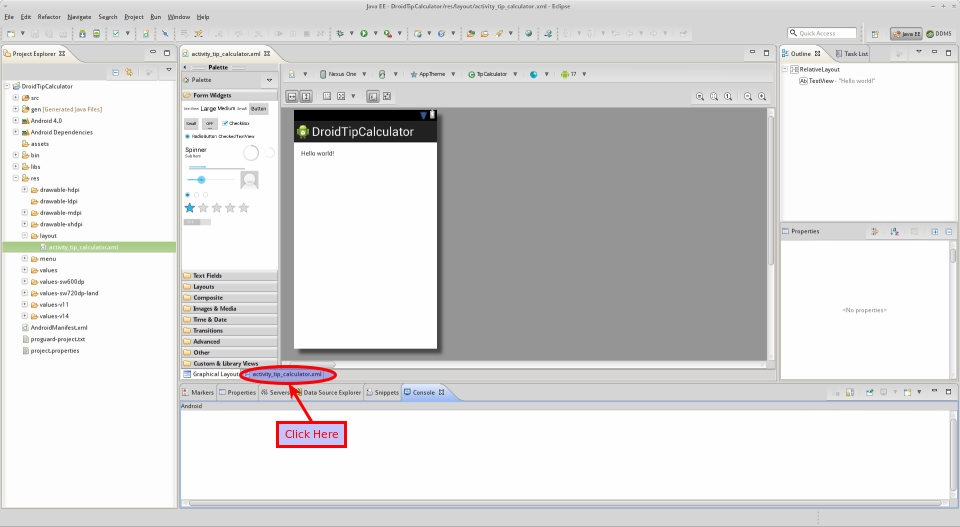
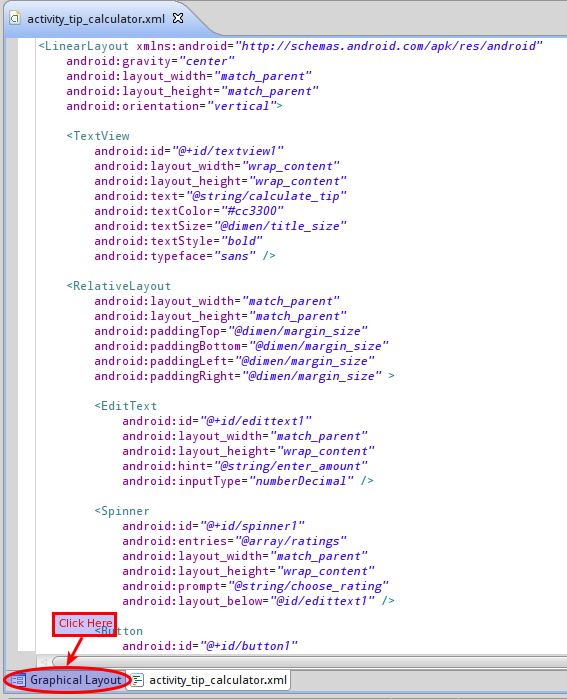
We will now modify some of the files highlighted in the figure 2.10 above to implement the desired application functionality. When we created the project for DroidTipCalculator, Android created a basic template for the HelloWorld like application and Eclipse opened the Activity layout of the HelloWorld application in the graphical mode as shown in the figure 2.9 above. Click on the activity_tip_calculator.xml tab to open the layout in the XML editor mode as shown in the following figure 2.11 below:
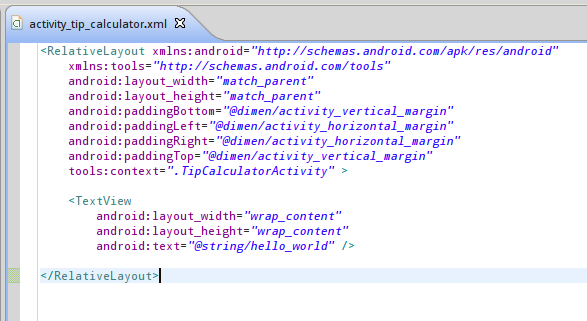
The following figure 2.12 shows the Activity layout in the XML mode:
Modify the contents of the dimens.xml file to look like the one shown in the listing 2.1 below:
Next, modify the contents of the strings.xml file to look like the one shown in the listing 2.2 below:
Next, modify the contents of the activity_tip_calculator.xml layout file to look like the one shown in the listing 2.3 below:
Let us now decipher the contents of the layout file activity_tip_calculator.xml from the listing 2.3 above:
View :: is the base class of all the graphical components (widgets). It is responsible for drawing the widget on the screen and handling user interaction. It has the following common properties:
id - used to identify a View on the screen. It is usually specified as @+id/REF where the value of REF is defined in the file strings.xml
layout_width - indicates the width dimension of the View. The values can be match_parent which will make the width as big as the parent or wrap_content which will make the width as big as the enclosed content
layout_height - indicates the height dimension of the View. The values can be match_parent which will make the height as big as the parent or wrap_content which will make the height as big as the enclosed content
paddingTop - indicates the top padding space inside the View. It is usually specified as @dimen/REF where the value of REF is defined in the file dimens.xml
paddingBottom - indicates the bottom padding space inside the View. It is usually specified as @dimen/REF where the value of REF is defined in the file dimens.xml
paddingLeft - indicates the left padding space inside the View. It is usually specified as @dimen/REF where the value of REF is defined in the file dimens.xml
paddingRight - indicates the right padding space inside the View. It is usually specified as @dimen/REF where the value of REF is defined in the file dimens.xml
gravity - arranges the position of the conent inside the View. For example, a value of center centers the content within the boundaries of the View
Layout :: defines the arrangement of graphical components (widgets) such as the icons, text, buttons, etc on the user interface
ViewGroup :: extends the View and is the base class of the Layout and is a container of other View components
LinearLayout :: a type of Layout that arranges the contained widgets in columns or rows based on the layout orientation (vertical or horizontal)
RelativeLayout :: a type of layout that provides great degree of control on where a widget showed be placed relative to another widget in the layout. In our example, we use the XML attribute layout_below for some of the widgets. It is usually specified as @id/REF where the value of REF is the id of another widget in the layout and its value is defined in the file strings.xml.
Also, we use the XML attribute layout_alignParentRight for one of the widget and set it to true. This will make the right edge of that widget align with the right edge of the parent
TextView :: extends the View and allows one to display some text on the screen. It has the following common properties:
text - used to specify the content to be displayed. It is usually specified as @string/REF where the value of REF is defined in the file strings.xml
textColor - used to specify the color of the displayed text. In our example, we have directly specified the value of the color in the hex form #RRGGBB
textSize - used to specify the size of the displayed text. It is usually specified as @dimen/REF where the value of REF is defined in the file dimens.xml
textStyle - used to specify the style of the displayed text. The value can be one of bold, italic, bolditalic, etc
typeface - used to specify the font type of the displayed text. The value can be one of sans, serif, monospace, etc
EditText :: extends the TextView and allows one to input text on the screen. It has the following common properties:
hint - used to specify the hint text to be displayed when the value is empty. It is usually specified as @string/REF where the value of REF is defined in the file strings.xml
inputType - used to control the type of input the user enters. In our example, we have directly specified that we are interested in a numeric decimal value
Spinner :: extends the ViewGroup and allows one to select a value from a set of values. It has the following common properties:
entries - used to specify a set of values to choose from. It is usually specified as @array/REF where the value of REF is defined in the file strings.xml as an array of items
prompt - used to display the prompt when the Spinner is shown on the screen. It is usually specified as @string/REF where the value of REF is defined in the file strings.xml
Button :: extends the TextView and allows one to display a button on the screen. It has the following common properties:
text - used to specify the text to be displayed on the Button. It is usually specified as @string/REF where the value of REF is defined in the file strings.xml
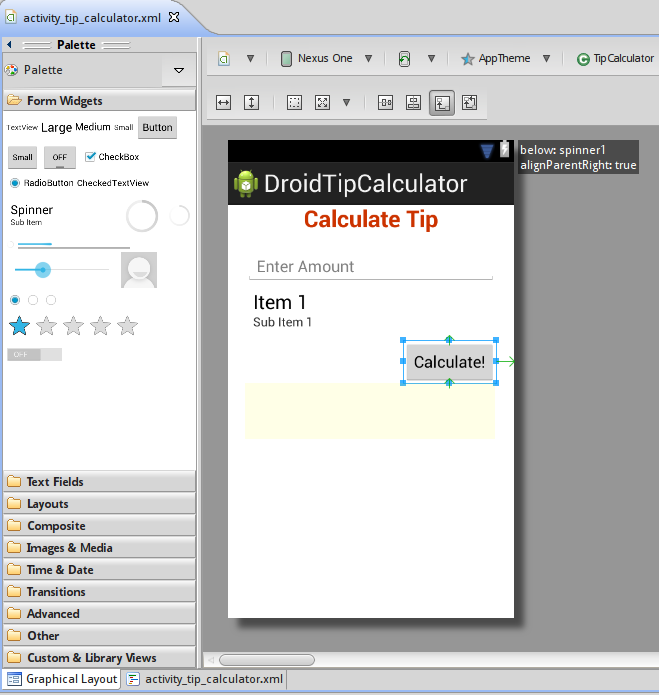
To preview the Android application layout, click on the Graphical Layout as shown in in the following figure 2.13 below:
This will enable us to preview our application in the graphical layout mode as shown in the following figure 2.14 below:
Finally, modify the java source file TipCalculatorActivity.java to look like the one shown in the listing 2.4 below:
From the listing 2.4 above, we see the TipCalculatorActivity class extends the Android Activity class. As indicated earlier, an Activity displays a screen on the Android device for the user to interact with. When an Android application starts up, it automatically invokes the OnCreate() method on the application Activity. Hence we have implemented all the logic to handle all user interactions in this method.
There are references to the Android generated class R in the OnCreate() method. The class R is dynamically generated by Android and includes all definitions from strings.xml and dimens.xml available for use in the java classes.
Let us now decipher the logic inside the OnCreate() method from the listing 2.4 above:
Bundle :: an object used by Android to maintain application instance state
setContentView :: sets the Activity window with the contents of the specified layout resource. In our example, we use the resource id R.layout.activity_tip_calculator which refers to our application layout activity_tip_calculator.xml
findViewById :: gets the View associated with the specified resource
setOnKeyListener :: set the callback handler to handle the keys pressed on the keyboard while in the EditText. The callback handler is an implementation of the interface View.OnKeyListener. Once a callback handler is registered, any key pressed on the keyboard invokes the onKey() method of the handler
setOnClickListener :: set the callback handler to handle the mouse click on the Button. The callback handler is an implementation of the interface View.OnClickListener. Once a callback handler is registered, any mouse click on the Button invokes the onClick() method of the handler
getSelectedItem :: gets the selected item of the Spinner
We are now ready to test our Tip Calculator application on the virtual Android device we created in Part-1. In order to do so we need to create a Run Configuration for the application.
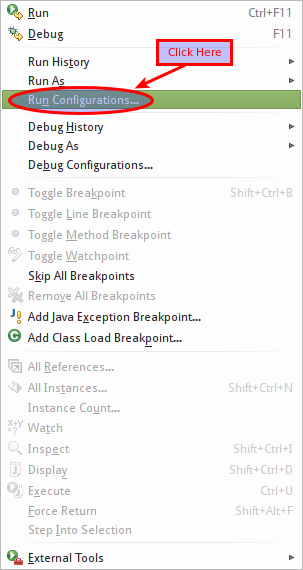
To create a new Run Configuration, click on the Eclipse Run menu item. Next, click on the Run Configurations... sub-item as shown in the following figure 2.15 below:
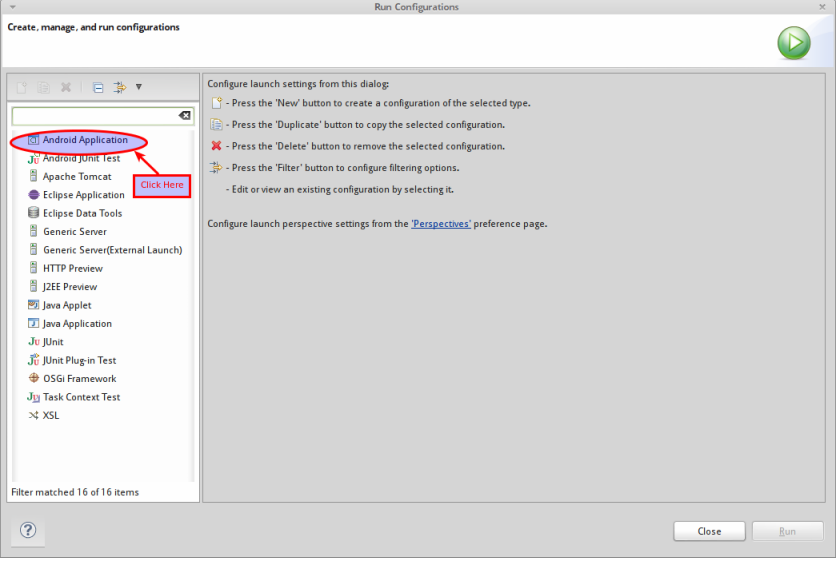
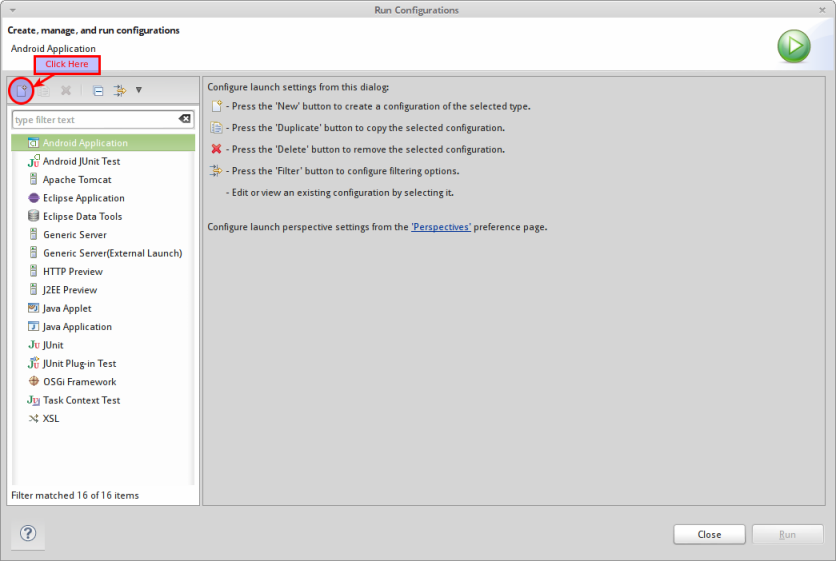
We will be in the Run Configurations window. Select the first item Android Application from the list of choices on the left hand side as shown in the following figure 2.16 below:
Click on the Create icon as shown in the following figure 2.17 below:
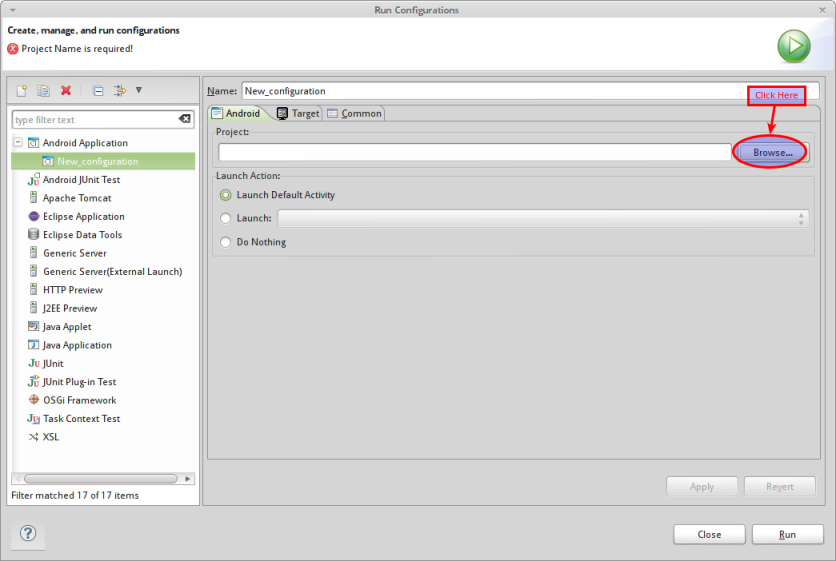
We will now be in the New Configuration screen. Click on the Browse... button as shown in the following figure 2.18 below:
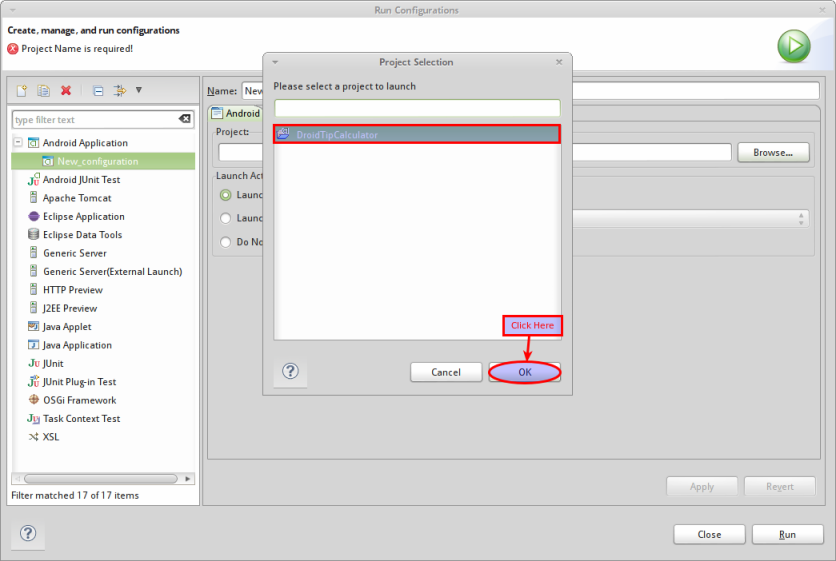
Select the DroidTipCalculator from the Project Selection window and click on the Ok button as shown in the following figure 2.19 below:
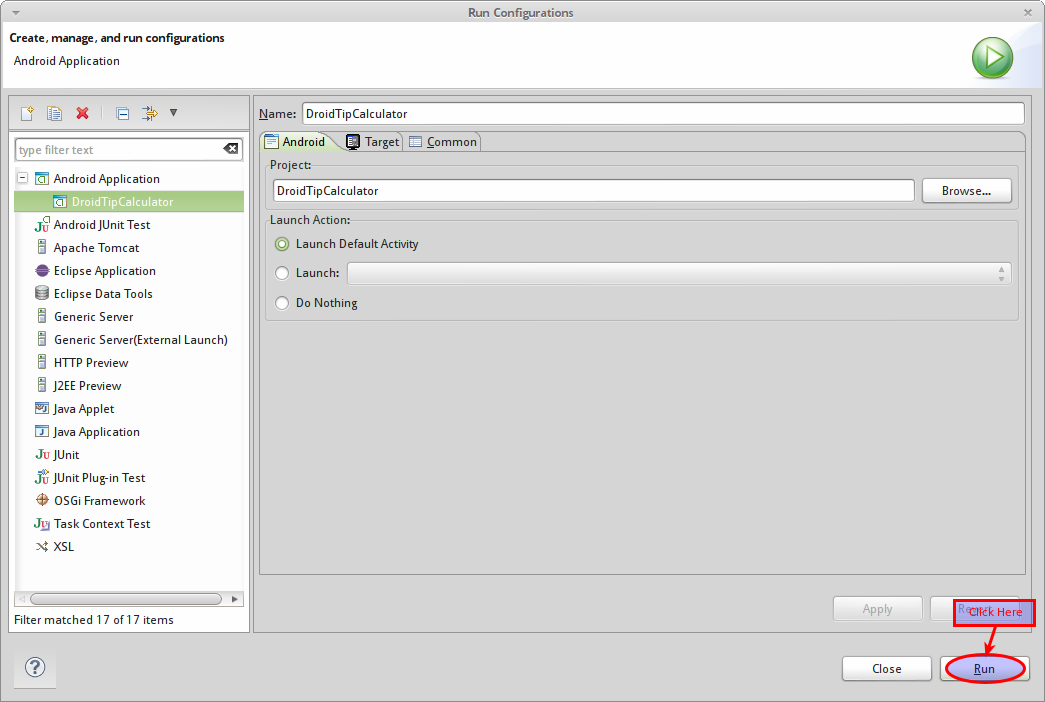
Change the Project Name to DroidTipCalculator and click on the Apply button as shown in the following figure 2.19 below:
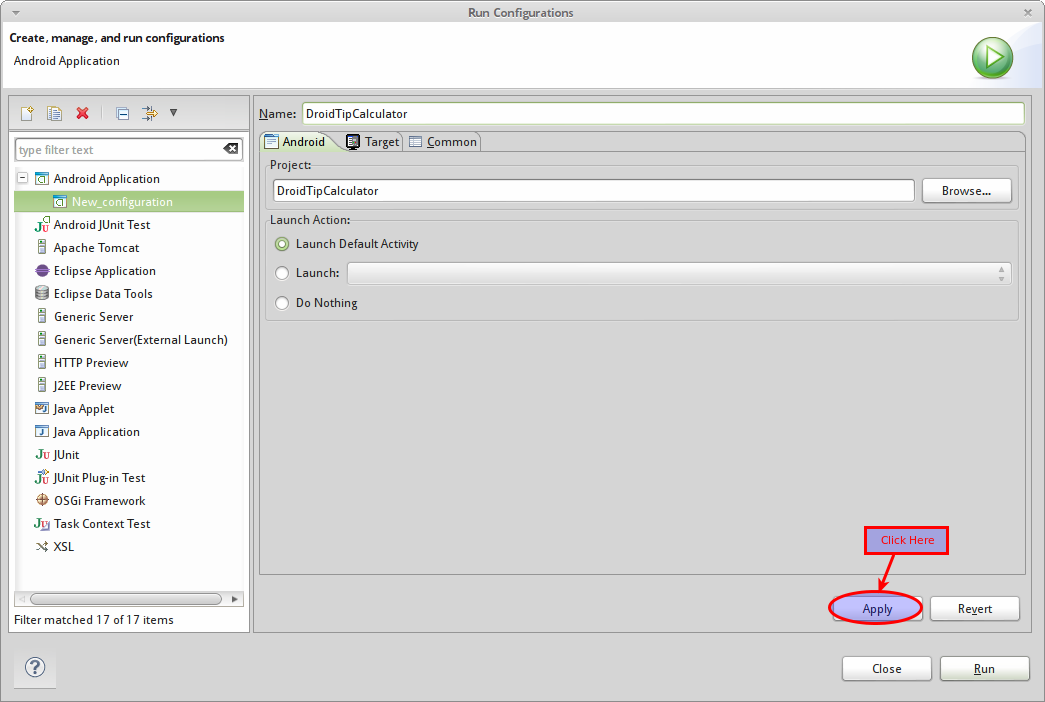
At this point the run configuration DroidTipCalculator is ready. Click on the Run button as shown in the following figure 2.20 below:
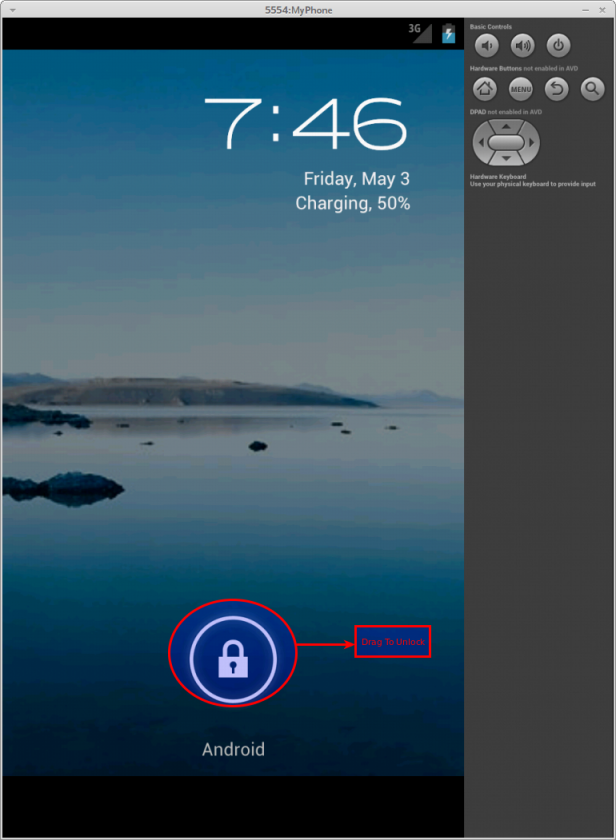
After a few seconds, our virtual device becomes ready for use. Drag on the Lock icon to the right with the mouse as shown in the following figure 2.21 below:
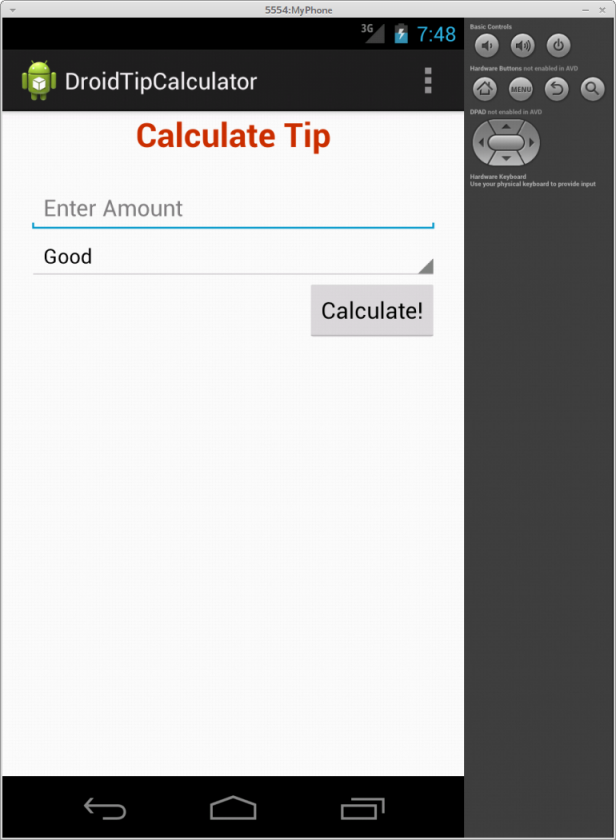
At this point our Tip Calculator application comes to life as shown in the following figure 2.22 below:
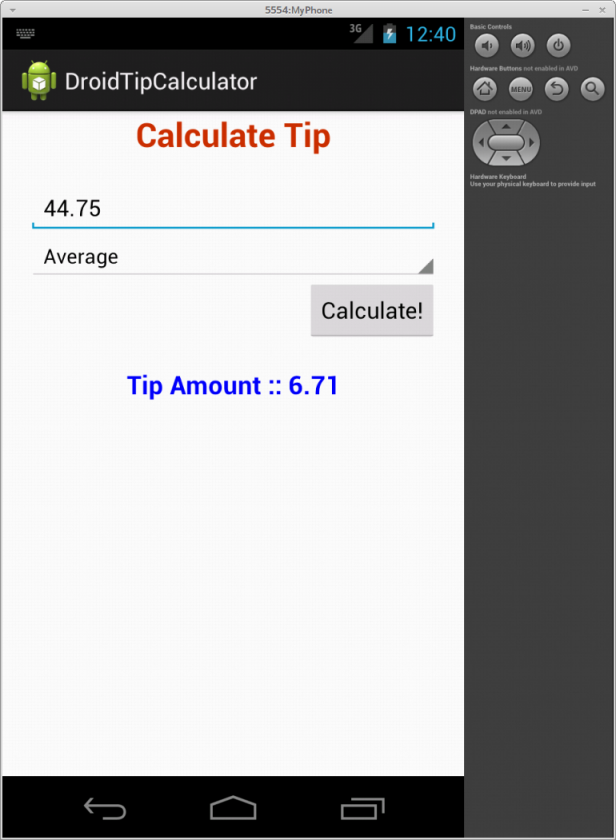
Enter the amount 44.75 and choose Average from the Spinner and click the Calculate! button. The application result will be as shown in the following figure 2.23 below:
We have successfully completed our Tip Calculator application.
References