In Part-10,
we demostrated a simple alarm application using
the Android Service. We had to use an AsyncTask
to avoid blocking the main UI Thread and
cancel the AsyncTask
and stop the Service once the alarm was
trigger at the desired time (hour and minute).
A simpler and easier way to acheive the same would be to use the
Android framework class android.app.IntentService.
The reason IntentService is simpler and
easier
is because it automatically creates a background processing thread to
handle the alarm task
and stops the service once the alarm is triggered.
In order to use IntentService, we need to
extend the android.app.IntentService class
and
override the following method:
Default Constructor :: Need to
implement
the default constructor and call its superclasswith the name of the IntentService
onHandleIntent() :: method that
will be
executed in the background thread. This is where we place the code
for the service task that will be long running and time consuming
We will now demonstrate this concept of using IntentService
by creating a new Android application named DroidAlarmService2.
This application is essentially similar to DroidAlarmService
except that it uses IntentService and we
will use
Notification instead of the
Toast to alert the user when the alarm
is triggered.
Let us create a new Android application named
DroidAlarmService2 to illustrate the concept of using
Android IntentService and
Notification to build
our own custom alarm clock application.
We will not go step-by-step to show the various
screens since we already did that in Part-2 for the DroidTipCalculator
application.
Modify the contents of the dimens.xml
file to look like the one shown in the
listing 11.1 below:
Next, modify the contents of the strings.xml
file to look like the one shown in the
listing 11.2 below:
The contents of the activity_time_pick.xml
layout file will look like the one shown in the listing 11.3 below:
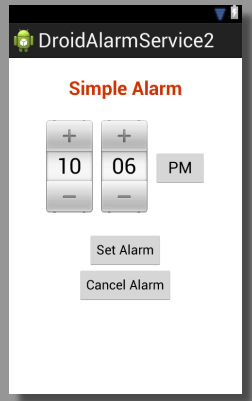
Previewing the activity_time_pick.xml
layout file in the Graphical Mode in Eclipse will look like the one
shown in the figure 11.1 below:
Figure-11.1
The contents of the java source file TimePickActivity2.java
will look like the one shown in the listing 11.4 below:
The contents of the java source file MyAlarmService2.java
will look like the one shown in the listing 11.5 below:
Here is how this custom alarm timer will work:
In the activity named TimePickActivity2,
the user will pick an appropriate time (hour and minute) for the alarm
and press
the Set Alarm button
On pressing the Set Alarm button
in the activity TimePickActivity2, an Intent is created to start the service
named MyAlarmService2 with the associated
data (selected hour and minute). Also, the Set Alarm
button is disabled and the Cancel Alarm
button is enabled
On pressing the Cancel Alarm button
in the activity TimePickActivity2 will
stop the service MyAlarmService2 and
cancel the logic to trigger the alarm. Also,
the Cancel Alarm button is disabled and
the Set Alarm button is enabled
Calling the startService() method
and passing the created Intent will start
the service MyAlarmService2 in the
background
When the service MyAlarmService2
starts, the onHandleIntent() method is
invoked. Note that the logic in this method is processed in a
background thread that is automatically created and managed
When the service MyAlarmService2
starts, the onHandleIntent() method is
invoked. Note
that this method is processed in a background thread that is
automatically
created and managed
Notice we start a Handler in the OnCreate() method of TimePickActivity2.
On receiving a Message, the Cancel Alarm button is disabled and the Set Alarm button is enabled
At the selected hour and minute, the code logic in the onHandleIntent() method of the service MyAlarmService2 will create an Android Notification and dispatch it via the
Android system NotificationManager.
In addition, it will trigger a Message to
the Handler
in TimePickActivity2
Notification in Android is used to
alert a user when some important event occurs. Unlike the Toast message which appears on the screen
for a brief period and disappears, a Notification
is a persistent message that appears on the status or notification
bar located at the top of the screen on the device. To dispatch an
Android Notification, we do the following:
To send notifications, we need an instance of the Android
framework
class android.app.NotificationManager,
which can be obtained from the Context
(Activity or Service)
by invoking the method getSystemService()
We will need an instance of the Android Intent.
This allows the Android system to launch any desired application Activity when the user selects this
notification. In our case we will stay with TimePickActivity2
We also need an instance of the Android framework class android.app.PendingIntent.
A PendingIntent is a token that you give to NotificationManager or any other
application,
which allows the other application to use your application's
permissions
to execute a predefined piece of code
Finally, we need to create an instance of the Android
framework class android.app.Notification
by using
the Notification.Builder
To send the notification, we need to call the notify() on the NotificationManager
Finally, modify the contents of the AndroidManifest.xml
file to look like the one shown in the listing 11.6 below:
We are now ready to test our DroidAlarmService2
application on the virtual Android device we created in
Part-1.
We will create a Run Configuration for DroidAlarmService2
as we did in Part-2
for DroidTipCalculator.
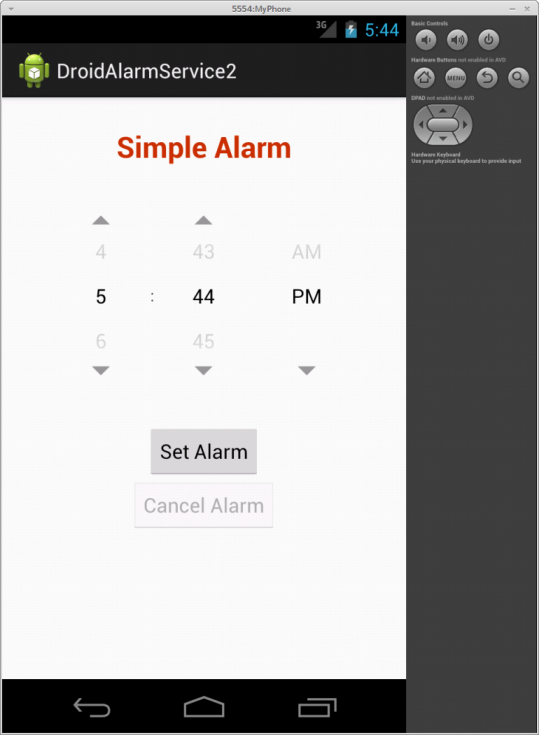
Once the run configuration for DroidAlarmService2
is ready, we will Run
the application and the application will come to life as shown in the
following figure 11.2 below:
Figure-11.2
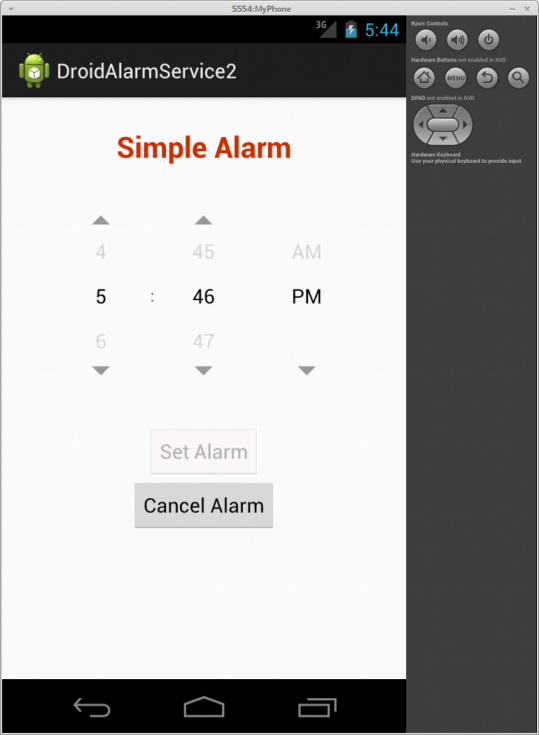
Pick the desired alarm time (hour and minute) and click on the
Set Alarm button. This will launch
the background service MyAlarmService2
resulting in the following figure 11.3 below:
Figure-11.3
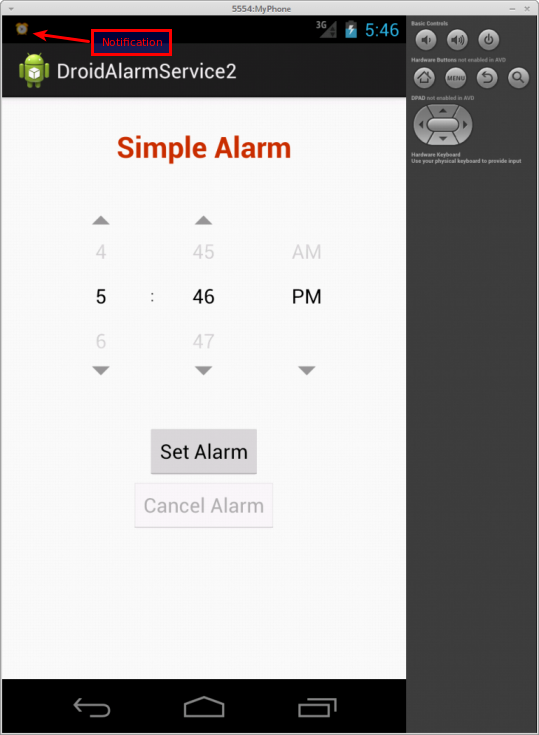
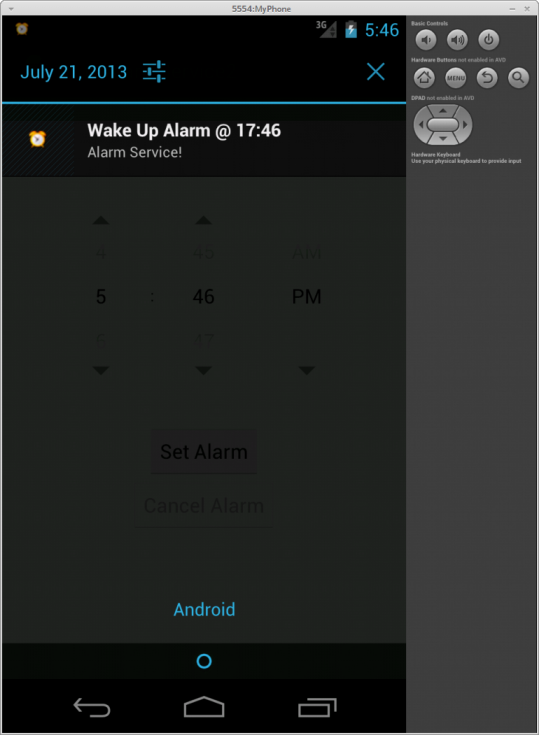
When the alarm goes off at the desired time (hour and minute),
it will display a Notification icon
on the status or notification bar as shown in the following
figure 11.4 below:
Figure-11.4
Drag the Notification icon downwards
with the computer mouse (to simulate the swipe down on the device)
and it will reveal the alarm alert as shown in the following
figure 11.5 below: